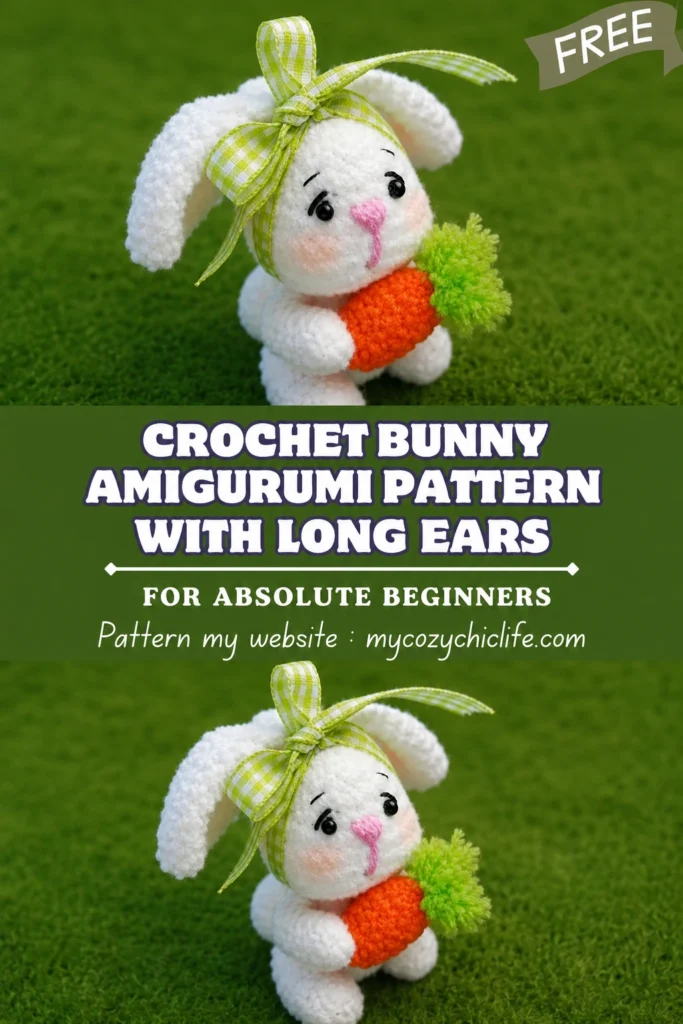
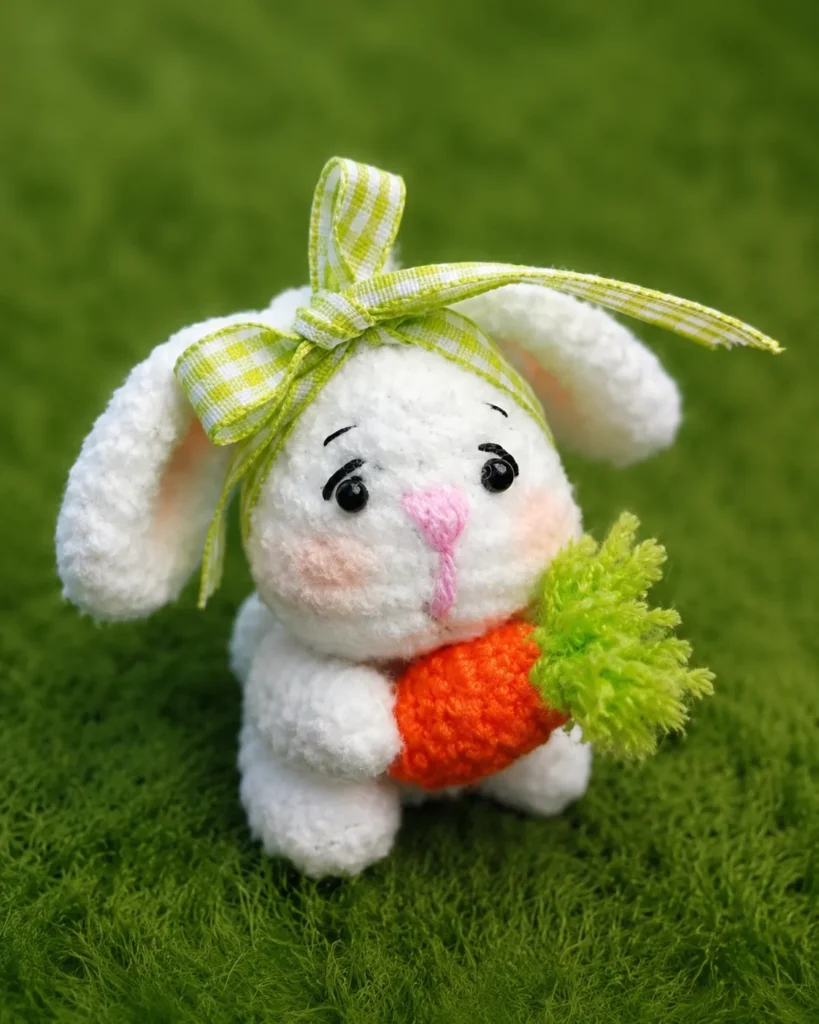
Cozy stitches and a sweet little face come together in this bunny amigurumi! 🐰🥕
This crochet bunny feels like a warm hug in handmade form. With soft texture, floppy ears, and a mini carrot accessory, the whole project is extra charming. Whether you are a complete beginner or just looking for a quick weekend project, this palm-sized bunny plush works up fast and makes an adorable gift for Easter, baby showers, or just because.
A simple crochet bunny pattern like this is a dreamy choice for anyone craving an amigurumi rabbit that works up small, neat, and giftable. The result is a cute crochet toy that fits the vibe of a beginner crochet animal, especially with basic shaping.
Love making adorable animals? You might also enjoy my No-Sew Mochi Bunny Pattern or the Free Triceratops Amigurumi.
Why This Bunny Is Perfect for Beginners
Soft and round with long, gentle ears, this bunny has that classic plush look that makes amigurumi so lovable. Here is why this pattern is great for beginners:
| Feature | Benefit |
|---|---|
| Palm-sized | Progress feels quick and satisfying |
| Simple shaping | Only basic increases and decreases |
| Minimal face embroidery | Easy to get a cute expression |
| Little carrot accessory | Fun finishing touch without complexity |
| Continuous spiral rounds | No joining or turning required |
The little carrot accessory is the finishing touch that makes the bunny feel like a character. That pop of orange and green stands out against white or cream yarn, and it is perfect for spring baskets, Easter decor, or a small handmade gift.
Materials Needed (Exact Measurements)
| Item | Quantity |
|---|---|
| Soft yarn (white or cream) | 50–80 g (90–150 m) |
| Pink yarn (nose detail) | 1–2 g (2–5 m) |
| Orange yarn (carrot) | 5–10 g (10–20 m) |
| Green yarn (carrot leaves) | 2–5 g (5–10 m) |
| Crochet hook | 2.5mm–4mm (smaller = tighter stitches) |
| Safety eyes (6–8mm) or black yarn | 2 pieces |
| Stuffing (polyfill) | 20–30 g |
| Stitch marker | 1 |
| Tapestry needle | 1 |
| Scissors | 1 |
Yarn Recommendations
- Soft acrylic (like Lion Brand, Red Heart, or Stylecraft) works beautifully
- Cotton blends give great stitch definition
- Velvet or chenille creates an extra-plush bunny (use a smaller hook)
Crochet Abbreviations (US Terms)
| Abbreviation | Meaning |
|---|---|
MR | magic ring |
sc | single crochet |
inc | increase (2 sc in one stitch) |
dec | decrease (sc 2 together) |
sl st | slip stitch |
ch | chain |
rep | repeat |
FO | fasten off |
[…] | total stitch count |
Skill Level
Beginner-friendly and easy to stitch! This pattern uses lots of repeated rounds that help build confidence. The shaping relies on simple stitch patterns and basic counting.
Finished Size
Small palm-size plush (approximately 4–5 inches / 10–12 cm tall). Size changes depending on:
- Yarn thickness
- Hook size
- How tightly you stitch
Time Planning
| Part | Estimated Time |
|---|---|
| Head and body | 60–120 minutes |
| Ears | 30–45 minutes |
| Carrot | 15–25 minutes |
| Assembly | 20–40 minutes |
| Total | 2–4 hours |
Important Notes Before Starting
- ✅ Count stitches at the end of each round to keep shaping smooth and even
- ✅ Keep tension tight, especially with fluffy yarn, to prevent stuffing from showing
- ✅ Use a stitch marker in the first stitch of each round to avoid losing your place
- ✅ Make both ears the same length by counting rounds carefully
- ✅ Stuff slowly and evenly with small pieces of polyfill to avoid lumps
Step-by-Step Pattern Instructions
Work in continuous spiral rounds for the smoothest finish.
Head (White or Cream Yarn)
- R1: MR, 6 sc. [6]
- R2: inc x6. [12]
- R3: (sc, inc) x6. [18]
- R4: (2 sc, inc) x6. [24]
- R5: (3 sc, inc) x6. [30]
- R6–R9: sc in each st (4 rounds). [30]
- R10: (3 sc, dec) x6. [24]
- R11: (2 sc, dec) x6. [18]
- 💡 Insert safety eyes between R6–R8 (about 5–6 stitches apart) before closing.
- 💡 Start stuffing here.
- R12: (sc, dec) x6. [12]
- R13: dec x6. [6]
- FO, weave tail through front loops of last 6 stitches, pull tight to close.
Body (White or Cream Yarn)
- R1: MR, 6 sc. [6]
- R2: inc x6. [12]
- R3: (sc, inc) x6. [18]
- R4: (2 sc, inc) x6. [24]
- R5–R7: sc in each st (3 rounds). [24]
- R8: (2 sc, dec) x6. [18]
- R9: (sc, dec) x6. [12]
- 💡 Stuff firmly before closing.
- R10: dec x6. [6]
- Close hole, leave a long tail for sewing.
Front Legs (Make 2 – White or Cream Yarn)
- R1: MR, 6 sc. [6]
- R2–R4: sc in each st (3 rounds). [6]
- Lightly stuff (optional).
- Close flat, leave a long tail for sewing.
Hind Legs (Make 2 – White or Cream Yarn)
Slightly wider at one end, then tapered.
- R1: MR, 6 sc. [6]
- R2: inc x6. [12]
- R3: sc in each st. [12]
- R4: (sc, dec) x4. [8]
- R5: sc in each st. [8]
- Lightly stuff, close flat, leave long tail.
Ears (Make 2 – White or Cream Yarn)
Long, floppy, and adorable—do NOT stuff the ears!
- R1: MR, 6 sc. [6]
- R2: (sc, inc) x3. [9]
- R3: (2 sc, inc) x3. [12]
- R4–R15: sc in each st (12 rounds). [12]
- 💡 For longer ears, add more even rounds here.
- R16: (sc, dec) x4. [8]
- R17: dec x4. [4]
- Close flat, leave a long tail for sewing.
Carrot (Orange Yarn)
Tapered shape like a real carrot.
- R1: MR, 4 sc. [4]
- R2: (sc, inc) x2. [6]
- R3: sc in each st. [6]
- R4: (2 sc, inc) x2. [8]
- R5–R6: sc in each st (2 rounds). [8]
- R7: (2 sc, dec) x2. [6]
- 💡 Lightly stuff before closing.
- R8: dec x3. [3]
- FO, close hole.
Carrot Leaves (Green Yarn)
Attach green yarn to the top of the carrot.
- Make 3–4 leaf sprigs:
- Ch 5, starting from 2nd ch from hook: sl st, sc, hdc, dc.
- Sl st back to the carrot top.
- Repeat for each leaf.
- FO and weave in ends.
Face Embroidery
Using pink yarn for the nose and black yarn for eyes (if not using safety eyes) and mouth:
| Feature | Instructions |
|---|---|
| Nose | Small triangle or horizontal stitch between the eyes |
| Mouth | Small “Y” shape or two short downward stitches |
| Eyes (if embroidering) | Two small dots or vertical stitches, 5–6 stitches apart |
Take your time with the face—this is what brings the bunny to life!
Assembly Instructions
| Step | Action |
|---|---|
| 1 | Pin all pieces before sewing to check placement |
| 2 | Sew head to body securely around the neckline |
| 3 | Attach ears evenly on top of the head (line up with eyes) |
| 4 | Sew front legs slightly forward on the body |
| 5 | Attach hind legs lower and slightly to the sides |
| 6 | Place carrot in the bunny’s “hands” or sew to the front |
| 7 | Knot securely and hide all yarn tails inside the body |
Beginner Tips
| Tip | Why It Helps |
|---|---|
| Use a smaller hook than the yarn label suggests | Creates tight amigurumi fabric (no stuffing showing) |
| Move the stitch marker every round | Prevents spiral drift |
| Stuff with small bits of polyfill | Avoids lumps and bumps |
| Pin pieces before sewing | Ensures perfect placement |
| Test face placement with loose yarn first | Avoids permanent mistakes |
Common Mistakes to Avoid
| Mistake | Solution |
|---|---|
| Loose stitches | Go down one hook size; tighten tension |
| Uneven stuffing | Add small amounts, shape with fingers |
| Incorrect eye placement | Use pins to test position before committing |
| Uneven ears | Count rounds carefully; match tension on both |
| Rushing assembly | Pin all pieces before sewing |
| Short yarn tails | Always leave 15–20 cm for sewing |
Creative Variations
| Idea | How To |
|---|---|
| Pastel bunny | Use mint, blush pink, or lavender yarn |
| Classic brown bunny | Warm brown yarn for a woodland look |
| Add a bow | Crochet or ribbon bow around the neck |
| Keychain version | Stitch a small loop on top of the head |
| Mini bunny | Thinner yarn (sport weight) + 2.5mm hook |
| Jumbo bunny | Bulky chenille yarn + larger hook (6mm) |
| Flower crown | Crochet tiny flowers and attach to the head |
Finishing Touches
- Adjust stuffing by gently pressing and shaping the head and body until the bunny looks round and smooth.
- Tug the ears a little to help them curve naturally.
- Hide all yarn ends using a tapestry needle, weaving through several stitches so nothing pops out later.
- Gently brush the bunny with a soft toothbrush for extra fluffiness (if using acrylic yarn).
FAQ Section
Can a beginner really make this?
Absolutely! This pattern uses only single crochet, increases, and decreases. No complicated stitches are required.
How do I keep the stuffing from showing?
Use a smaller hook than recommended for your yarn (e.g., 3mm for worsted weight) and keep tension tight.
My bunny is lumpy. What went wrong?
You may have added stuffing unevenly or overstuffed. Remove some filling and shape gently with your fingers.
Can I sell bunnies made from this pattern?
Yes! You may sell finished items (small batches, handmade). Please do not sell or redistribute the pattern itself.
How do I wash my bunny?
Hand wash in cool water with mild soap. Air dry completely. For safety eyes, cover with a cloth before drying.
You Did It! 🎉
Congratulations! You have crocheted an adorable long-eared bunny amigurumi with a tiny carrot. Soft, sweet, and made with your own hands—this little bunny is ready to hop into someone’s heart.
Share your creation! Tag me or leave a comment below. I would love to see your bunny—pastel, classic, or jumbo version!
More Free Patterns You Will Love
| Pattern | Skill Level |
|---|---|
| No-Sew Mochi Bunny | Beginner |
| Miffy Pillow | Beginner |
| Free Triceratops Amigurumi | Intermediate |
| No-Sew Axolotl | Beginner |
| Amigurumi Seahorse Keychain | Beginner |
| Free Crochet Dragon Ornament | Advanced |
Happy Crocheting!