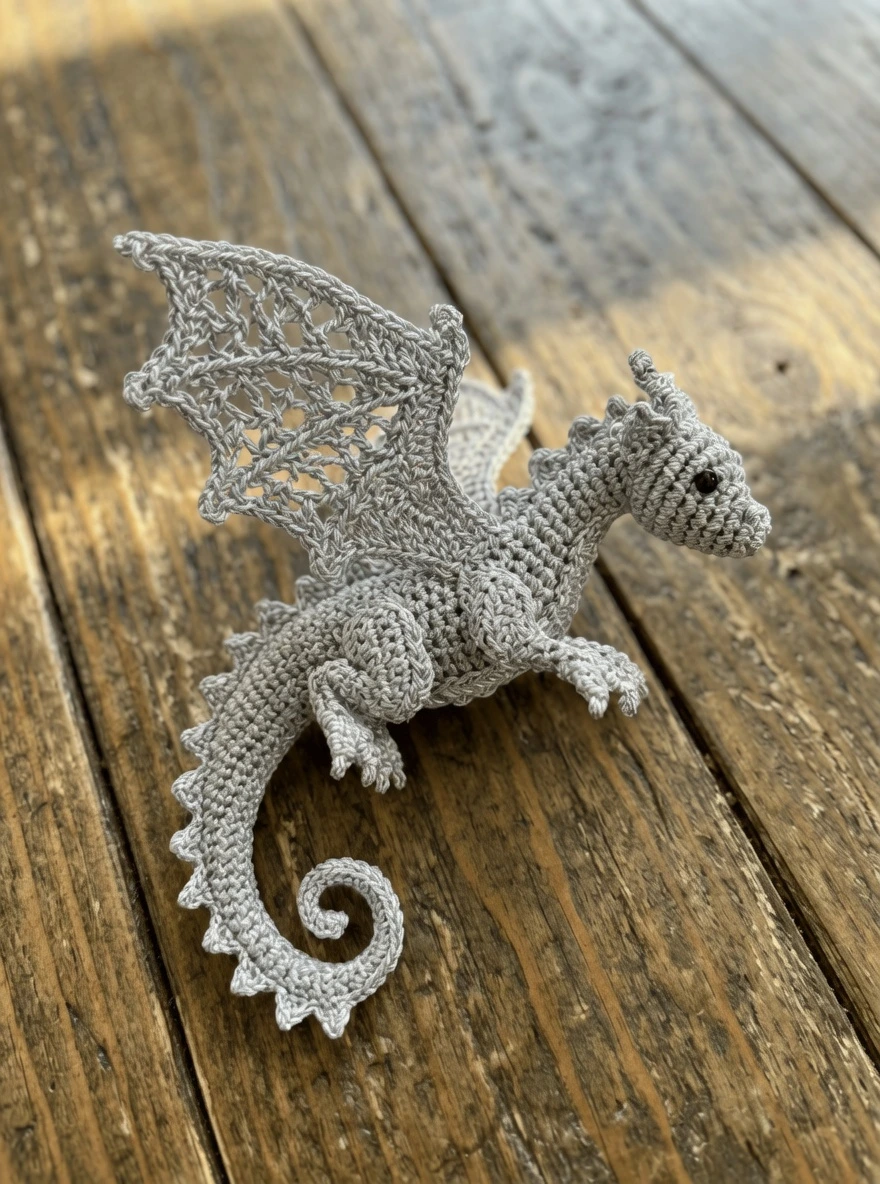
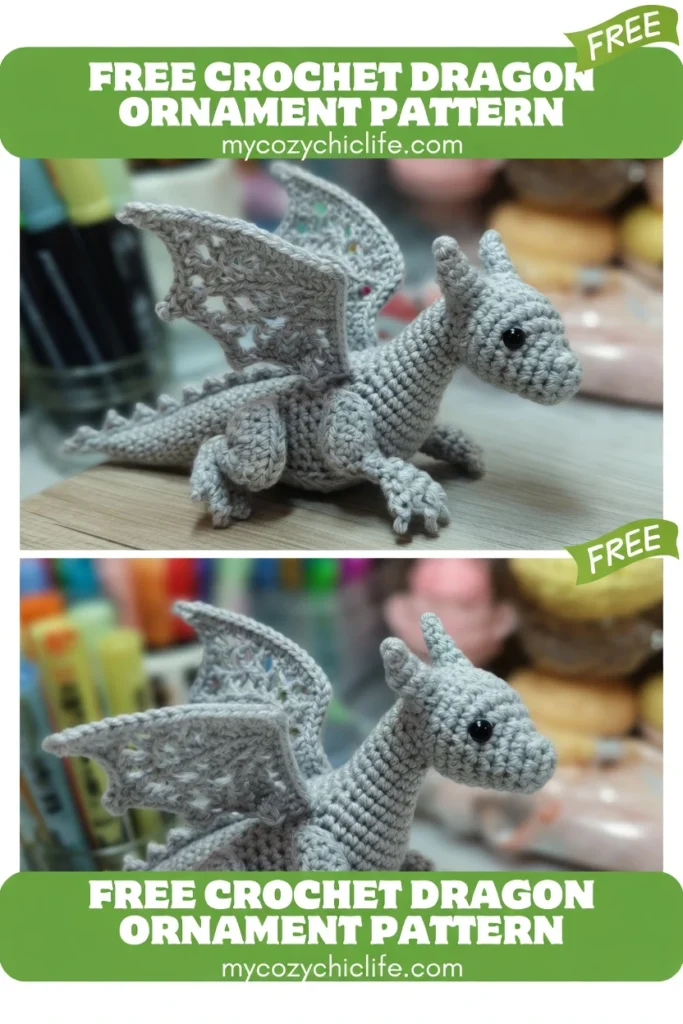
Some crochet projects are made to relax with. This is not one of them. This Free Crochet Dragon Ornament pattern is a masterclass in miniature fiber engineering — a breathtakingly detailed, fully poseable dragon built with metallic crochet thread, a 1.0mm steel hook, internal wire armatures, and techniques most crocheters have never attempted. If you’ve mastered standard amigurumi and you’re hungry for a real challenge, this is the project that will push your skills to their absolute limit.
Designed by Maria Lynn of Savorgastronomy, this pattern goes far beyond basic increase-and-decrease shaping. You’ll use short-round sculpting to force permanent anatomical bends into the tail and limbs, lace filigree geometry to create translucent bat-like wings, and tension sculpting to carve realistic eye sockets and nostrils into the dragon’s face. The finished piece is a heirloom-quality ornament small enough to hang on a Christmas tree but detailed enough to display year-round.
This article walks through every part of the pattern — from materials and preparation to the final master pose — with all stitch counts, round instructions, and advanced techniques preserved in full.
Skill Level and What Makes This Pattern Advanced
This is an expert-level pattern. It assumes you are completely comfortable working in continuous rounds, shaping with increases and decreases, and assembling multi-piece amigurumi. Beyond those fundamentals, this pattern introduces several specialized techniques that elevate it into true miniature sculpture.
Internal wire armatures give the dragon a fully poseable spine, limbs, and wings. You’ll prepare wire with crimped, taped ends and crochet directly around it. Short-round shaping — working partial rounds and turning — forces the crochet fabric to bend permanently, creating anatomical curves in the tail, elbows, and hips without relying on wire alone. Lace filigree geometry uses chain spaces and extended single crochet to build see-through wing membranes that hold their shape. And tension sculpting with a needle and thread pulls the eye sockets inward to create a lifelike, shadowed gaze.
If any of these techniques are new to you, that’s the point. This pattern is designed to teach them.
Materials
- Thread: Size 10 Metallic Crochet Thread in silver or gold (recommended for best stitch definition)
- Hook: 1.0mm steel hook (mandatory for this project)
- Wire — body and spine: 1.5mm bonsai wire or 18-gauge floral wire
- Wire — wings and limbs: 20-gauge floral wire
- Stuffing: High-density polyester fiberfill
- Eyes: One pair of 4mm safety eyes
- Tools: Jewelry pliers, duct tape or strong tape, forceps or a small wooden dowel (for precise stuffing), tapestry needle, scissors
Preparing the Wire Armature
Before inserting any wire into your crochet work, you must cap every end. Using pliers, fold the sharp tip over on itself, crimp it as flat as possible, then wrap the crimped tip tightly with a small piece of duct tape. This prevents the wire from poking through the metallic thread over time and provides a small anchor for the stuffing to grip inside narrow pieces.
The Inside-Out Method
For micro-crochet at this scale, work all pieces inside-out — the smooth “V” side of your stitches faces inward, leaving the textured wrong side on the exterior. This creates a pebbled, scale-like surface texture, hides the diagonal lean that occurs in continuous spirals, and produces cleaner lines on anatomical details like the nose bridge and eye sockets.
Abbreviations
mr – magic ring | ch – chain | st – stitch | sl st – slip stitch | sc – single crochet | hdc – half double crochet | dc – double crochet | tr – treble crochet | inc – increase (2 sc in one st) | dec – decrease (sc2tog) | […] – repeat sequence | × – times
Facial Architecture — The Sculpted Head, Horns, and Frills
The Sculpted Head
Worked in a continuous spiral from the snout up.
- Rnd 1: Ch 4. Starting in 2nd ch from hook: 2sc, 3sc in the last ch. Working along the opposite side of the chain: 1sc, inc in the last ch. (8)
- Rnd 2: inc, 1sc, (inc) × 3, 1sc, (inc) × 2. (14)
- Rnd 3: Sc evenly around. (14)
- Rnd 4 (The Nose Bridge): 5sc, hdc inc × 2, 7sc. (16)
- Rnd 5 (The Nostrils): 5sc, ch 2 (skip 1 st), 2sc, ch 2 (skip 1 st), 7sc. The chain spaces create deep, realistic nostril pits. Do not crochet into the ch-2 spaces during the next round.
- Rnd 6: 5sc, skip the ch-space, 2sc, skip the ch-space, 7sc. (14)
- Rnd 7: (1sc, inc) × 7. (21)
- Rnd 8–10: Sc evenly around. (21)
- Rnd 11 (Eye Socket Sculpting): Work HDC between the posts around (inserting the hook between vertical bars rather than top loops). This flattens the recessed eye sockets. (21)
- Rnd 12: (sc 5, dec) × 3. (18)
Insert 4mm safety eyes into the flattened sockets from Rnd 11. Secure washers firmly.
- Rnd 13: (sc 1, dec) × 6. (12)
Insert a 4-inch piece of wire through the back of the head into the snout. Stuff the snout firmly around the wire.
- Rnd 14: dec × 6. (6)
Fasten off, leaving a long tail for assembly.
The Frills (Make 2)
- Row 1: Ch 6. Starting in 2nd ch: 5sc, turn. (5)
- Row 2: Ch 3, sl st in 2nd ch from hook (picot), sc in next 2 sts, ch 2, sl st in 2nd ch from hook, sc in last 2 sts.
Fasten off.
The Curved Horns (Make 2)
Short rounds force a permanent backward arch.
- Rnd 1: 4sc in MR. (4)
- Rnd 2: (sc, inc) × 2. (6)
- Rnd 3: Sc around. (6)
- Rnd 4 (Short Rnd): 3sc, turn.
- Rnd 5 (Short Rnd): 3sc, turn.
- Rnd 6: Sc around all 6 sts. (6)
Fasten off, leaving a tail for sewing.
The Muscular Body and Tail
The Tapered Tail Tip
- Rnd 1: 4sc in MR. (4)
- Rnd 2: (sc, inc) × 2. (6)
- Rnds 3–10: Sc evenly around. (6)
- Rnd 11: (2sc, inc) × 2. (8)
- Rnds 12–18: Sc evenly around. (8)
Slide prepared wire spine into the tail tip. Crochet remaining rounds around this wire.
The Anatomical Tail Curl (Short Rounds)
This cycle forces the fabric to bend permanently.
- Rnd 19 (Short Rnd): 4sc, turn. (4)
- Rnd 20 (Short Rnd): Do not ch, 4sc, turn. (4)
- Rnd 21: Work all the way around the 8 stitches of the tail base. (8)
- Rnd 22: (3sc, inc) × 2. (10)
- Rnds 23–30: Repeat the short round cycle (Rnds 19–21). Adding extra rows to only one side creates the permanent curve.
The Muscular Haunches and Torso
Stitch height variation sculpts a powerful body shape.
- Rnd 31 (Expansion): (4sc, inc) × 2. (12)
- Rnd 32 (Haunch Shaping): Belly (stitches 1–6): 6sc. Back (stitches 7–12): 6 hdc inc. (18)
- Rnd 33: Belly: 6sc. Back: (sc, inc) × 6. (24)
- Rnd 34 (The Sprawl): Belly: 8sc. Back: 16 hdc. (24)
- Rnds 35–40: Repeat Rnd 34. The HDC on the back adds the volume needed for a muscular silhouette.
The Shoulder Taper and Closing
Stuff the torso firmly around the wire as you work.
- Rnd 41 (Shoulder Shaping): (2sc, dec) × 6. (18)
- Rnd 42: Sc evenly around. (18)
- Rnd 43: (sc, dec) × 6. (12)
Finish stuffing. Ensure the wire spine is centered and exiting through the neck opening.
- Rnd 44: dec × 6. (6)
Fasten off, leaving a tail. Weave yarn through final loops and pull tight around the wire.
The Front Limbs with Elbow Joint Mapping
Make 2. Worked in a continuous spiral, inside-out.
- Rnd 1: 5sc in MR. (5)
- Rnd 2: inc × 5. (10)
- Rnds 3–6: Sc evenly around. (10)
The Elbow Joint (Short-Round Mapping)
- Rnd 7 (Short Rnd): 5sc, turn. (Do not work the full round.)
- Rnd 8 (Short Rnd): Do not ch, 5sc, turn.
- Rnd 9: Work all the way around the base, including unworked stitches from Rnd 6. (10)
The limb will naturally begin to hook forward — this is the elbow.
- Rnds 10–18: Sc evenly around. (10)
- Rnd 19 (Shoulder Expansion): (sc 1, inc) × 5. (15)
Fasten off, leaving a long tail for sewing.
The Micro-Claws
Take a 2-inch piece of 24-gauge wire, fold it into a V shape, and insert it into the paw at Rnd 2. Thread your needle with silver metallic thread, apply a tiny drop of adhesive to the wire tip, and wrap the thread tightly from the tip down to the paw base. Repeat for three claws per paw.
The Rear Haunches with Hip Cap and Weighted Paw
Make 2. Worked in a continuous spiral, inside-out.
- Rnd 1: 6sc in MR. (6)
- Rnd 2: inc × 6. (12)
- Rnd 3: (sc 1, inc) × 6. (18)
- Rnd 4: Sc evenly around. (18)
The Hip Cap (Volume-Shifting Short Rounds)
- Rnd 5 (Short Rnd): 9sc, turn. (Leave remaining stitches unworked.)
- Rnd 6 (Short Rnd): Do not ch, 9sc, turn.
- Rnd 7: Work (sc 1, dec) × 6 around the entire base including short rows and unworked stitches from Rnd 4. (12)
A distinct cap or bulge forms — this is the anatomical hip.
The Lower Leg Taper
- Rnds 8–15: Sc evenly around. (12)
The Weighted Paw
- Rnd 16 (Paw Base): inc × 12. (24)
- Rnd 17: (sc 2, dec) × 6. (18)
- Rnd 18: (sc 1, dec) × 6. (12)
Stuff the paw firmly.
- Rnd 19: dec × 6. (6)
Fasten off, leaving a 10-inch tail for assembly.
The Filigree Wings
A. The Wing Spines (The Skeleton)
Worked in a continuous spiral around a wire.
- Rnd 1: 4sc in MR. (4)
- Rnds 2–25: Sc evenly around. (4)
Insert a 4.5-inch piece of 20-gauge wire. Crimp the ends. Crochet 2 more rounds to encapsulate the wire and close the tip. Fasten off. Bend the wire into a sharp checkmark shape to establish the top ridge of the wing.
B. The Filigree Membrane
Worked in rows, attached directly to the wing spines. Use the 1.0mm hook.
The Filigree Foundation:
- Row 1: Join silver metallic thread at the elbow (the bend) of the wing spine. Ch 3, work 4dc into the base of the 3rd ch from hook. Turn. (4)
- Row 2: Work 1 esc (Extended Single Crochet) in each st across. Turn. (4)
- Row 3 (Initial Lace Row): esc inc, ch 2 (skip 1 st), esc inc. Turn. (6)
- Row 4: esc in each st across, working directly into the ch-2 space as if it were a stitch. Turn. (6)
Tiered Expansion:
- Row 5: esc inc, 4 esc, esc inc. Turn. (8)
- Row 6 (High Filigree): esc 1, ch 3 (skip 2 sts), 2 esc, ch 3 (skip 2 sts), esc 1. Turn.
- Rows 7–15: Continue increasing by 2 stitches every other row. Alternate one solid row of esc with one lace row using ch-spaces. As you approach Row 15, increase the number of ch-3 windows to create the intricate mesh pattern.
Edge Hardening (Crab Stitch and Picots):
Do not turn your work. Work a row of Crab Stitch (Reverse Single Crochet) along the entire bottom edge of the membrane. After every 4th Crab Stitch, work a Hardened Picot: ch 3, sl st into 2nd ch from hook, sc in the next, and resume the Crab Stitch.
Surface Detail — Wing Veins:
Thread your tapestry needle with a single strand of silver metallic thread. Embroider three raised lines (veins) starting from the elbow of the wing spine and radiating out toward the jagged points of the border. Use a Stem Stitch or Surface Slip Stitch to ensure the veins stand out against the filigree mesh.
Final Ornamentation — The Dorsal Ridge and Tail Spade
The Royal Dorsal Ridge
Worked in rows. Measure against your dragon’s spine before finishing.
The Spinal Foundation:
- Row 1: Ch 45 (or the exact length from the base of the horns to the start of the tail spade). Starting in 2nd ch from hook: sl st 2, *[sc 2, hdc 1, sc 2, sl st 1]*. Repeat from * to * across the entire chain.
The Royal Picot Series (The Scales):
- Row 2: Ch 1, turn. Valley: sl st into the first 2 sl sts. Peak: In the next sc, work (sc, ch 3, sl st in 2nd ch from hook, hdc in same st). Valley: sl st into the next 3 sts. Peak: In the next hdc, work (hdc, dc, ch 3, sl st in 3rd ch from hook, dc, hdc). Repeat this sequence, alternating small and large picot peaks, decreasing picot size as you reach the tail tip.
Surface Stitch Reinforcement:
- Row 3: Do not fasten off. Work a row of Surface Slip Stitches back along the base of the foundation chain. This creates a stable platform for sewing the ridge to the body.
The Royal Tail Spade
Worked in the round, then flattened.
- Rnd 1: 4sc in MR. (4)
- Rnd 2: (sc 1, inc) × 2. (6)
- Rnd 3: (sc 2, inc) × 2. (8)
- Rnd 4: (sc 1, inc) × 4. (12)
- Rnd 5 (Flattening): Flatten the piece so edges meet. Work 6sc through both layers to close the base. Turn. (6)
- Rnd 6 (The Predatory Points): (ch 3, sl st in 2nd ch from hook, sc in next ch, sl st to the next available st on the base) × 3.
Fasten off, leaving a 10-inch tail.
Assembly: The Master Sequence
The assembly order matters. Before beginning, bend the wire extending from the neck and tail into a continuous, fluid S-shape. For all joins, use a Whip Stitch, sewing under the vertical posts of the stitches rather than the top loops to create invisible seams.
Step 1 — Belly Armor (optional): If you’ve created a separate belly piece, attach it first to prevent the torso from twisting. Pin the entire length from throat to tail and sew along both long edges.
Step 2 — The Cranial Mount: Stuff the head very firmly. Slide it onto the neck wire so the wire runs along the internal top-center for support. Use seamless whip stitch to join. Angle the nose slightly downward for a regal, focused expression.
Step 3 — The Predator Stance (Limbs): Position front limb shoulders approximately 7 stitches apart on the chest, elbows angled forward. Position rear haunches over the largest back curve. If using internal leg wires, push them deep into the body stuffing toward the tail to lock into the S-curve frame.
Step 4 — Wings: Insert exposed wire ends of the wing spines into the shoulder ridge of the body. Angle at a downward slant toward the tail for a sense of motion. Reinforce by sewing around the internal wire.
Step 5 — Finishing the Silhouette: Attach horns and frills just behind the eye sockets. Pin the dorsal ridge down the center of the S-curve spine, slightly taut, and sew through the reinforced surface slip stitch base. Slide the tail spade over the blunt tip of the spiral tail, align points with the dorsal spine, and sew firmly.
Facial Sculpting and Final Polish
Tension Sculpting (The Eye Sink)
Perform after the head is firmly stuffed but before attaching final eye beads. Thread a long needle with doubled matching metallic thread. Insert at the base of the head (the neck join), bring it out at the center of the left eye socket. Move one stitch over, re-insert, and bring it back out at the base. Pull firmly until the eye socket dips inward. Tie a secure knot. Repeat for the right eye, ensuring symmetrical depth.
Surface Nostril and Brow Definition
Join yarn at the corner of the nostril pit (Rnd 5). Work (Surface sl st, 3 Surface sc, Surface sl st) in a U-shape around the upper edge of the chain-space pit to create a raised hood. For the eyelids, embroider a thick horizontal line directly above the eye socket, angling the outer corner slightly downward. Work a row of Surface Slip Stitches above the eyelid for the brow ridge.
Royal Beading
Add micro-beads at anatomical pressure points: three tiny glass seed beads at the base of each horn, one bead every 5th picot along the spinal ridge, and a tiny drop of high-clarity jewelry glue to press 4mm half-beads into the sculpted eye sockets.
The Master Pose
Hold the dragon by the torso and press the tail spiral into a tight downward coil. Pull the head upward with a slight left or right tilt for a sense of curiosity. Spread the filigree wings wide, then dent the wire spines slightly downward for a heavy, draped effect. Tuck the front paws slightly inward, cradling the space beneath the snout.
Tips for Working at This Scale
Bright, high-contrast lighting is essential. At 1.0mm hook scale, identifying individual stitches requires excellent visibility. A desk lamp with a daylight bulb makes an enormous difference.
Adjust your thread tension. Metallic thread behaves differently than yarn. If it keeps slipping, try wrapping it an extra time around your pinkie finger.
Never skip the wire preparation. Uncapped wire ends will eventually poke through the metallic thread. Every wire end must be folded, crimped, and taped before insertion.
Stuff with forceps, not fingers. At this scale, your fingers are too large to place stuffing precisely. Forceps or a small wooden dowel give you the control needed to fill narrow limbs and the snout evenly.
Can you use regular yarn instead? It’s not recommended for this pattern. Size 10 metallic thread provides a crispness and stitch definition that cotton or acrylic cannot match at this tiny scale. Regular yarn would result in a much larger, heavier dragon that loses the delicate wing and tail details.