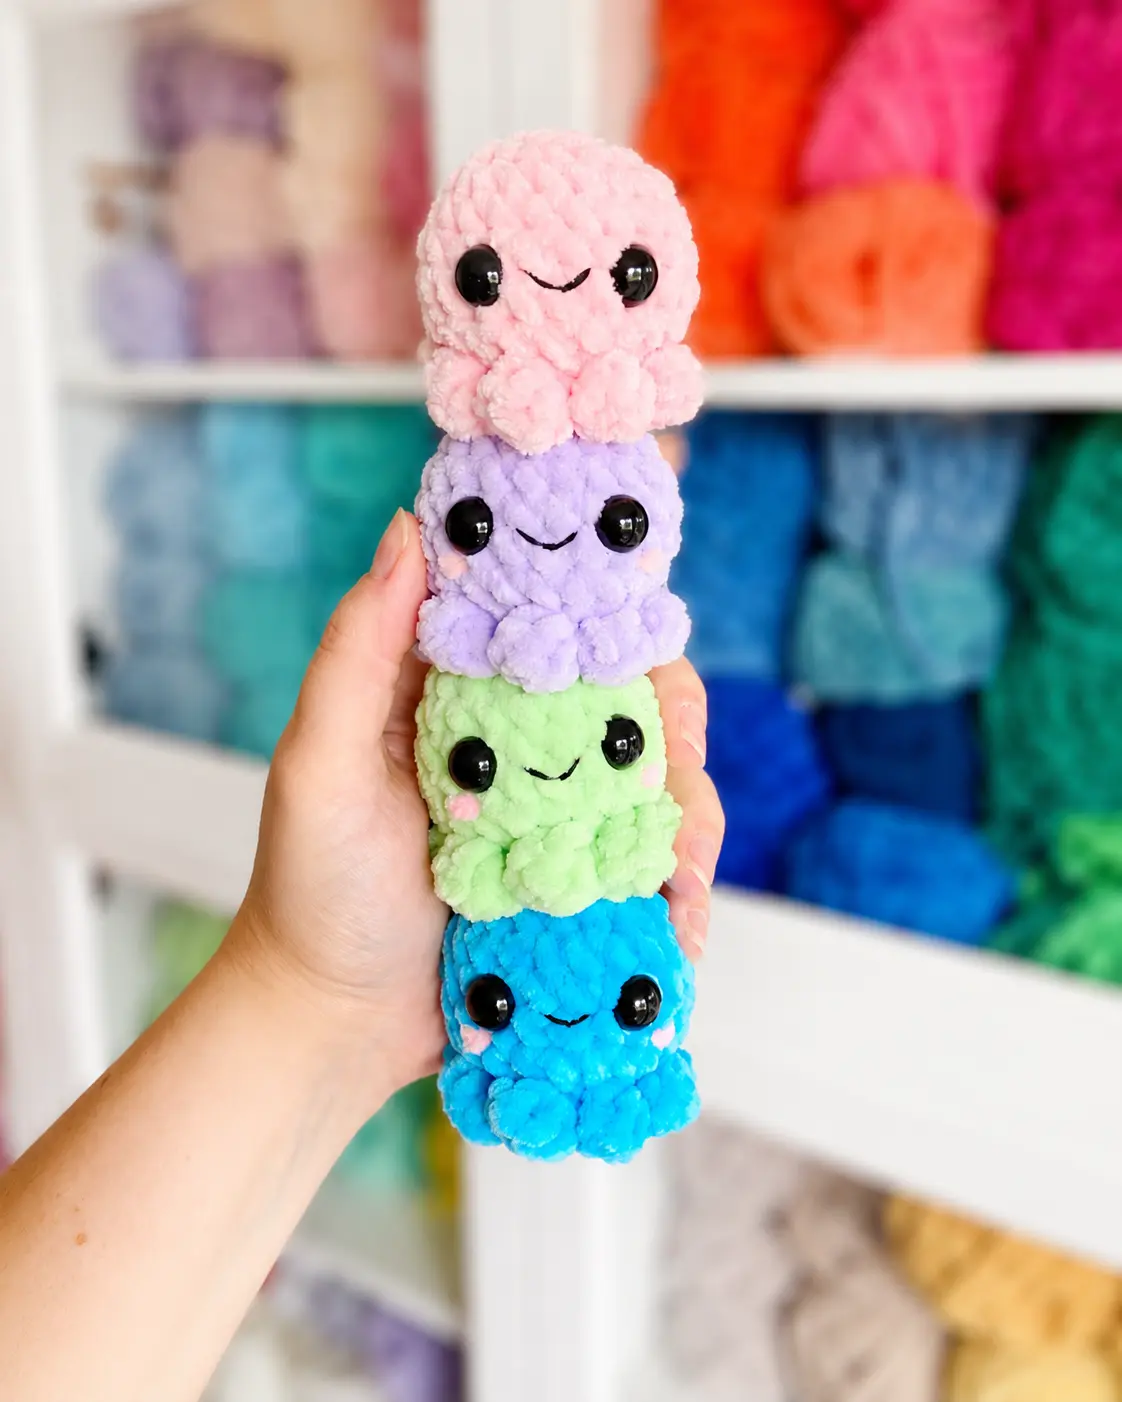
If you’ve been searching for an adorable, quick, and beginner-friendly amigurumi project, this squishy baby octopus crochet pattern is exactly what you need. With just a few rounds of single crochet and a clever bobble stitch tentacle technique, you can whip up the cutest little ocean friend in an afternoon. Best of all, it’s completely no-sew — no tedious seaming required!
Whether you’re new to amigurumi or a seasoned crocheter looking for a fun, fast make, this guide walks you through every step in detail — filling in all the tips and tricks you need to succeed.
Why You’ll Love This Baby Octopus Pattern
This tiny crochet octopus has everything going for it: it’s small, squishy, fast to make, and absolutely irresistible. The finished piece fits right in the palm of your hand, making it perfect as a baby toy, bag charm, desk decoration, or handmade gift. Because it uses bulky yarn and a no-sew construction, even complete beginners can finish one in a single crafting session.
If you love making cute no-sew amigurumi like this, you might also enjoy my No-Sew Mochi Bunny Crochet Pattern or this sweet No-Sew Axolotl Amigurumi — both follow the same satisfying no-sew approach.
Materials You’ll Need
Before you start, gather everything so you’re not hunting for supplies mid-project:
- Bulky weight yarn (#6) — a chenille or velvet-style yarn works beautifully for that extra squishy texture, but any bulky yarn will do
- 4.5mm crochet hook
- One pair of 12mm safety eyes
- Polyester fiberfill stuffing
- Yarn needle and scissors
- Stitch marker (or a small piece of scrap yarn)
- Sewing pins (optional but helpful for placing eyes)
- Optional: a strand of pink yarn for embroidered cheeks, and embroidery floss or thin black yarn for a smile
Yarn tip: Chenille or “parfait”-style bulky yarns give this octopus a wonderfully soft, cloud-like texture. However, because the fibers are dense, it can sometimes be harder to see your stitches. Work slowly under good lighting, and use the tip of your hook to feel for each stitch if needed.
Skills Required
This pattern is rated beginner, but it does use a couple of techniques that may be new to first-timers. Don’t worry — each one is explained below:
- Crocheting in a spiral (no joining rounds)
- Magic ring
- Chain stitch
- Slip stitch
- Single crochet
- Invisible decrease
- Increase (2 sc in same stitch)
- Bobble stitch
- Back loop only (BLO) crochet
Key Techniques Explained
The Yarn Under Method
Most crochet patterns use the standard “yarn over” technique. For this pattern, yarn under is used instead when making single crochet stitches. To do this, insert your hook into the next stitch, then pass the yarn under the hook (rather than over) to pull through. Complete the stitch normally with a yarn over. This technique produces a tighter, more defined stitch that gives the octopus a rounder, denser look — especially important with bulky yarn.
The Invisible Decrease (dec)
A regular decrease leaves a visible bump on the surface of your work. The invisible decrease hides this neatly:
- Insert your hook under the front loop only of the first stitch — do not yarn over yet.
- Now insert your hook under the front loop of the next stitch and pick it up.
- Yarn over and draw through both front loops, then yarn over and draw through all loops on the hook.
The result is a smooth, seamless decrease that keeps your octopus looking polished.
The Bobble Stitch (bo)
The bobble stitch creates the octopus’s fluffy tentacles. Here’s how to make one:
- Yarn over, insert hook into the stitch, yarn over and pull through (3 loops on hook), yarn over and pull through 2 loops (2 loops remain).
- Repeat step 1 three more times in the same stitch until you have 5 loops on your hook.
- Yarn over and pull through all 5 loops to close the bobble.
The bobble pops out toward you as a round, dimensional bump — this is what gives each tentacle its cute rounded shape.
Abbreviations
| Abbreviation | Meaning |
|---|---|
| BLO | Back loops only |
| bo | Bobble stitch |
| ch | Chain |
| dec | Invisible decrease |
| inc | Increase (2 sc in same stitch) |
| mr | Magic ring |
| pm | Place stitch marker |
| sc | Single crochet |
| sl st | Slip stitch |
| st(s) | Stitch(es) |
The Pattern
Head
Work in a continuous spiral. Place a stitch marker at the beginning of each round and move it up as you go.
Round 1: Magic ring, 8 sc into ring. (=8)
Round 2: 8 inc (increase in every stitch). (=16)
Round 3: (3 sc, 1 inc) × 4. (=20)
Rounds 4–7: 20 sc (work even, no increases or decreases). (=20)
Round 8: (3 sc, 1 dec) × 4. (=16)
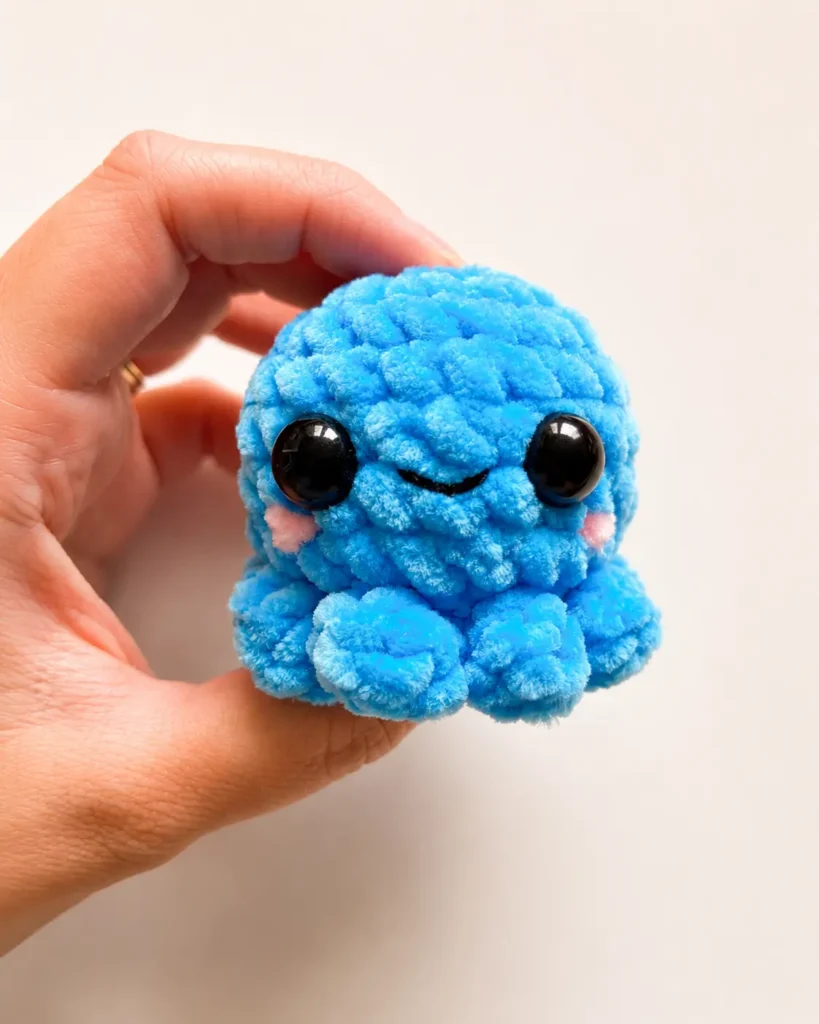
Place safety eyes between rounds 5 and 6, with approximately 3 stitches between them. Use sewing pins to test placement before committing — symmetry makes a big difference in the finished look! Push the backs firmly onto the posts so the eyes are secure before stuffing.
Round 9 (BLO): Working into the back loops only for this entire round, place a stitch marker in the first front loop of this round and do not remove it. Work 16 sc. (=16)
Fasten off and cut a long yarn tail. Stuff the head firmly with polyester fiberfill — the fuller you stuff it, the rounder and squishier it will feel. Then close the opening using the yarn needle by weaving through the front loops of each stitch, pulling snug, and hiding the tail inside.
Tentacles
Hold the head right-side up and join a new length of yarn into the front loop where your stitch marker is (you can remove the marker now).
Round 1: Ch 1 (does not count as a stitch). Bobble stitch into the current stitch, slip stitch into the next 2 front loops. Repeat from * around — the bobble is always made in the same stitch as the second slip stitch, so a bobble is made every other stitch. You will make a total of 8 bobble stitches (8 tentacles).
Cut a short yarn tail, knot the working yarn with the starting tail, and tuck both ends neatly inside the head.
Tentacle tip: Keep your tension relaxed when making the bobbles so they puff out fully. If they feel tight or flat, try going up a hook size for just the tentacle round.
Finishing Touches (Optional but Adorable)
- Cheeks: Thread a strand of pink yarn onto your needle and embroider two small circles just below and to the sides of the eyes.
- Smile: Using thin black yarn or embroidery floss, stitch a small curved smile between rounds 5 and 6, centered below the eyes.
These tiny details transform a cute octopus into an absolutely irresistible one.
Tips for Beginners
Counting stitches: Always count your stitches at the end of each round and compare with the stitch count in parentheses. Catching a mistake early saves a lot of unraveling later.
Stitch markers: Don’t skip the stitch marker! Working in a continuous spiral means it’s very easy to lose track of where a round starts. A simple loop of scrap yarn works just as well as a fancy marker.
Stuffing amount: For the squishiest result, stuff generously before closing. Once the opening is closed, you can’t add more!
Closing the opening: The “weave through front loops” method described in the pattern creates a clean, invisible closure. Pull slowly and evenly as you work around to avoid puckering.
What to Make Next?
Once you’ve mastered this little octopus, you’ll be hooked on amigurumi (pun intended)! Here are some more beginner and intermediate patterns you might love:
- Mini Octopus Free Crochet Pattern — a slightly different take on our favorite eight-armed friend
- Amigurumi Seahorse Keychain — another adorable ocean creature, wearable as a bag charm
- Miffy Pillow Crochet Pattern — a sweet no-sew project that’s perfect for gifting
- Green Alien Cat Amigurumi Keychain — quirky and fun, great for using up yarn scraps
- Free Triceratops Amigurumi Pattern — for the dinosaur lovers in your life
Frequently Asked Questions
Can I use a different yarn weight? Yes! You can use any yarn weight you like — just adjust your hook size accordingly. A lighter yarn (like DK or worsted) will produce a smaller octopus with more stitch definition, while bulky yarn gives that fluffy, squishy look.
What if I don’t have safety eyes? You can embroider eyes using black yarn or felt circles cut and glued on. Just make sure any embellishments are secure if the toy is for a young child.
Is this pattern safe for babies? Safety eyes have small backs that can be a choking hazard. For toys intended for children under 3, embroider the eyes instead using black yarn, and ensure the stuffing is fully enclosed.
How long does it take to make? With bulky yarn, most crafters finish the octopus in 1–2 hours. It’s a perfect project for an evening in front of a movie.
Can I sell finished octopuses made from this pattern? Always check the specific license terms of the pattern you’re using. Many designers allow selling finished items with credit given — read the pattern’s copyright notice carefully.
Final Thoughts
This squishy baby octopus is one of those patterns you’ll make again and again — in every color imaginable. It’s quick, it’s beginner-friendly, and the result is so endearing that it’s almost impossible to make just one. Try it in pastels for a baby shower gift, in bold brights for a fun desk toy, or in spooky Halloween shades for a seasonal decoration.
Happy crocheting! 🐙