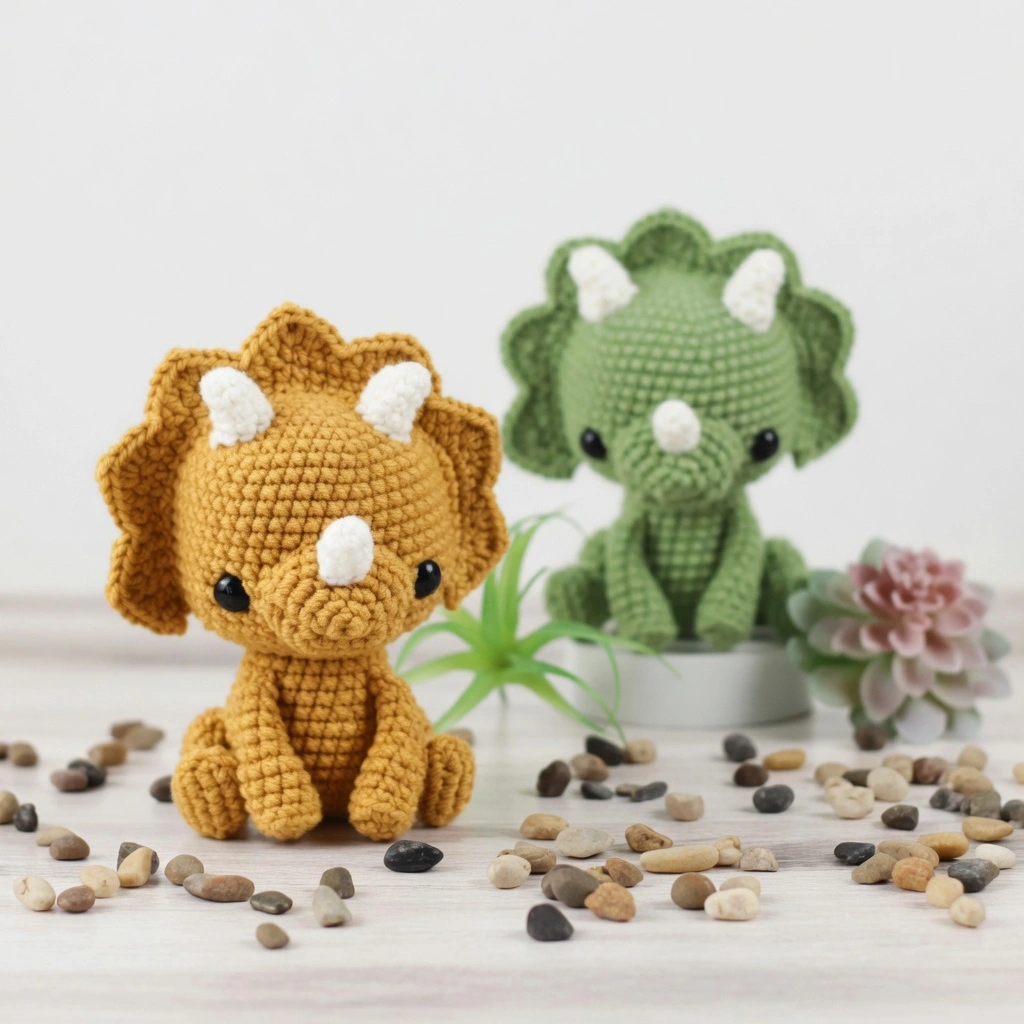
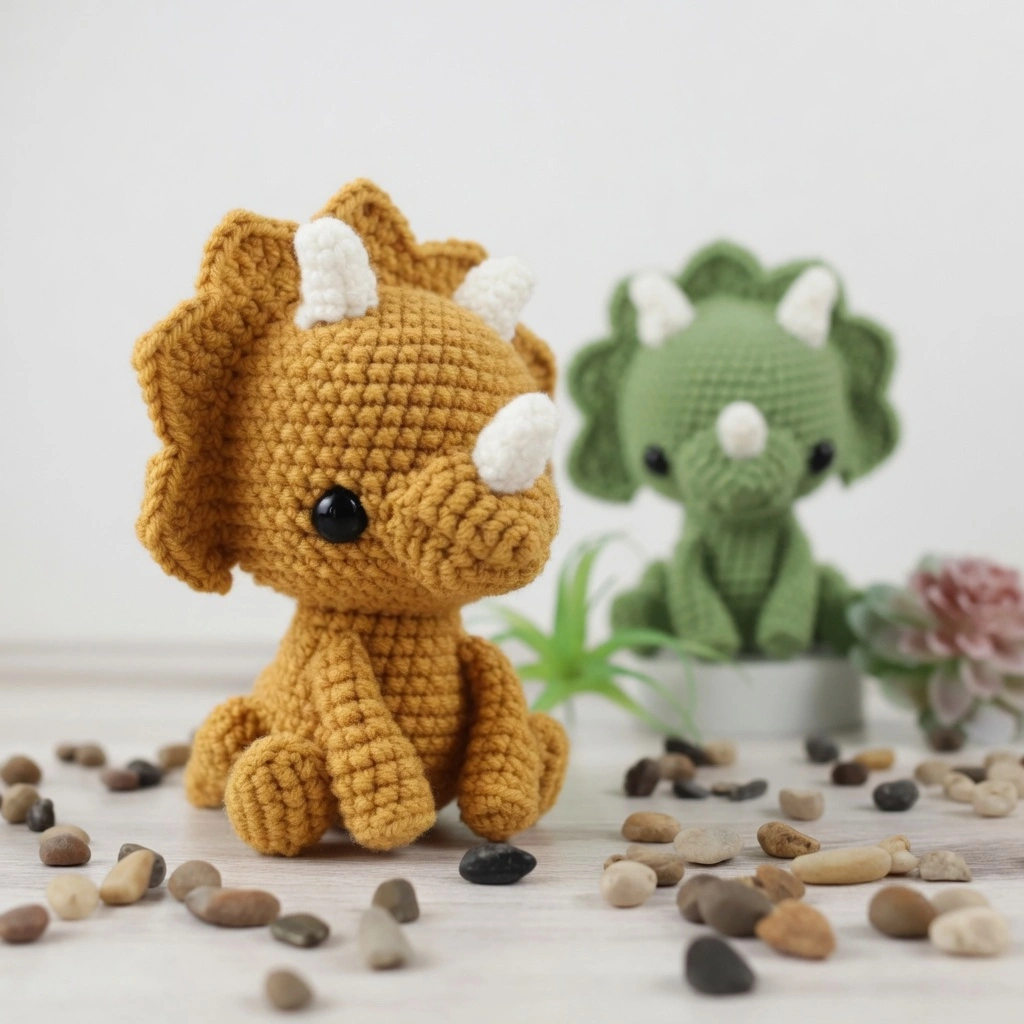
Some amigurumi patterns give you a cute stuffed animal. This one gives you a character with serious personality. Trixie the Triceratops, designed by Holly Lanier of Storyland Amis, is a beautifully detailed dinosaur amigurumi with a sculpted two-piece beak, a scalloped frill, three horns, oval foundation-chain legs, and a tail that helps her sit upright on her own. At approximately 6.5 inches (16 cm) tall, she’s substantial enough to be a proper plush toy but detailed enough to impress even experienced crocheters.
This pattern has earned nearly 30,000 shares and glowing reviews from the crochet community — including praise from a crocheter with 50 years of experience who called it “the most well written pattern I have ever seen.” That’s not an accident. Holly’s pattern includes precise stitch counts for every round, detailed photo collages showing each assembly step, video tutorials for key techniques, and clear instructions for everything from eye placement to sewing pieces together with invisible joins.
Whether you’re making Trixie for a dinosaur-obsessed child, as a nursery decoration, or simply because you love a well-designed amigurumi challenge, this pattern delivers a showstopping result. Let’s walk through every piece.
What Makes This Triceratops Pattern Special
Most dinosaur amigurumi patterns simplify the triceratops into a round head with a few bumps. This pattern takes a completely different approach by building the facial architecture from multiple separately crocheted pieces: a top beak, a bottom beak, a scalloped frill, two top horns, and a front horn. Each piece is shaped, positioned, pinned, and sewn to create a three-dimensional face with genuine depth and character.
The frill is particularly impressive. It’s worked in rows using a progression of stitch heights — slip stitches, single crochet, half double crochet, double crochet, and treble crochet — that create a scalloped, organic edge with seven peaked points. When sewn to the top of the head, it frames the face exactly like a real triceratops’s bony frill.
The body construction is equally thoughtful. The legs use a foundation chain start to create oval feet (rather than round ones), and they’re worked with a BLO round that creates a realistic ridge between the foot and the leg. The tail is asymmetrically increased to create a natural taper. And every piece is designed so that Trixie can sit upright on a flat surface — the legs, arms, and tail all act as balance points.
If you enjoy detailed multi-piece amigurumi, you might also appreciate our Free Crochet Dragon Ornament — an expert-level miniature build with wire armatures, filigree wings, and sculpted facial features.
Materials You’ll Need
- Yarn: Worsted weight (4-ply / Aran / 8-ply) in green and cream. The original uses Hobby Lobby’s I Love This Yarn in “Mid Green” and “Ivory.”
- Hook: G (4mm) crochet hook
- Eyes: 12mm black safety eyes
- Stuffing: Polyester fiberfill
- Tools: Bent tip tapestry needle, scissors, stitch marker, straight pins
The finished size is approximately 6.5 inches (16 cm) tall. Your personal gauge, tension, hook size, and yarn brand will all impact the final dimensions.
Crochet Abbreviations (US Terms)
sc – single crochet | st/sts – stitch(es) | sl st – slip stitch | dec – decrease (sc2tog) | inc – increase (2sc in next st) | hdc – half double crochet | dc – double crochet | trc – triple crochet | BLO – back loops only | R – round | rep – repeat | ** – repeat between asterisks
Important Notes Before Starting
Starting method: This pattern uses the “ch 2 method” to start rounds. If you prefer the magic circle/ring, they’re interchangeable and produce the same result.
Right vs. wrong side: Always crochet with the right side of the stitches facing outward.
Yarn under vs. yarn over: The designer always uses yarn under (YU) rather than yarn over (YO) for amigurumi. Using YO may make your pieces slightly larger.
Sewing: All pieces are sewn together using the whipstitch unless otherwise specified.
Continuous rounds: All rounds are worked continuously — do not join with a slip stitch.
The Full Pattern
Head (Green Yarn)
- R1: ch 2, starting in 2nd ch from hook, sc 6 [6]
- R2: *inc* rep 6 times [12]
- R3: *sc 1, inc* rep 6 times [18]
- R4: *sc 2, inc* rep 6 times [24]
- R5: *sc 3, inc* rep 6 times [30]
- R6: *sc 4, inc* rep 6 times [36]
- R7: *sc 5, inc* rep 6 times [42]
- R8–9: sc in all 42 sts (2 rounds) [42]
- R10: *sc 6, inc* rep 6 times [48]
- R11–15: sc in all 48 sts (5 rounds) [48]
- R16: *sc 7, inc* rep 6 times [54]
- R17: sc in all 54 sts [54]
- R18: *sc 7, dec* rep 6 times [48]
- R19: *sc 6, dec* rep 6 times [42]
- R20: *sc 5, dec* rep 6 times [36]
Adding the Eyes: Insert 12mm safety eyes between R16 and R17, spaced 13 stitches apart. Insert the first eye, count 13 stitches from its hole, and insert the second eye. There should be 11 visible stitches between the two eyes.
Start stuffing the head. Continue stuffing as you close it up.
- R21: *sc 4, dec* rep 6 times [30]
- R22: *sc 3, dec* rep 6 times [24]
Finish off, leaving a short tail. Do not sew the opening closed. Finish stuffing and set aside.
Top of Beak (Green Yarn)
- R1: ch 2, starting in 2nd ch from hook, sc 4 [4]
- R2: *inc* rep 4 times [8]
- R3: *sc 1, inc* rep 4 times [12]
- R4: *sc 2, inc* rep 4 times [16]
- R5: *sc 3, inc* rep 4 times [20]
- R6: sc in all 20 sts [20]
Finish off leaving a long tail for sewing. Do not stuff. Flatten the piece and sew the open end closed using the whipstitch to create a flat edge for sewing.
Bottom of Beak (Green Yarn)
- R1: ch 5, starting in 2nd ch from hook, inc 1, sc 2, inc 1, rotate work 180 degrees and work in the front loops of the chain: inc 1, sc 2, inc 1 [12]
- R2: *inc, sc 1* rep 6 times [18]
- R3: sc in all 18 sts [18]
Finish off leaving a long tail for sewing. Do not stuff. Sew the open end closed to create a flat edge.
Sewing the Beak to the Head
Position the top of the beak over R13 to R16 of the head so the bottom corners curve down to R16 and the top edge sits over R13. Pin in place. Sew the outer edge to the head using the whipstitch — sew only the top outer edge.
Position the bottom of the beak directly under the top piece over R16 to R20. The bottom piece should curve so the corners reach R16 and the bottom edge rests over R20. Pin and sew the outer edge down. Knot the remaining tails together to secure, then weave into the head.
Frill (Green Yarn)
The frill is worked in rows. Chain 1 and turn at the end of each row.
- R1: ch 37, starting in 2nd ch from hook, sc in each of the 36 chs [36], ch 1, turn
- R2: *inc 1, sc 5* rep 5 times, inc, sc 4, inc [43], ch 1, turn
- R3: *sl st 1, sc 1, make 1 hdc and 1 dc in the next st, make 1 dc, 1 trc, and 1 dc in the next st, make 1 dc and 1 hdc in the next st, sc 1* rep 7 times, sl st 1
Finish off leaving a long tail. Position the frill centered over the top of the head. Pin in place and sew the bottom edge to the head using the whipstitch.
Top Horns (Make 2, Cream Yarn)
- R1: ch 2, starting in 2nd ch from hook, sc 4 [4]
- R2: inc, sc 2, inc [6]
- R3: sc in all 6 sts [6]
- R4: inc, sc 4, inc [8]
- R5: sc in all 8 sts [8]
Finish off leaving a long tail. Do not stuff. Position the horns in front of the frill over R5–8 of the head, with the increases pointing outward. Sew using the seamless join method. Weave tails to the back of the head, knot them together, and weave into the head.
Front Horn (Cream Yarn)
- R1: ch 2, starting in 2nd ch from hook, sc 4 [4]
- R2: sc 3, inc [5]
- R3: sc 4, inc [6]
- R4: sc 5, inc [7]
Finish off leaving a long tail. Do not stuff. Position over R4–6 of the top of the beak with the increases facing inward toward the head. Sew using the seamless join method.
Body (Green Yarn)
- R1: ch 2, starting in 2nd ch from hook, sc 6 [6]
- R2: *inc* rep 6 times [12]
- R3: *sc 1, inc* rep 6 times [18]
- R4: *sc 2, inc* rep 6 times [24]
- R5: *sc 3, inc* rep 6 times [30]
- R6–11: sc in all 30 sts (6 rounds) [30]
- R12: *sc 3, dec* rep 6 times [24]
- R13–15: sc in all 24 sts (3 rounds) [24]
Finish off leaving a long tail. Stuff firmly. The last round of the head and the last round of the body both have 24 stitches, so they line up perfectly. Sew together using the whipstitch. When about three-quarters of the way around, add extra stuffing to the neck for sturdiness.
Legs (Make 2, Green Yarn)
- R1: ch 5, starting in 2nd ch from hook, inc 1, sc 2, inc 1, rotate 180 degrees and work in the front loops of the ch: inc 1, sc 2, inc 1 [12]
- R2: sc in all 12 sts [12]
- R3: BLO sc in all 12 sts [12] (BLO on this round only)
- R4: sc in all 12 sts [12]
- R5: sc 3, dec 3, sc 3 [9]
- R6: sc in all 9 sts [9]
- R7: *sc 2, inc* rep 3 times [12]
- R8: *sc 1, inc* rep 6 times [18]
- R9–10: sc in all 18 sts (2 rounds) [18]
- R11: *sc 1, dec* rep 6 times [12]
Stuff the leg lightly. Do not overstuff — it makes sewing to the body difficult.
- R12: *dec* rep 6 times [6]
Finish off leaving a long tail. Flatten the top and sew the open end closed to create a flat edge. Position legs to the sides of the body so Trixie can sit upright. Pin in place and sew the flat back edge to the body, then sew down 3–4 stitches from the bottom of the thigh and 3–4 stitches from the top edge. Knot tails together at the back and weave in.
Arms (Make 2, Green Yarn)
- R1: ch 2, starting in 2nd ch from hook, sc 6 [6]
- R2: *sc 1, inc* rep 3 times [9]
- R3: BLO sc in all 9 sts [9] (BLO on this round only)
- R4–6: sc in all 9 sts (3 rounds) [9]
- R7: *sc 1, dec* rep 3 times [6]
- R8–11: sc in all 6 sts (4 rounds) [6]
Finish off leaving a long tail. Stuffing is optional. Flatten and sew open ends closed. Position arms over R13–14 of the body, angled slightly so the bottoms touch the ground. Space them about 5 stitches apart on the chest. Pin and sew using the whipstitch. Knot tails at the back and weave in.
Tail (Green Yarn)
- R1: ch 2, starting in 2nd ch from hook, sc 4 [4]
- R2: inc, sc 2, inc [6]
- R3: inc, sc 4, inc [8]
- R4: inc, sc 6, inc [10]
- R5: inc, sc 8, inc [12]
- R6: inc, sc 10, inc [14]
- R7: inc, sc 12, inc [16]
- R8: inc, sc 15 [17]
Finish off leaving a long tail. Stuff lightly. Position the tail at the back of the body over approximately R4–10, centered between the backs of the legs. Set Trixie on a flat surface to make sure the tail touches the ground for balance. Pin and sew using the whipstitch. Finish stuffing when about three-quarters sewn. Knot and weave in ends.
Assembly Tips for the Best Results
Pin everything before sewing. This pattern has many pieces that need precise placement — the beak pieces, frill, horns, legs, arms, and tail. Using straight pins to hold each piece in position while you sew ensures symmetry and saves you from having to rip out stitches.
Check the sitting balance frequently. Set Trixie on a flat surface after pinning each leg, arm, and the tail. The legs and tail act as a tripod that keeps her upright. If she tips, adjust the leg or tail position before you commit to sewing.
Use the seamless join for the horns. The seamless join method (sewing under the vertical posts of stitches rather than the top loops) creates invisible seams that make the horns look like they’re growing naturally from the head. This technique also works for the Crochet Dragon Ornament’s assembly if you’re tackling that project.
Knot sewing tails together at the back. Holly’s clever technique of weaving sewing tails from opposite pieces to the back of the body and knotting them together creates incredibly secure joins. This is especially important for pieces that children might tug on.
Don’t overstuff the legs. Lightly stuffed legs are much easier to sew to the body because the flat edge stays flexible. Overstuffed legs become rigid and bulge away from the body, leaving gaps in the seam.
Customization Ideas
Color swaps change Trixie’s personality completely. The original uses green and cream, but try orange body with yellow horns (like the “Sungold” version the designer made), purple with white, or teal with gold for entirely different dinosaurs.
Yarn weight experiments scale the pattern up or down. Several makers have successfully used blanket yarn to create a larger version of Trixie — the same pattern, just bigger. Conversely, using a lighter weight yarn and smaller hook would produce a miniature version.
Pairs and families are a natural extension. Make a large Trixie and a small one (different yarn weights, same pattern) for a parent-and-baby set. The designer’s T-Rex pattern uses a similar construction style, so making both dinosaurs creates a matching prehistoric pair.
Where This Pattern Fits in Your Crochet Journey
This triceratops sits at the intermediate level. The individual pieces use basic stitches, but the multi-piece facial assembly, foundation chain starts, BLO technique, and careful positioning require patience and attention to detail.
If you’re newer to amigurumi and want to build up to this level, our No-Sew Mochi Bunny is a great beginner starting point — single piece, no sewing, basic stitches. From there, a project like our Green Alien Cat Keychain introduces multi-piece assembly on a small scale. Then this triceratops is the logical next challenge, with its complex facial construction and precise positioning.
For crocheters who’ve already mastered Trixie and want something even more ambitious, our No-Sew Axolotl introduces dual-yarn texture techniques, while the Crochet Dragon Ornament pushes into expert territory with wire armatures and lace filigree wings.
A Dinosaur Worth Every Stitch
With her sculpted beak, scalloped frill, trio of horns, and the ability to sit upright on her own, Trixie is one of the most impressive free amigurumi patterns available anywhere. The level of detail in both the design and the written instructions sets a high bar — every round is counted, every assembly step is photographed, and every technique has a video tutorial link.
Whether she ends up as a beloved toy, a shelf decoration, or a gift for the dinosaur fan in your life, Trixie is the kind of project you’ll be genuinely proud to say you made. She took nearly two years to design, and that care shows in every stitch.
Pattern Credit
This free pattern was designed by Holly Lanier of Storyland Amis. An ad-free, beautifully formatted PDF version is available in her shop. Find more of Holly’s patterns and tutorials on her blog at storylandamis.com, on Instagram (@storyland_amis), and on Facebook (Storyland Amis). If you make Trixie, sharing photos with the designer supports her work and helps keep free patterns coming.
Happy crocheting — and enjoy your magnificent triceratops!