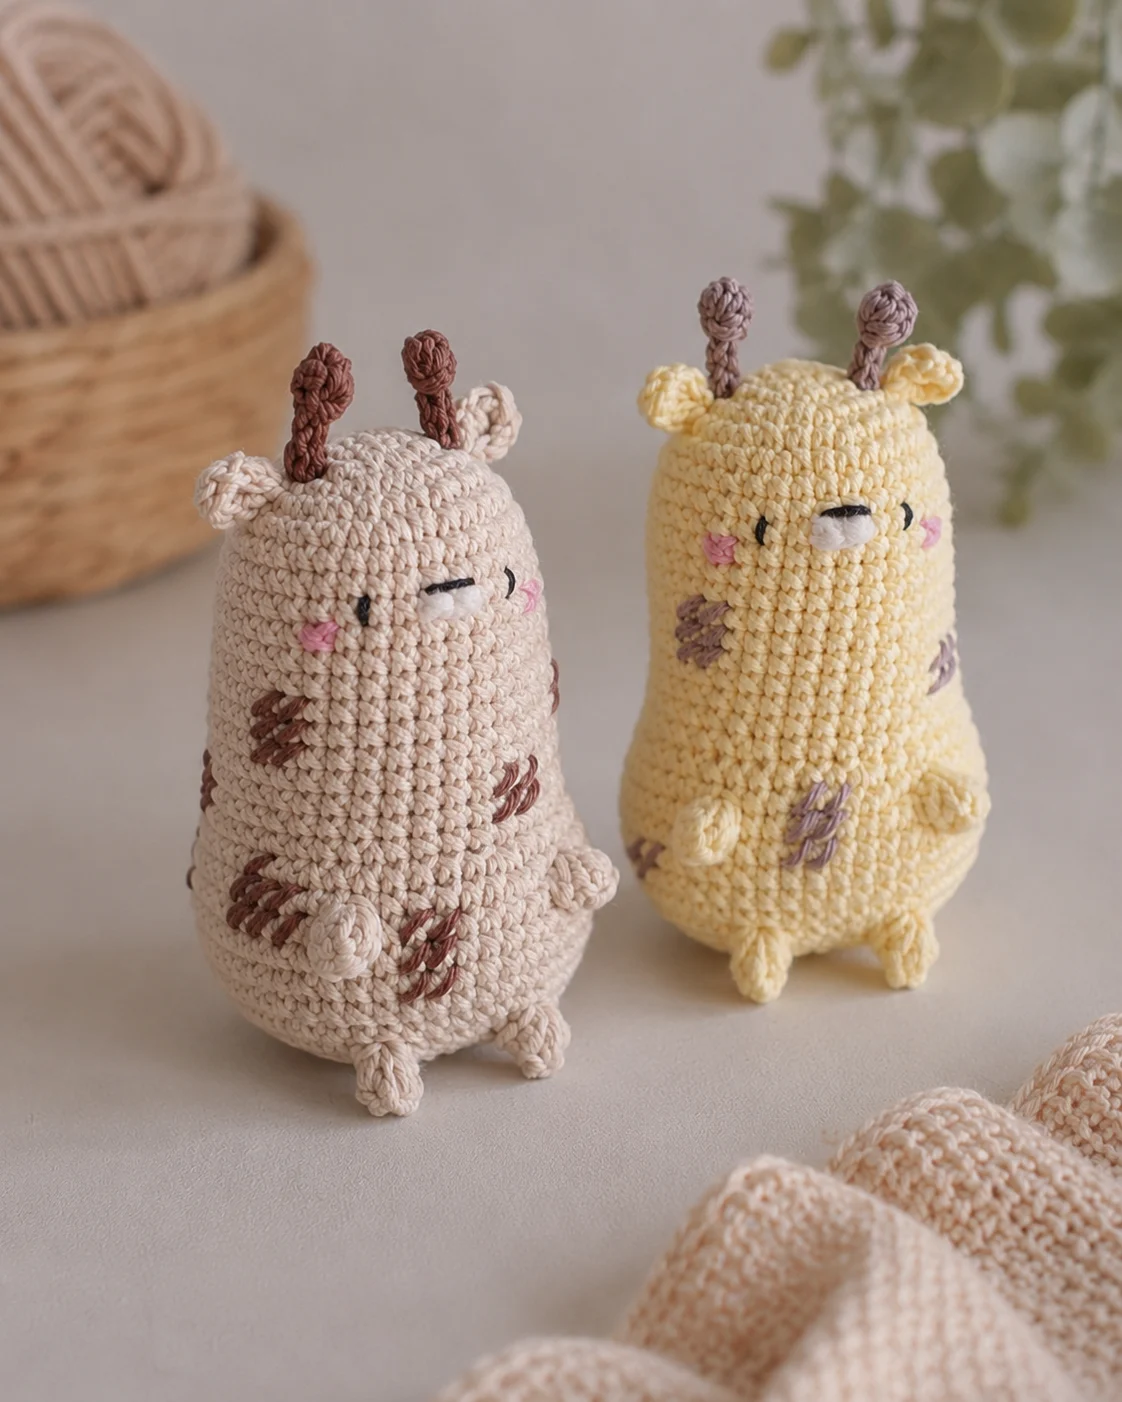
Few things are sweeter than a soft, long-necked little giraffe sitting on a nursery shelf or tucked into a baby’s arms. With its tall neck, gentle smile, and tiny ossicones (those little horn-like bumps on a giraffe’s head), this baby giraffe amigurumi is full of personality — and it’s surprisingly beginner-friendly to make.
This pattern is worked mostly in one continuous piece, starting at the top of the head and flowing down through the neck and body. Only the ears and ossicones are made separately and sewn on, so there’s very little assembly. The face is embroidered rather than using safety eyes, which makes the finished giraffe safe for babies and small children.
Whether you’re making it for a baby shower, nursery decor, or just because you’ve fallen in love with giraffes, this is a deeply rewarding little project. Let’s get started.
What You’ll Be Making
You’ll create a sitting baby giraffe roughly 6–8 inches tall, with:
- A round head with embroidered eyes, nose, and a tiny smile
- A long, sturdy neck — the giraffe’s signature feature
- A soft body with popcorn-stitch arms and legs for cute, bobble-like limbs
- Two ears and two ossicones (little horns) attached to the head
- Optional brown spots embroidered or appliquéd around the body for that classic giraffe look
The whole thing sits up on its own, making it perfect for shelves and photo moments.
Materials Needed
- Yarn: Sport or DK weight (light worsted) yarn in:
- Yellow or golden — about 50–70 g for the main body
- Brown — small amount for spots and ossicones
- Beige or light brown — optional, for a contrasting muzzle
- Black — small amount for embroidering the face
- Crochet hook: 2.5 mm to 3.0 mm (use a smaller hook than your yarn label suggests so stitches stay tight enough to hide the stuffing)
- Polyester or wool fiberfill stuffing
- Yarn / darning needle for sewing and embroidering
- Stitch markers
- Scissors
- Pins for positioning ears and ossicones before sewing
- Safety eyes (optional — but embroidery is strongly recommended for a baby-safe version)
Tip: A slightly smaller hook than your yarn’s recommended size is the single biggest secret to professional-looking amigurumi. It keeps stitches dense, prevents stuffing from peeking through, and gives that crisp, plump finish.
Crochet Abbreviations
This pattern uses US crochet terminology.
| Abbreviation | Meaning |
|---|---|
| MR | magic ring |
| sc | single crochet |
| inc | increase (2 sc in one stitch) |
| dec | decrease (sc 2 stitches together) |
| sl st | slip stitch |
| ch | chain |
| hdc | half double crochet |
| dc | double crochet |
| BLO | back loop only |
| FLO | front loop only |
| popcorn / puff | 5 dc into one stitch, remove hook, reinsert into the first dc, then pull through to form a bobble |
| ( ) * | repeat the sequence in parentheses the indicated number of times |
| [ ] | total stitch count for that round |
Skill Level & Time
Skill level: Beginner to advanced beginner. If you can do single crochet, increases, and decreases, you can make this giraffe. The popcorn stitches add fun texture but they’re easy once you’ve tried one or two.
Time to make: Around 4–8 hours, depending on your pace — a perfect weekend project.
Before You Begin — Please Read
A few quick notes that will make the pattern much smoother:
- The giraffe is worked in continuous rounds (a spiral). Use a stitch marker at the start of each round and move it up as you go — this is essential for not losing your place.
- The whole body, neck, and head are made as one piece, starting from the head and working down.
- Only the ears and ossicones are made separately.
- For a baby-safe giraffe, skip safety eyes entirely and embroider the face with black yarn.
Part 1: Head & Neck (Worked as One Piece)
Start with yellow yarn.
- R1: 6 sc in a magic ring [6]
- R2: Inc in every st [12]
- R3: (1 sc, 1 inc) around [18]
- R4: (2 sc, 1 inc) around [24]
- R5: (3 sc, 1 inc) around [30]
- R6: (5 sc, 1 inc) around [35]
This forms the round head.
The Neck
- R7–R18: 35 sc in each st — work 12 rounds with no shaping [35]
You’ll see the signature giraffe neck building up. Stuff the head firmly now and start lightly stuffing the neck as you go — this prevents the long neck from flopping later.
Part 2: Shoulders & Body Shaping
This section transitions from the neck into the wider body and adds a sweet textural ridge where the neck meets the shoulders.
- R19: (6 sc, 1 inc) around [40]
- R20: Working in BLO, 40 sl st around — this creates a defined ridge at the base of the neck
- R21: Working in FLO of the same round you just slip-stitched, (9 sc, 1 inc) around [44]
- R22: (10 sc, 1 inc) around [48]
Why the BLO/FLO trick? Slip-stitching in the back loops leaves the front loops free. When you continue working in those free front loops, you create a small “shelf” ridge that beautifully defines the giraffe’s shoulders — a tiny detail that gives the finished plushie a polished look.
Part 3: The Arms (Popcorn Stitch Row)
This round places the giraffe’s front arms as cute popcorn bobbles.
- R23: 16 sc, 1 popcorn, 9 sc, 1 popcorn, then sc to the end of the round [48 with 2 popcorns]
- R24–R27: 48 sc in each st — work 4 plain rounds [48]
The two popcorn stitches will pop out like soft little arms.
Popcorn refresher: Work 5 dc into one stitch, then drop the working loop from your hook. Insert the hook into the top of the first dc, pick up the dropped loop, and pull it through. Pull snug. That’s one popcorn.
Part 4: Lower Body & Legs
Now you’ll shape the rounded bottom and place two more popcorns for the front legs. Stuff the body firmly as you go from here on — once the opening is small, it’s hard to add more stuffing later.
- R28: Work two more popcorns for the front legs, evenly spaced on the front of the body, with sc between them. For example: 14 sc, 1 popcorn, 8 sc, 1 popcorn, sc to end [48 with 2 popcorns]
- R29: (6 sc, 1 dec) around [42]
- R30: (5 sc, 1 dec) around [36]
- R31: (4 sc, 1 dec) around [30]
- R32: (3 sc, 1 dec) around [24]
- R33: (2 sc, 1 dec) around [18]
- R34: (1 sc, 1 dec) around [12]
- R35: 6 dec [6]
Finish stuffing before this final round closes too tightly. Cut the yarn, leaving a tail, and use it to close the small remaining hole. Weave in the end inside the body.
Shape the bottom gently with your hands so the giraffe sits upright.
Part 5: Ears (Make 2)
With yellow yarn:
- Chain 7
- Starting from the 3rd ch from the hook, work clusters of sc or hdc along the chain to create a softly rounded teardrop shape
- Slip stitch along the base to finish
- Cut the yarn, leaving a long tail for sewing
Pinch the base of each ear slightly as you sew it on to give it dimension. Attach the ears to the sides of the head, just above the eye line.
Part 6: Ossicones / Horns (Make 2)
The ossicones are the small horn-like bumps on top of a giraffe’s head.
With brown yarn:
- Start with a magic ring of 4 sc [4]
- Round 2: 4 sc [4]
- Round 3: 4 sc [4]
- Optional Round 4: change to yellow and work 1–2 more rounds for a yellow base under the brown tip
Cut the yarn, leaving a long tail. Lightly stuff if you’d like more dimension. Sew the two ossicones to the top of the head, slightly forward of the ears and close together.
Part 7: Finishing the Face & Spots
This is where the giraffe gets its personality.
- Eyes: Using black yarn and your darning needle, embroider two small oval or oblong eyes about 4–5 rounds below the top of the head. Add tiny white highlight stitches if you like.
- Nose & nostrils: Embroider two small black dots low on the face for nostrils.
- Mouth: Embroider a small curved smile beneath the nostrils.
- Spots: Using brown yarn, embroider small irregular patches scattered around the body and neck for that signature giraffe pattern. Alternatively, cut small felt circles and stitch them on.
Weave in all ends securely, especially anything near the face.

Helpful Tips for First-Time Amigurumi Makers
- Use a stitch marker every round — losing your place mid-pattern is the #1 frustration with amigurumi, and a marker prevents it entirely.
- Stuff in small handfuls. Big clumps create lumps; small pieces packed firmly give a smooth, plump finish.
- Don’t overstuff. Too much stuffing stretches the stitches open and you’ll see white poking through.
- Keep your tension consistent. If you can see stuffing, go down a hook size.
- Take breaks. Long stretches of single crochet — especially that 12-round neck — can tire your hands. Stretch and stop now and then.
- For baby gifts, embroider the face fully and avoid any glued or plastic parts.
Common Mistakes & How to Fix Them
Lopsided head or body. This almost always means a missed increase or decrease. Count your stitches at the end of every round and write the count down if needed.
Popcorns sitting flat instead of popping. Your tension is too tight. Loosen up slightly on the 5 dc, and don’t pull too hard when reinserting the hook.
Stuffing showing through. Either your stitches are too loose or you’ve overstuffed. Drop down a hook size next time, and add stuffing more conservatively.
Floppy neck. Stuff the neck firmly as you crochet it, not after — once the body is closed, it’s hard to push stuffing up into the neck. The BLO ridge round also gives extra structural support.
Trouble closing the bottom. Make sure to add the final bits of stuffing before your stitch count drops below about 10. Use your yarn needle to weave through the front loops of the last round and pull tight to close cleanly.
Make It Your Own
This pattern is full of room for creativity:
- Color it differently. A pastel pink-and-cream giraffe, a soft grey one, or a rainbow-spotted version all look adorable.
- Add accessories. A tiny crocheted scarf, a bow tie, or a bandana around the neck adds instant character.
- Scale it down. Use thinner yarn and a smaller hook for a keychain-sized giraffe.
- Make it a rattle. Insert a small, securely-stitched rattle insert before closing the body. Always make sure it can’t come loose if it’s for a baby.
- Change the pose. Lengthen or shorten the body shaping rounds for a standing rather than sitting giraffe.
Size & Color Suggestions
With DK yarn and a 2.5–3 mm hook, expect a finished giraffe around 6–8 inches tall when seated. The classic look is bright yellow with chocolate brown spots and ossicones, but soft beige and taupe make a gorgeous neutral nursery version. A speckled or variegated yarn adds subtle texture without needing to embroider many spots.
For a larger giraffe, use bulkier yarn and a larger hook — just be aware that the proportions will shift slightly with thicker yarn.
You Did It!
Step back and look at your finished giraffe. From a magic ring and a ball of yellow yarn, you’ve made a tall, cheerful little creature with its own personality. It might not be flawless — handmade plushies never are — but that’s exactly what makes it special. Every uneven stitch, every slightly tilted ossicone, is part of its charm.
If you loved this make, here are a few more cute amigurumi projects to try next:
- Free Triceratops Amigurumi Crochet Pattern — another cuddly animal friend for the collection
- No-Sew Mochi Bunny Crochet Pattern — a quick, gift-ready beginner project
- Crochet No-Sew Axolotl Free Amigurumi Pattern — another beginner-friendly cuddly creature
- Miffy Pillow Crochet Pattern — a cozy no-sew make perfect for a nursery
Happy crocheting! ❤️
Frequently Asked Questions
Is this a no-sew pattern? It’s mostly seamless — the head, neck, and body are all one continuous piece. Only the two ears and two ossicones are sewn on at the end, so there’s very little assembly compared to traditional amigurumi.
Can a complete beginner really make this? Yes. If you’ve done a simple amigurumi ball or sphere before, you can do this. The popcorn stitches add a small new technique, but they’re forgiving and only appear in a couple of stitches.
How long does it take to make? Around 4–8 hours total, depending on your pace and how often you take breaks. The neck section is the longest stretch of repetitive sc, so that’s where most people pause.
Is it safe for babies? Yes — provided you embroider the eyes and face rather than using safety eyes, and weave in every yarn end securely. Avoid glued embellishments or anything that could come loose.
What if I want a larger giraffe? Use bulkier yarn (worsted or chunky) and a matching larger hook. The proportions will be slightly different, but the pattern works at any scale.
My popcorn stitches look messy. What can I do? Loosen your tension a touch on the 5 dc, make sure each dc is the same height, and pull the popcorn closed firmly but evenly. The first one or two often look awkward — they get better quickly with practice.
Can I sell the giraffes I make from this pattern? You’re welcome to sell finished giraffes you make from this pattern. Please don’t resell or redistribute the pattern itself, and a credit link back to this blog is always appreciated if you share your work online.