Ned and Norman Crochet Narwhal Pattern
About This Amigurumi Design
Introducing the Ned and Norman Crochet Narwhal Pattern, a charming crochet project that brings the whimsical world of narwhals to your craft table. This adorable amigurumi design features intricate details like a spiral tusk and delightful pectoral fins, making it a perfect project for those looking to create a unique stuffed toy. The pattern is suitable for crocheters with some experience, especially when it comes to mastering the adjustable ring technique and working in rounds.
Not only does this project allow you to express your creativity, but it also serves as a wonderful gift for children, friends, or anyone who loves marine life. With the potential for customization in colors, you can create various versions of Ned and Norman that reflect your personal style or the recipient’s favorite colors.
Materials
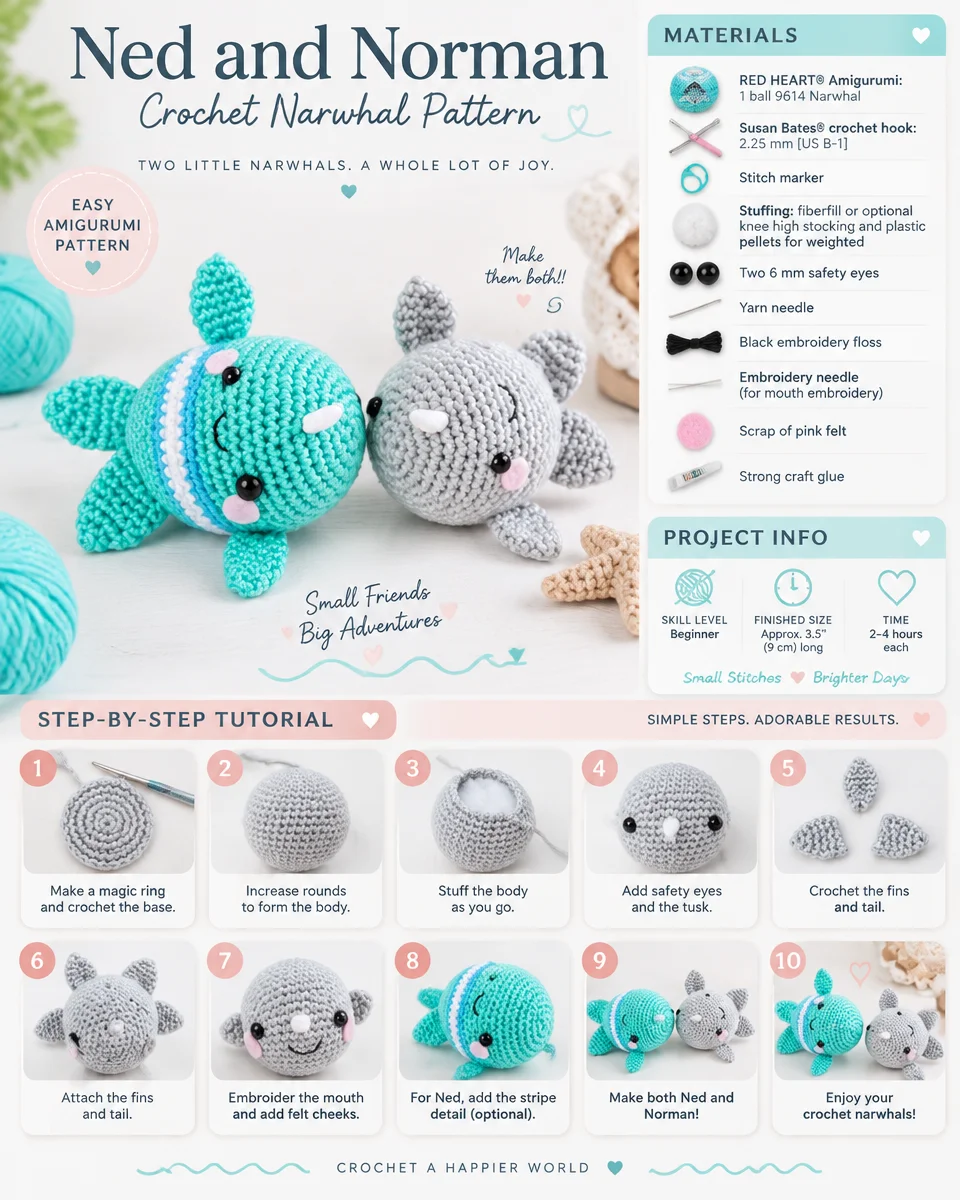
To create your crochet narwhal, gather the following materials:
Yarn
- RED HEART® Amigurumi: 1 ball of 9614 Narwhal
Crochet Hook
- Susan Bates® crochet hook: 2.25 mm [US B-1]
Stuffing
- Fiberfill or optional knee high stocking filled with plastic pellets for weighted stuffing
Accessories
- Stitch Marker
- Two 6 mm safety eyes
- Yarn Needle
- Black Embroidery Floss
- Embroidery Needle (for mouth embroidery)
- Scrap of Pink Felt
- Strong Craft Glue
- Wooden Toothpick (for tusk)
Optional Materials
- Knee high stocking and plastic pellets for weighted stuffing
Crochet Abbreviations
Here are the common crochet abbreviations used in this pattern:
- sc – Single Crochet
- sc2tog – Single Crochet Two Together
Color References
- Grey = A
- White = B
- Aqua = C
- Turquoise = D
Special Technique
Adjustable Ring
To create an adjustable ring:
- Wrap yarn into a ring, ensuring that the tail falls behind the working yarn.
- Grip the ring and tail between your middle finger and thumb.
- Insert your hook through the center of the ring, yarn over (with the working yarn), and draw up a loop.
- Work stitches of the first round in the ring. After the first round is worked, pull gently on the tail to tighten the ring.
Solid Color Body
Beginning at the Top of Head with A
-
Make an adjustable ring.
-
Round 1 (right side): Work 6 sc in ring; do not join, work in continuous rounds (spiral)—6 sc.
- Place a marker in the last sc worked to indicate the end of the round. Move the marker up as each round is completed.
-
Round 2: Work 2 sc in each of the next 6 sts—12 sc.
-
Round 3: Work 2 sc in each of the next 12 sts—24 sc.
-
Round 4: [Sc in next 2 sts, 2 sc in next st] 8 times—32 sc.
-
Round 5: Sc in each st around.
-
Round 6: [Sc in next 3 sts, 2 sc in next st] 8 times—40 sc.
-
Rounds 7–19: Sc in each st around.
Attach safety eyes between Rounds 10 and 11, about 8 stitches apart.
-
Round 20: [Sc in next 3 sts, sc2tog] 8 times—32 sc.
-
Round 21: [Sc in next 2 sts, sc2tog] 8 times—24 sc.
-
Begin stuffing the piece with fiberfill or place an optional knee high, filled with plastic pellets, into the piece. Continue stuffing as work progresses.
-
Round 22: [Sc in next st, sc2tog] 8 times—16 sc.
-
Round 23: [Sc in next 2 sts, sc2tog] 4 times—12 sc.
-
Rounds 24 and 25: Sc in each st around.
-
Round 26: Work 2 sc in each of the next 12 sts—24 sc.
-
Round 27: [Sc in next 3 sts, 2 sc in next st] 6 times—30 sc.
-
Fasten off.
Tail (Solid Narwhal)
-
Flatten the last few rounds so that stitches at the back match stitches at the front, forming a double row of stitches.
-
Working through both thicknesses, join A with a slip stitch in the center stitch.
Note: When flattening the last few rounds, ensure the ends of rounds are centered at the back of the piece.
First Tail Fin
- Round 1: Sc in next 14 sts; leave remaining sts unworked—14 sc.
- Place a marker in the last sc made to indicate the end of the round. Move the marker up as each round is completed.
- Rounds 2 and 3: Sc in each st around.
- Round 4: [sc2tog, sc in next 5 sts] twice—12 sc.
- Round 5: [Sc in next st, sc2tog] 4 times—8 sc.
- Round 6: {Sc2tog} 4 times—4 sc.
- Fasten off. Weave in and trim ends.
Second Tail Fin
- Round 1: Join A with sc in the first unworked st following the center stitch, sc in next 13 sts—14 sc.
- Rounds 2–6: Work the same as Rounds 2–6 of the first tail fin.
- Fasten off. Weave in and trim ends.
Striped Body
Beginning at the Top of Head with C
-
Make an adjustable ring.
-
Rounds 1–13: With C, work the same as Rounds 1–13 of the solid narwhal body and change to D in the last st of Round 13—40 sc.
-
Rounds 14 and 15: With D, sc in each st around and change to B in the last st of the last round.
-
Rounds 16 and 17: With B, sc in each st around and change to D in the last st of the last round.
-
Rounds 18 and 19: Repeat Rounds 14 and 15.
Attach safety eyes between Rounds 10 and 11, about 8 stitches apart.
-
Round 20: With B, [sc in next 3 sts, sc2tog] 8 times—32 sc.
-
Round 21: With B, [sc in next 2 sts, sc2tog] 8 times and change to D in the last st—24 sc.
-
Begin stuffing the piece with fiberfill or place an optional knee high, filled with plastic pellets, into the piece. Continue stuffing as work progresses.
-
Fasten off B.
-
Round 22: With D, [sc in next st, sc2tog] 8 times—16 sc.
-
Round 23: With D, [sc in next 2 sts, sc2tog] 4 times and change to C in the last st—12 sc.
-
Fasten off D. Work the remainder of the piece with C only.
-
Rounds 24–27: With C, work the same as Rounds 24–27 of the solid narwhal body.
-
Fasten off.
Tail (Striped Narwhal)
-
Flatten the last few rounds so that stitches at the back match stitches at the front, forming a double row of stitches.
-
Working through both thicknesses, join C with a slip stitch in the center stitch.
Note: When flattening the last few rounds, ensure that the color changes are centered at the back of the piece.
-
With C, work the tail and tail fins the same as for the solid narwhal body.
-
Fasten off. Weave in and trim ends.
Pectoral Fins (Make 2 for Each Narwhal)
- If making a solid narwhal, use yarn color A.
- If making a striped narwhal, use yarn color C.
Pectoral Fin Construction
- Make an adjustable ring.
- Round 1 (right side): Work 6 sc in the ring; do not join, work in continuous rounds (spiral)—6 sc.
- Place a marker in the last sc worked to indicate the end of the round. Move the marker up as each round is completed.
- Round 2: [Sc in next st, 2 sc in next st] twice, sc in the last 2 sts—8 sc.
- Round 3: [Sc in next st, 2 sc in next st] 4 times—12 sc.
- Rounds 4 and 5: Sc in each st around.
- Round 6: [Sc in next st, sc2tog] 4 times—8 sc.
- Round 7: Sc in each st around.
- Fasten off, leaving a long tail for sewing the fin to the body. If needed, thread the beginning yarn tail through stitches at the beginning of the piece and pull to close the opening. Weave in and trim the beginning tail only.
Finishing
Assembly / Sewing
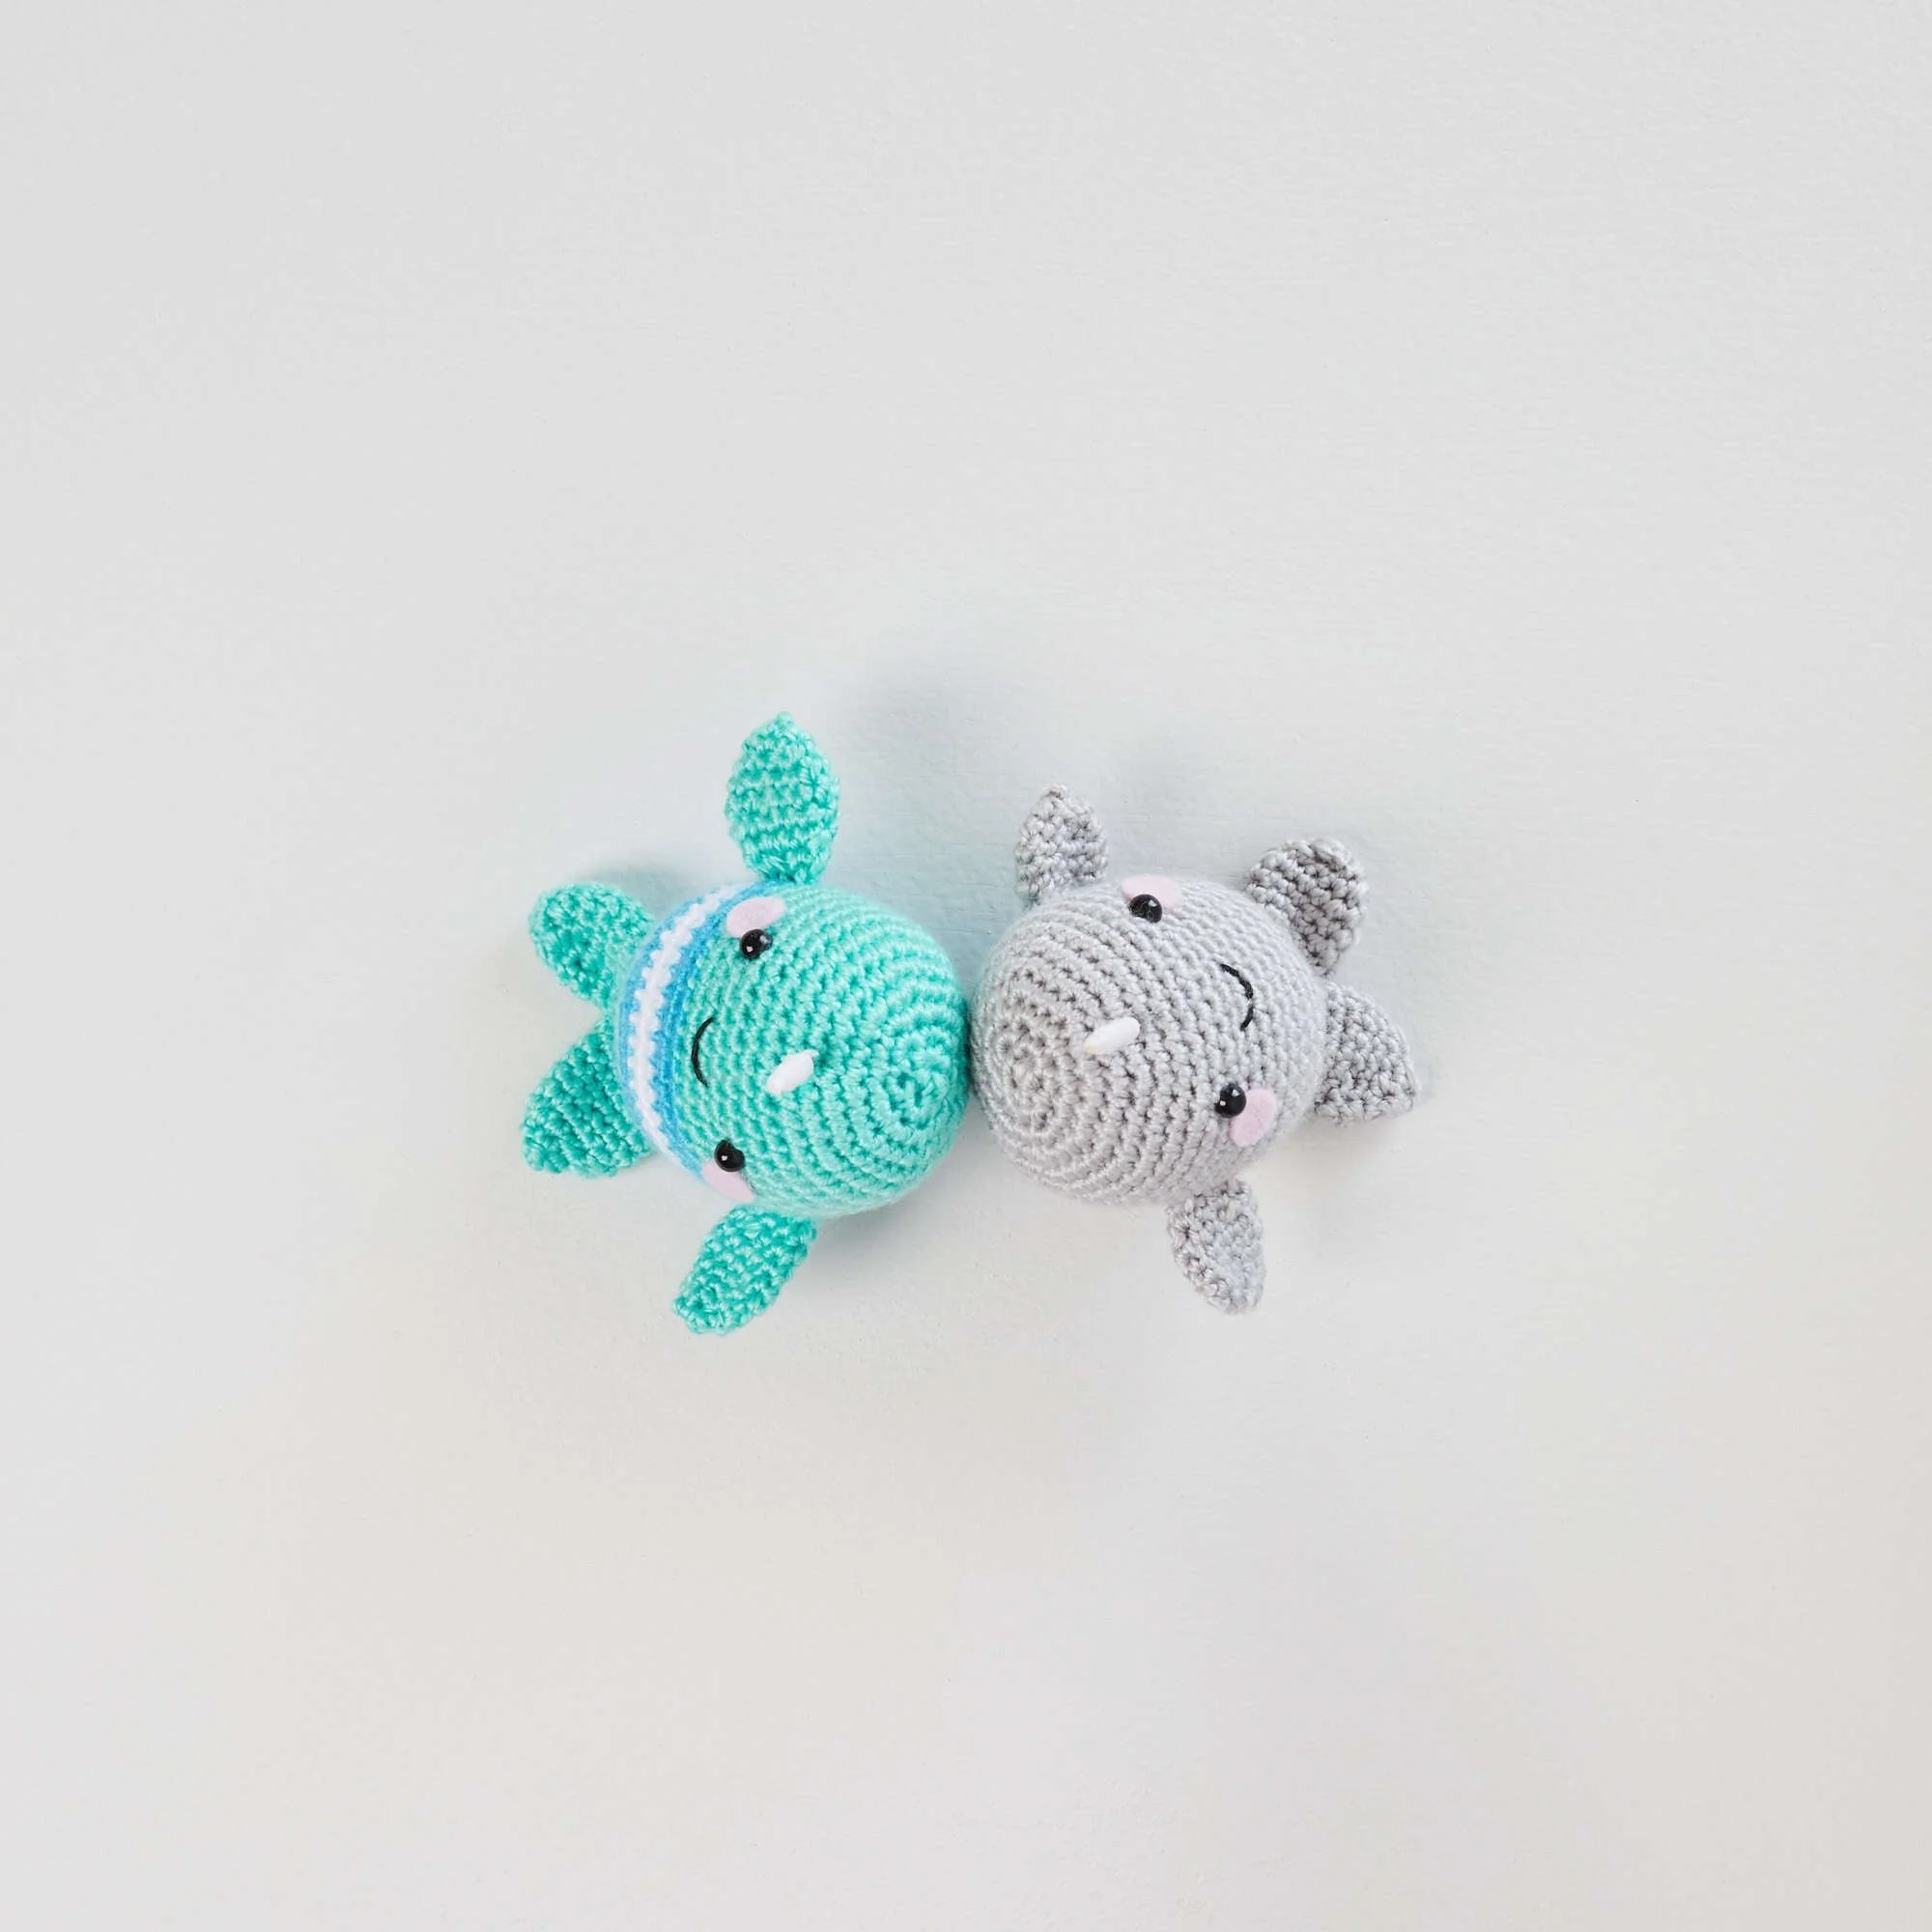
- Referring to the photograph as a guide to placement, sew the pectoral fins to the sides of the body, near Round 13.
- With the embroidery needle and 2 strands of black embroidery floss, embroider a smile in the middle of the face over Round 13, about 3 stitches wide.
- Cut two small circles from pink craft felt. Using the photograph as a guide, glue the cheeks to the face directly under and to the outside of the eyes.
Tusk
- Generously coat about half of the wooden toothpick with strong craft glue.
- Beginning near the center of the toothpick, wrap B-colored yarn around the toothpick, wrapping up to the point. Hold the wraps until the yarn adheres. Trim the yarn evenly when glue is dry.
- After the tusk is dry, place a small amount of glue on the unwrapped end of the toothpick and insert it into Round 6 at the center of the narwhal’s forehead. Allow glue to dry.
- Weave in and trim any remaining ends.
Frequently Asked Questions
What crochet hook is used for this pattern?
The pattern uses a Susan Bates® crochet hook in 2.25 mm [US B-1] size.
Is this project worked in rows or rounds?
The Ned and Norman Crochet Narwhal is worked in rounds throughout.
How many pieces does this project consist of?
The project consists of the body, tail, two tail fins, and two pectoral fins, making it a multi-component project.
Does this crochet project require assembly?
Yes, assembly is required to attach the fins and tusk to the body.
Can I customize the colors of this pattern?
Absolutely! The design allows for customization in color combinations using the specified yarns, enabling you to create different versions of the narwhal.
Conclusion
The Ned and Norman Crochet Narwhal Pattern is a delightful project that combines creativity and craftsmanship. With easy-to-follow instructions and customization options through color selection, creating your own little narwhal will be a rewarding experience. Happy crocheting!