Larry and Linda Crochet Llama Pattern
Crochet enthusiasts, get ready to meet Larry and Linda, the adorable crochet llamas that will surely steal your heart! This amigurumi project presents an easy and enjoyable crochet challenge for both beginners and experienced crafters. Let’s dive right into the details of bringing these lovable llamas to life!
About the Crochet Project
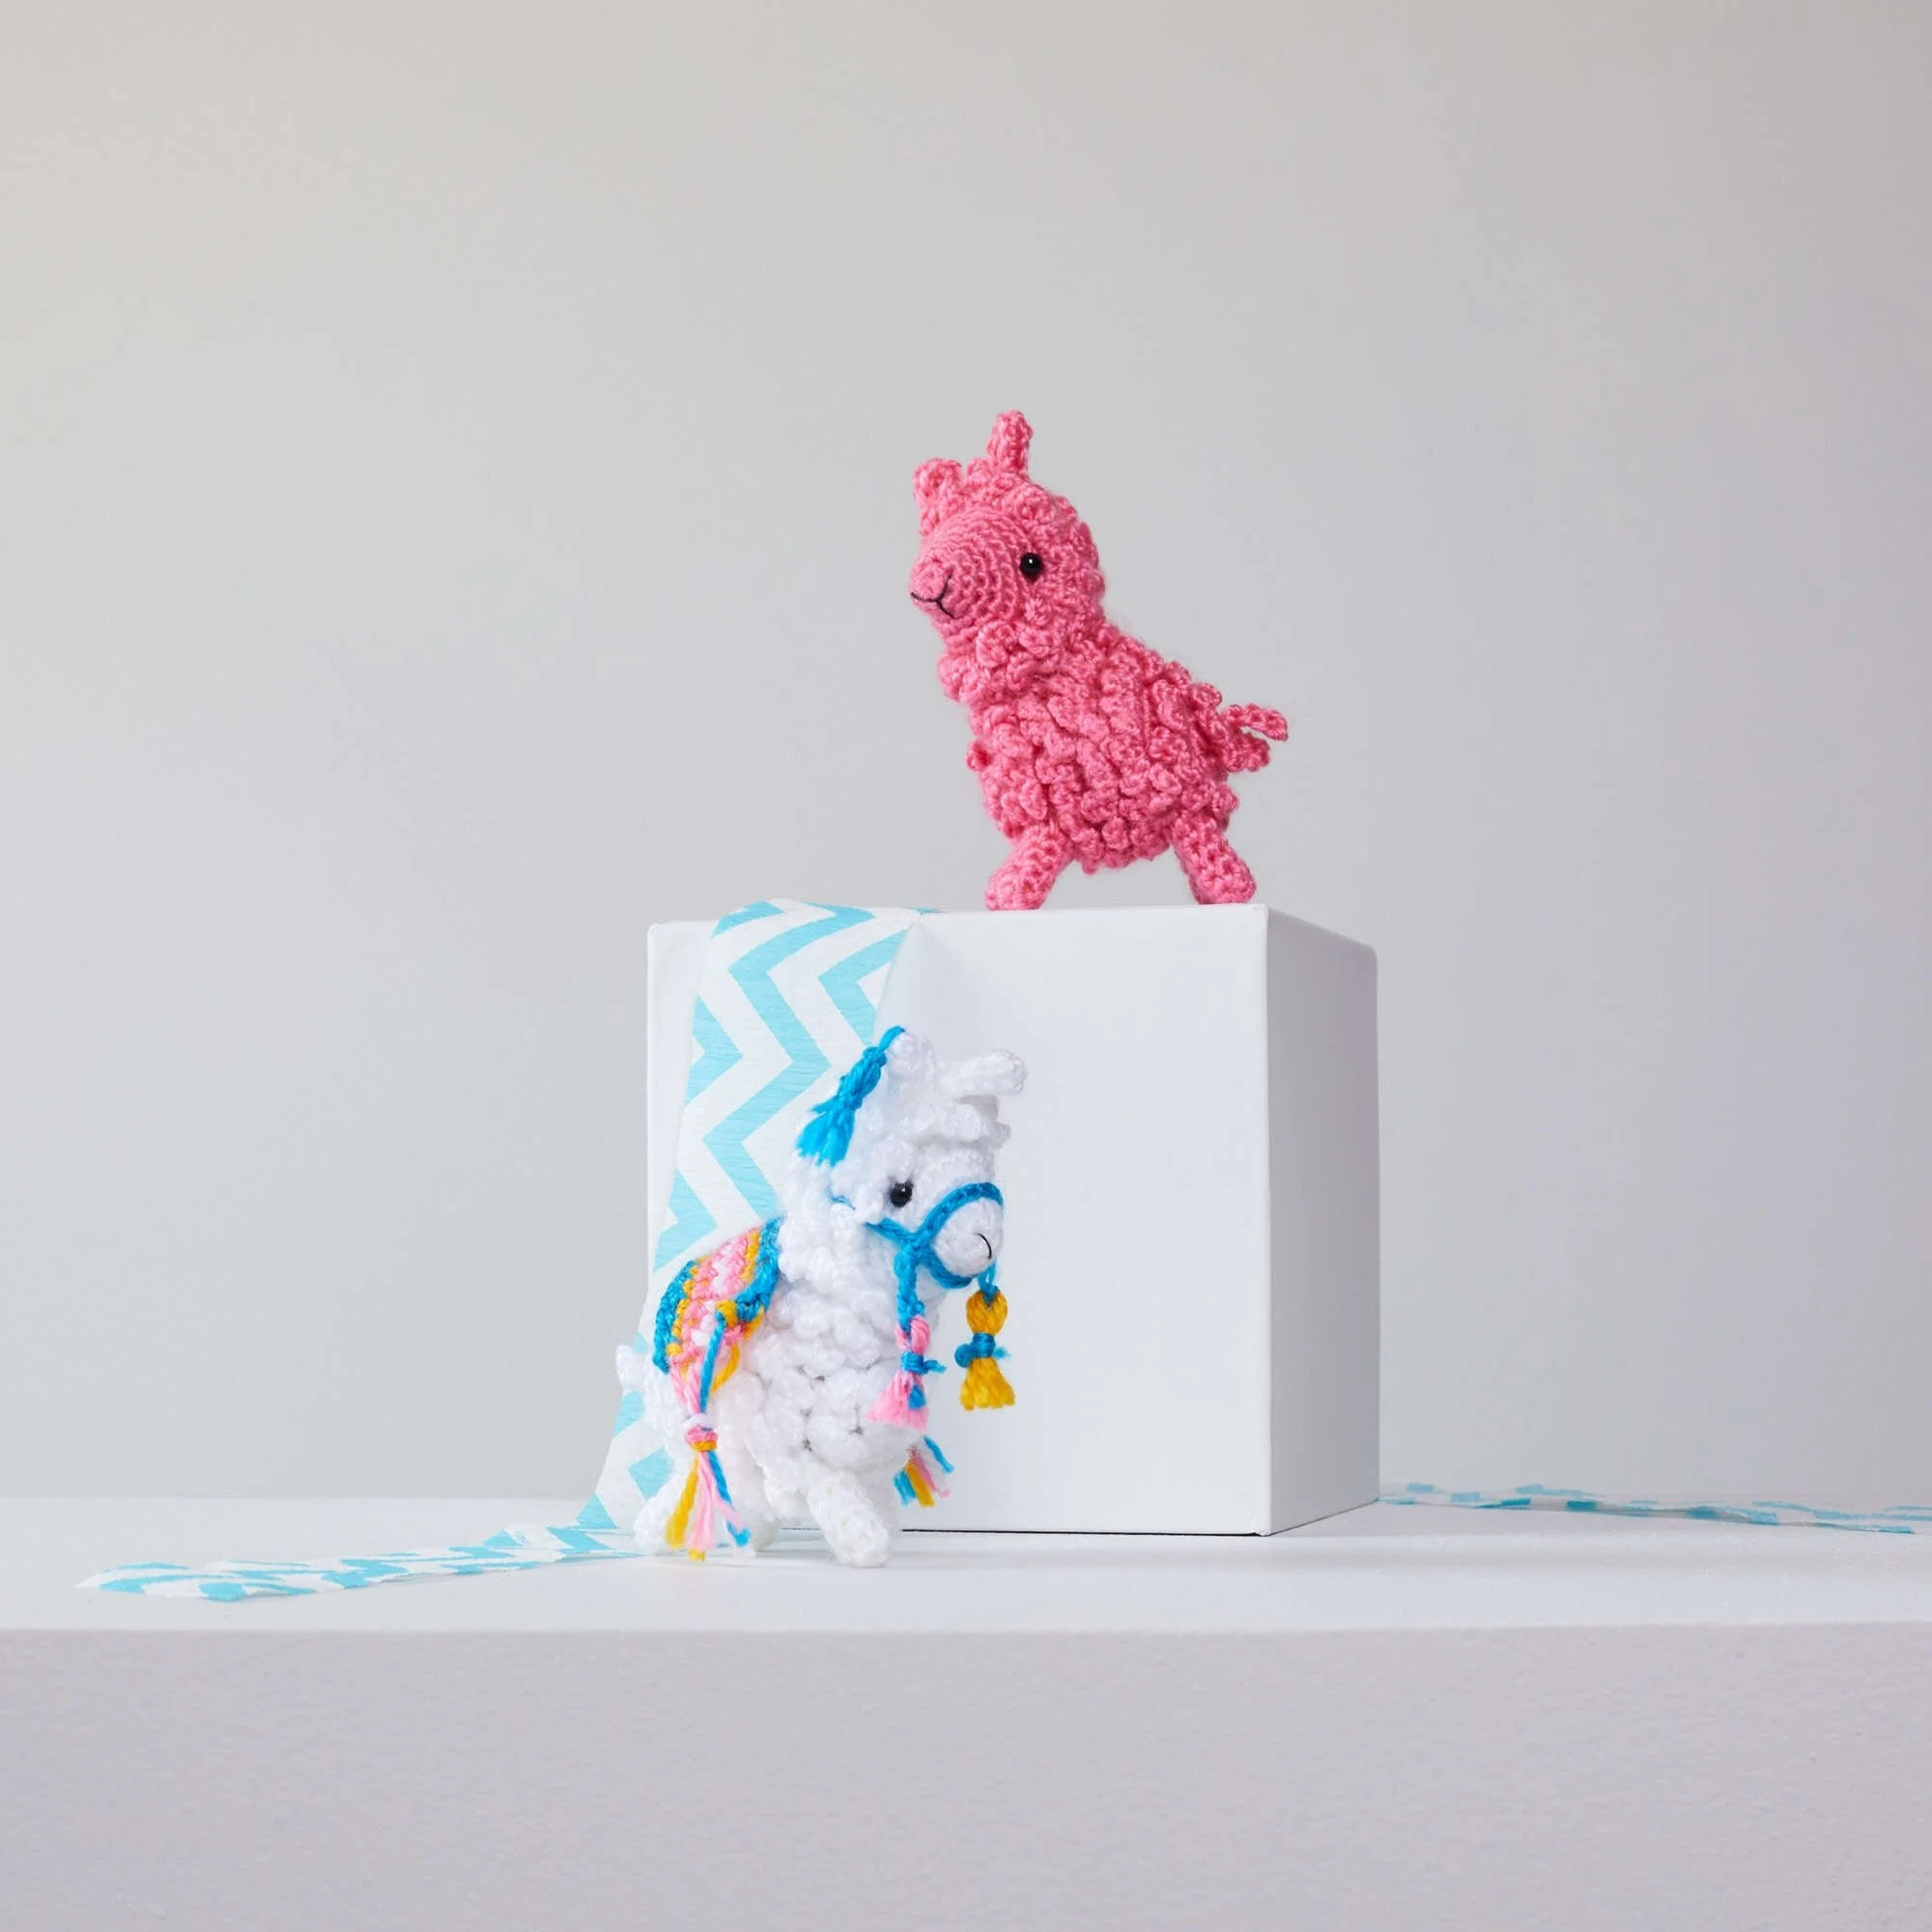
The Larry and Linda Crochet Llama Pattern is a delightful amigurumi design that allows you to create two charming llamas, complete with a cozy blanket. Using vivid colors and simple crochet techniques, these llamas are perfect for gifts, decoration, or cuddling companions.
Materials
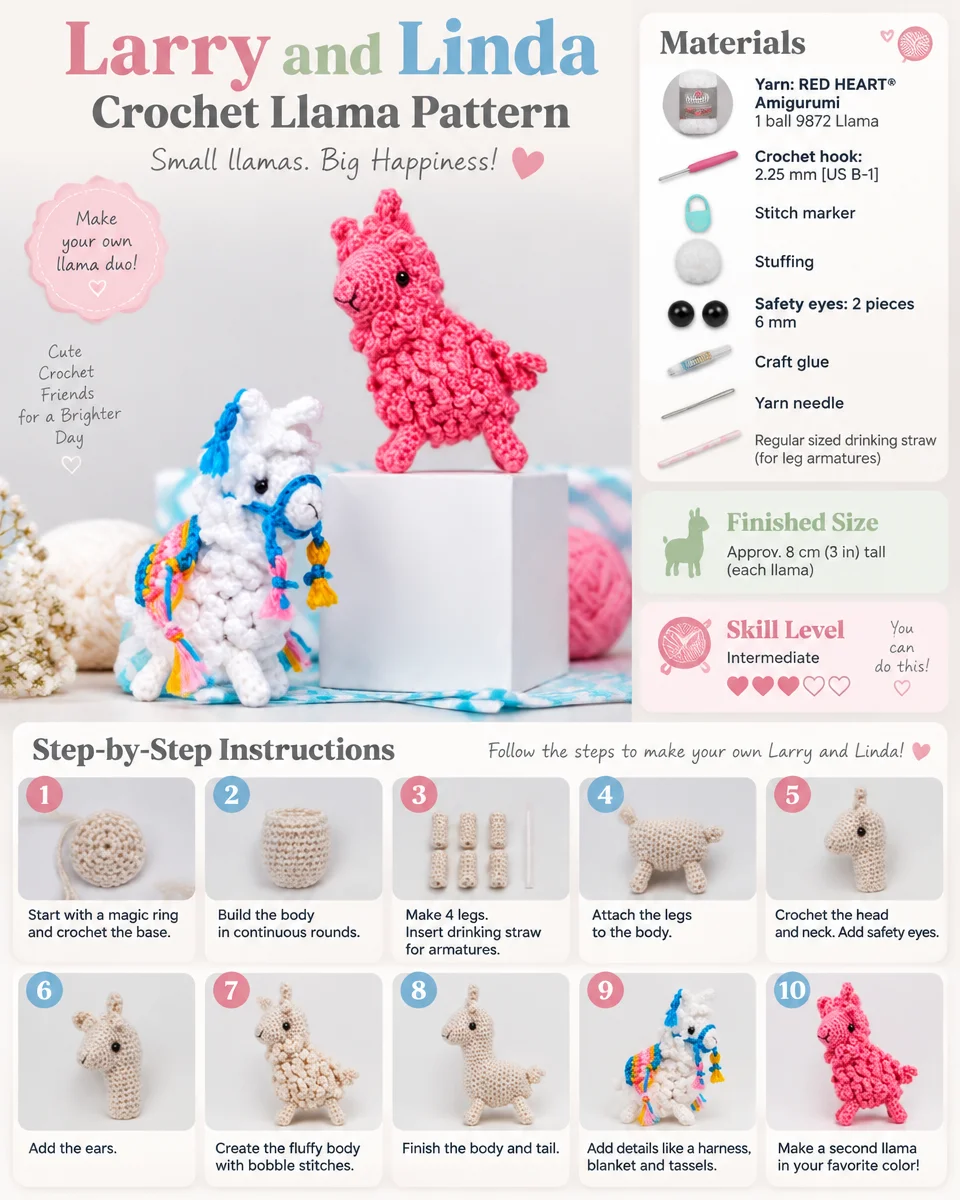
To create your very own llamas, you will need the following materials:
Yarn
- RED HEART® Amigurumi, 1 ball 9872 Llama: This yarn provides a soft, durable finish, ideal for your amigurumi project.
- Additional blanket colors: Colors C, D, B, A as specified in the instructions.
Crochet Hook
- 2.25 mm [US B-1] crochet hook.
Notions
- Stitch marker
- Stuffing (fiberfill or weighted stuffing as desired)
- Safety eyes: 2 pieces, 6 mm
- Craft glue
- Yarn needle
- Regular-sized drinking straw (for leg armatures)
- Black embroidery floss
- Embroidery needle (for nose embroidery)
Optional
- Pins
- Knee-high stocking
- Plastic pellets (for weighted stuffing)
Fleece Attachment
Almost all of the fleece color yarn is needed to make each llama (see notes).
Crochet Abbreviations
- sc: single crochet
- sc2tog: single crochet two stitches together
- ch: chain
- st: stitch
- sts: stitches
- rnd: round
Skill Level
CROCHET SKILL LEVEL: EASY
Special Stitches
- sc2tog (single crochet 2 stitches together):
[Insert hook in next stitch, yarn over and pull up a loop] twice, yarn over and draw through all 3 loops on the hook.
Special Technique
- Adjustable ring:
Wrap yarn into a ring, ensuring the tail falls behind the working yarn. Grip the ring and tail between the middle finger and thumb. Insert the hook through the center of the ring, yarn over and draw up a loop. Work stitches of the first round in the ring. After the first round, pull gently on the tail to tighten the ring.
Construction Overview
This crochet pattern involves the following components:
- Body
- Head/Neck
- Legs
- Ears
- Tail
- Fleece
- Blanket
- Halter
- Tassels
Body
Start with color A or B and make an adjustable ring.
-
Round 1 (right side): Work 6 sc in ring; do not join, work in continuous rounds (spiral)—6 sc.
Place the marker in the last sc worked to indicate the end of the round and move the marker up each round. -
Round 2: Working in back loops only, work 2 sc in each of the next 6 sts—12 sc.
-
Round 3: [sc in next st, 2 sc in next st] 6 times—18 sc.
-
Round 4: Working in back loops only, [sc in next 2 sts, 2 sc in next st] 6 times—24 sc.
-
Round 5: Sc in each st around.
-
Round 6: Working in back loops only, sc in next 18 sts, ch 6, skip the last 6 sts (for neck opening)—18 sc and 1 ch-6 space.
-
Round 7: Sc in next 18 sts, sc in next 6 ch—24 sc.
-
Round 8: Working in back loops only, sc in each st around.
-
Round 9: Sc in each st around.
-
Round 10: Repeat Round 8.
-
Round 11: [sc in next 2 sts, sc2tog] 6 times—18 sc.
-
Round 12: Working in back loops only, [sc in next st, sc2tog] 6 times—12 sc.
-
Round 13: [sc2tog] 6 times—6 sc.
Tail: Ch 6, sc in 2nd ch from hook and next 4 ch.
Fasten off, leaving a long yarn tail. Thread the tail through the stitches of Round 13 and pull to close the opening and anchor the tail. Weave in and trim the tail.
Stuffing: After Round 13, stuff the body with fiberfill or insert a knee-high filled with pellets through the neck opening.
Head/Neck
With the same yarn color used for the body, make an adjustable ring.
-
Round 1 (right side): Work 6 sc in a ring; do not join, work in continuous rounds (spiral)—6 sc.
Place the marker in the last sc worked to indicate the end of the round and move the marker up each subsequent round. -
Round 2: Work 2 sc in each of the next 6 sts—12 sc.
-
Rounds 3 and 4: Sc in each st around.
-
Round 5: Work 2 sc in each of the next 12 sts—24 sc.
-
Rounds 6–8: Sc in each st around.
-
Round 9: Working in back loops only, sc in next 18 sts, ch 6, skip the last 6 sts (for neck opening)—18 sc and 1 ch-6 space.
-
Round 10: Sc in next 18 sts, sc in next 6 ch—24 sc.
-
Round 11: Working in back loops only, sc in each st around.
-
Round 12: [sc in next 2 sts, sc2tog] 6 times—18 sc.
Attach safety eyes: Between Rounds 7 and 8, about 10 or 11 stitches apart. Place both eyes an equal distance from the edges of the neck opening just made so they sit correctly when the neck is added.
Stuffing: Begin stuffing the head and continue to stuff as the work progresses. Do not use weighted stuffing in the head.
- Round 13: Working in back loops only, [sc2tog] 9 times—9 sc.
Fasten off. Weave in and trim ends.
Neck (of head/neck piece)
Join yarn with a slip stitch in any st of the neck opening.
In the next round, stitches worked into each stitch (including the chains of the ch-6) around the neck opening.
-
Neck Round 1: Ch 1, sc in the same st as joining, in each st around, and in the left and right side edges of the opening—14 sc.
Place marker in the last sc worked to indicate the end of the round and move the marker up each completed round. -
Neck Round 2: Working in back loops only, sc in each st around.
-
Neck Round 3: Sc in each st around.
-
Neck Round 4: Repeat Neck Round 2.
Fasten off, leaving a long tail for sewing the neck to the neck opening of the body.
Legs (make 4)
With the same yarn color as used for the body, make an adjustable ring.
-
Round 1 (right side): Work 6 sc in the ring; do not join, work in continuous rounds (spiral)—6 sc.
Place the marker in the last sc worked to indicate the end of the round and move the marker up each subsequent round. -
Rounds 2–6: Sc in each st around.
Fasten off, leaving a long tail for sewing the leg to the body. If needed, thread the beginning yarn tail through the stitches at the beginning of the piece and pull to close the opening. Weave in and trim the beginning tail only.
Leg armature: Insert a drinking straw into the leg and cut to size.
Ears (make 2)
With the same yarn color as used for the body: ch 12.
- Row 1: Working in back bumps only, sc in each bump across.
Fasten off, leaving a long tail. Fold the strip in half. With the tail, sew together edges that make up the opposite side of the foundation chain. Do not trim the tail; use later to sew the ear to the head.
Fleece (added after stuffing; uses free loops on surface)
Fleece Round (base instructions):
Join matching yarn with a slip stitch in any free loop of head Round 9,
ch 5, slip stitch in the same st, slip stitch in the next st;
(slip stitch, ch 5, slip stitch) in next st, slip stitch in next st; repeat from * around.
Fasten off and weave in ends.
Repeat Fleece Round around specific rounds/sections:
- Head: repeat around Rounds 11 and 13 of head
- Neck: repeat around Rounds 2 and 4 of neck
- Body: repeat around Rounds 2, 4, 6, 8, 10, and 12 of body
Blanket (worked as a striped rectangle)
With color C, leaving a long beginning tail for fringe: ch 15.
- Row 1: With C, sc in 2nd ch from hook and in each remaining ch across and change to D in the last st—14 sc.
- Row 2: With D, ch 1, turn, sc in each st across and change to B in the last st.
- Row 3: With B, ch 1, turn, sc in each st across and change to A in the last st.
- Row 4: With A, ch 1, turn, sc in each st across and change to B in the last st.
- Row 5: With B, ch 1, turn, sc in each st across and change to D in the last st.
- Row 6: With D, ch 1, turn, sc in each st across and change to C in the last st.
- Row 7: With C, ch 1, turn, sc in each st across.
Fasten off C, leaving a long tail for fringe.
Fringe assembly:
Hold all fringes along one side of the blanket together and tie an overhand knot about ½” [1.5 cm] from the edge of the blanket. Trim ends even, about ½” [1.5 cm] from the knot. Repeat on the other side of the blanket.
Finishing / Assembly
Sew pieces together (placement as guided by photo). Use yarn tails or yarn scraps.
-
Sew head/neck to body neck opening:
Position head facing forwards relative to the chest (or position to the side, if desired). Take care to sew all the way around the neck opening using a secure whipstitch. -
Sew ears to the top of the head between the first and second fleece rounds on the head, about 2 or 3 stitches apart.
-
Sew legs to the bottom portion of the body, between fleece rounds:
Position back legs about ½” [1.5 cm] from front legs. Place back legs very close together (so they touch) and place front legs very close together. To check for balance, pin or baste legs in place first then sew securely.
Embroider nose:
With an embroidery needle and 2 strands of black embroidery floss, embroider a “Y” shape for the nose. Embroider the “Y” beginning at the tip of the muzzle and about 3 rows high. Weave the floss back through the head and knot securely then bury the yarn in the head, trimming excess as needed.
Halter
Noseband:
With color C, ch 14; join with a slip stitch in the first ch to form a ring.
Note: this will be placed around the llama’s muzzle.
Head strap:
Ch 21.
Note: the strap fits around the llama’s head.
Fit and join:
Try the halter on for size and adjust as needed. Join the end of the head strap with a slip stitch in the opposite side of the noseband circle. Fasten off, knotting the yarn end securely. Place the halter on the llama.
Tassels (make 3: 1 each with B, C, D)
- Cut 2 lengths of C, about 3″ [7.5 cm] long for ties.
- Cut 3 strands of tassel color yarn, about 2″ [5 cm] long.
- Hold the 3 strands together and fold in half.
- Thread one of the 3″ [7.5 cm] ties through the fold then tie into a knot for the top of the tassel.
- Tie the remaining 3″ [7.5 cm] tie around the top of the tassel, about ⅛” [3 mm] below the top of the tassel, for the tassel neck. Trim ends even. Place a small dot of glue on the knot to secure.
Repeat to make all 3 tassels.
Placement:
Using a photograph as a guide, use yarn tails or scraps to tie two tassels to the halter where the noseband and head strap meet. Tie the third tassel to one of the llama’s ears.
Attach blanket:
Place the blanket on the back of the llama and tack in place using the same yarn color as the body.
Final weaving:
Weave in and trim any remaining ends.
Frequently Asked Questions
What crochet hook is used for this pattern?
You will need a 2.25 mm [US B-1] crochet hook.
Does this project require assembly?
Yes, the head, neck, ears, and legs must be sewn onto the body during assembly.
Is this pattern suitable for beginners?
This pattern is classified as easy, making it accessible for beginners who are familiar with basic crochet techniques.
Are the head and neck worked together?
No, the head and neck are separate pieces that are attached after completing each individually.
What kind of yarn is used for these llamas?
The pattern uses RED HEART® Amigurumi yarn in color 9872 Llama along with other additional colors for accents and the blanket.
Conclusion
Creating Larry and Linda the llamas using this crochet pattern is an enjoyable and fulfilling project for anyone interested in amigurumi. With simple stitches and clear instructions, you’ll soon have a pair of charming llamas to display or gift to someone special. Gather your materials, follow the steps, and enjoy the delightful process of crocheting these beloved creatures! Happy crocheting!