Crochet Love Bug Amigurumi Pattern
Crocheting your very own Love Bug Amigurumi is an exciting project that combines creativity with a touch of whimsy. This adorable crochet design features a charming little bug with wheels, making it perfect for gifts or as a decorative piece for your home. Let’s dive into the details and get you started on this delightful pattern!
About the Crochet Project
The Love Bug Amigurumi is an enjoyable crochet project that comprises multiple components including the main body, fenders, wheels, flowers, and lights. The finished product is not only cute but also functional as a toy or decor. It’s a wonderful way to practice your crocheting skills while creating something truly special.
Materials
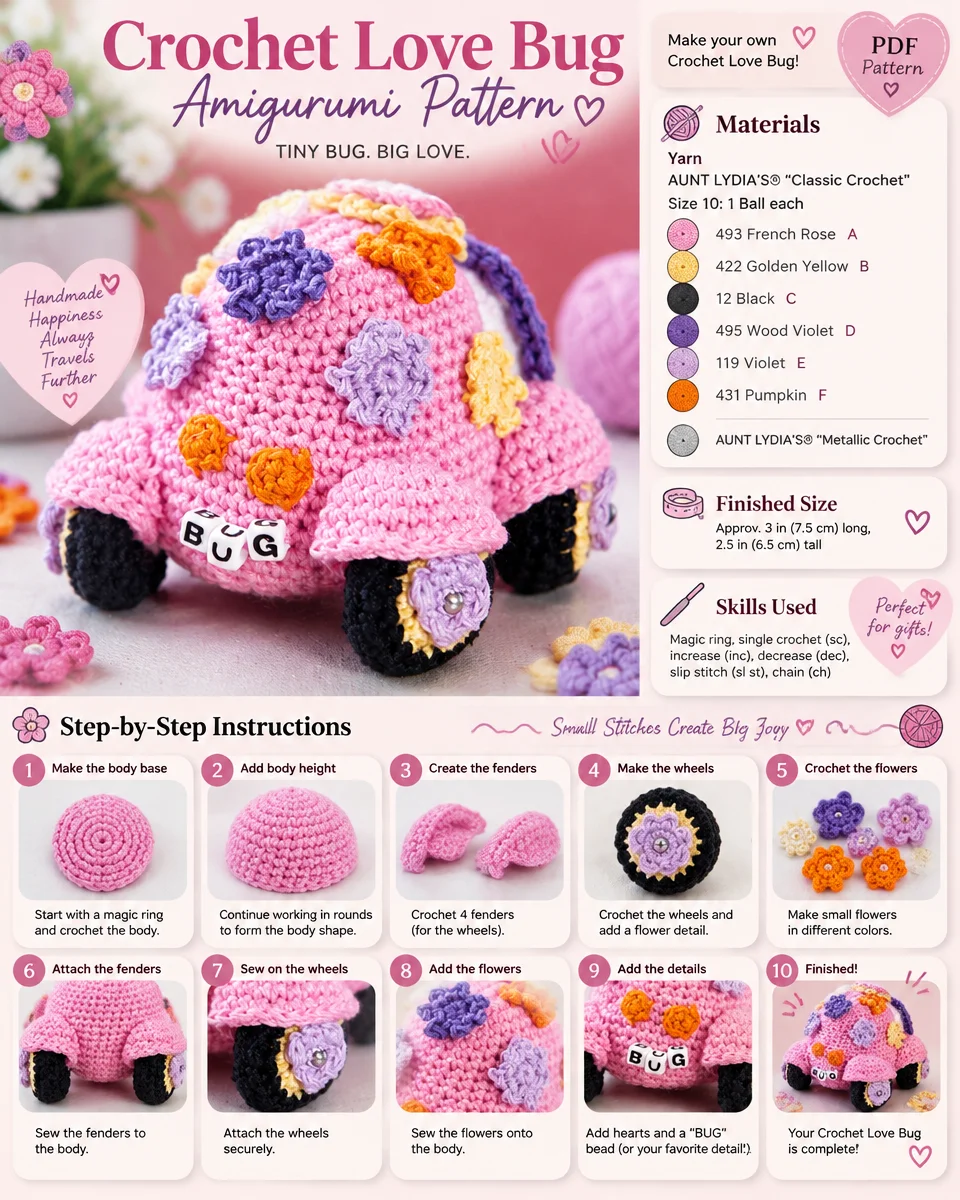
Yarn
-
AUNT LYDIA’S® “Classic Crochet”, Size 10:
- 1 Ball each of:
- 493 French Rose (Color A)
- 422 Golden Yellow (Color B)
- 12 Black (Color C)
- 495 Wood Violet (Color D)
- 119 Violet (Color E)
- 431 Pumpkin (Color F)
- 1 Ball each of:
-
AUNT LYDIA’S® “Metallic Crochet”, Size 10:
- 1 Ball of:
- 1P White/Pearl (Color G)
- 1 Ball of:
Crochet Hook
- 2.75mm [US C-2]
Other Supplies
- Split-ring stitch marker
- Stuffing
- Yarn needle
- 4 silver beads
- Sewing needle and thread
- 3 alphabet beads: B, U, and G
Gauge
- 20 sc = 4”
- 24 rounds = 4” with two strands held together
- CHECK YOUR GAUGE. Use any size hook to obtain the gauge.
Crochet Abbreviations
- sc: single crochet
- sc2tog: [draw up a loop in next st] twice, yo and draw through all 3 loops on hook.
Instructions
LOVE BUG
With Color A, ch 12.
Round 1: Sc in 2nd ch from hook and in next 9 ch, 3 sc in last ch; turn to work along opposite side of beginning ch, sc in next 9 ch, 2 sc in next ch – 24 sts.
Round 2: *Sc in next 3 sts, 2 sc in next st; repeat from * around – 30 sts.
Round 3: *Sc in next 4 sts, 2 sc in next st; repeat from * around – 36 sts.
Round 4: Sc in each st around.
Rounds 5-10: Repeat Round 4.
Round 11: *Sc in next 2 sts, 2 sc in next st; repeat from * around – 48 sts.
Round 12: Repeat Round 4.
Round 13: *Sc in next 3 sts, 2 sc in next st; repeat from * around – 60 sts.
Rounds 14-20: Repeat Round 4.
Round 21: *Sc in next 3 sts, sc2tog; repeat from * around – 48 sts.
Round 22: *Sc in next 2 sts, sc2tog; repeat from * around – 36 sts. Add stuffing.
Round 23: *Sc in next st, sc2tog; repeat from * around – 24 sts.
Round 24: sc2tog around – 12 sts. Fasten off. Sew seam parallel to beginning ch.
Fender (Make 4)
With Color A, ch 2.
Round 1: 6 sc in 2nd ch from hook – 6 sts.
Round 2: 2 sc in each st around – 12 sts.
Round 3: *Sc in next st, 2 sc in next st; repeat from * around – 18 sts.
Round 4: *Sc in next 2 sts, 2 sc in next st; repeat from * around – 24 sts.
Rounds 5-6: Sc in each st around.
Round 7: Slip st in each st around. Fasten off.
Wheel (Make 4)
With Color B, ch 2.
Round 1: 6 sc in 2nd ch from hook – 6 sts.
Round 2: 2 sc in each st around – 12 sts.
Round 3: *Sc in next st, 2 sc in next st; repeat from * around – 18 sts. Change to Color C in last st. Fasten off B.
Round 4: With Color C, *sc in next 2 sts, 2 sc in next st; repeat from * around – 24 sts.
Rounds 5-6: Sc in each st around.
Round 7: Sc2tog around – 12 sts.
Round 8: Repeat Round 7 – 6 sts. Fasten off. Add stuffing. Draw remaining sts together.
Wheel Flower (Make 4)
With Color D, ch 2.
Round 1: 8 sc in 2nd ch from hook – 8 sts.
Round 2: *Slip st in next st, ch 1; repeat from * around. Fasten off.
Headlight/Eye (Make 2)
With Color G, work same as for Fender through Round 3 – 18 sts.
Round 4: Working in back loops only, sc in each st around.
Round 5: *Sc in next st, sc2tog; repeat from * around – 12 sts. Fasten off.
Petal-Round 6: Working in the front loops from Round 3 only, join Color E in any st, ch 1, sc in same st as joining, *3 hdc in next st, sc in next st; repeat from * around. Fasten off.
Tail Lights (Make 2)
With Color F, ch 2.
Round 1: 6 sc in 2nd ch from hook; join with a slip st. Fasten off.
Large Flower
With Color D, ch 5; join.
Round 1: Ch 3 (counts as 1st dc), 11 dc in ring; join – 12 sts. Fasten off Color D.
Round 2: Working in front loops only, join Color A in any st, ch 2, *slip st in next st, ch 2; repeat from * around. Fasten off Color A.
Round 3: Working in back loops of Round 1 only, join Color B in any st, ch 3, *slip st in next st, ch 3; repeat from * around. Fasten off Color B.
Small Flowers
With Color D, ch 2.
Round 1: 7 sc in 2nd ch from hook – 7 sts.
Round 2: *(Slip st, ch 3, slip st) all in next st; repeat from * around. Fasten off.
Make 1 more Small Flower with Color D, 2 with Color B, 1 with Color G, 1 with Color E, and 1 with Color F.
Finishing / Assembly
- Sew Wheel Flowers to center of each Wheel.
- Sew 1 silver bead in the center of each Flower, pulling thread tightly to indent.
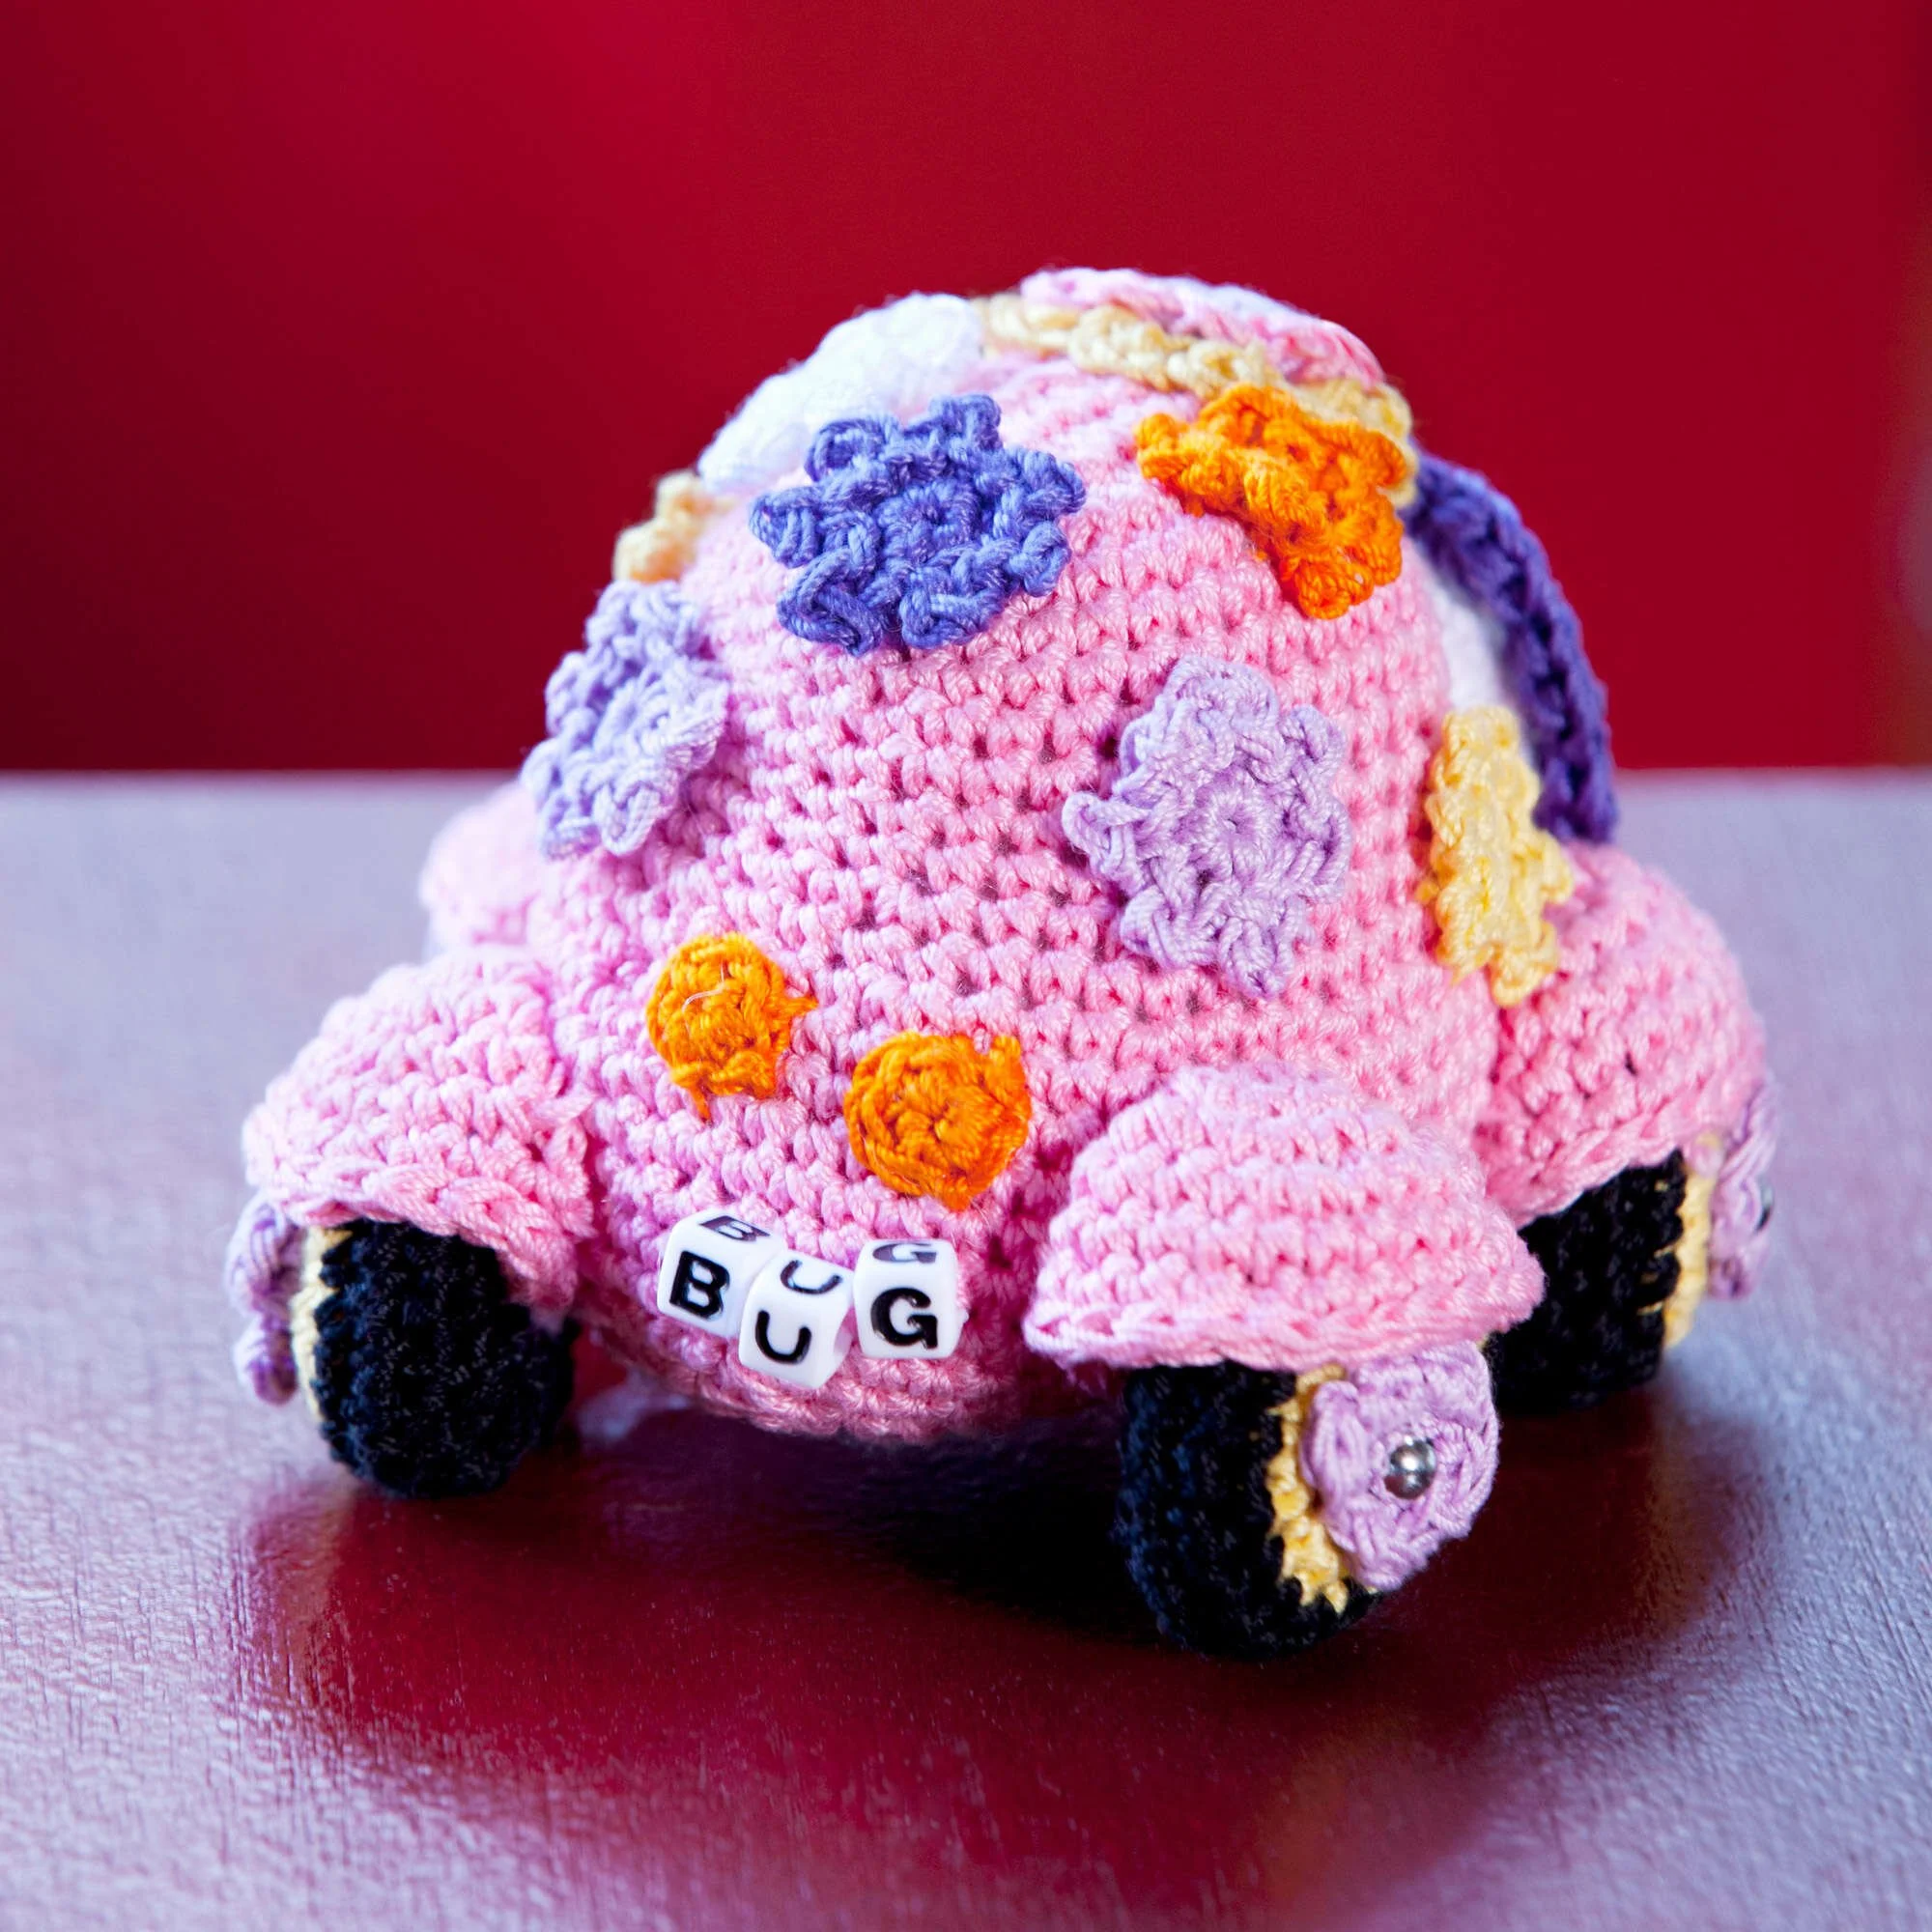
- Sew each Wheel under a Fender, and sew each Fender to the Car as pictured.
- With Color C, embroider a pupil in the center of each Headlight/Eye.
- Stuff Eye lightly and sew into place onto Car.
- Embroider mouth and nose as pictured.
- Sew Tail Lights into place at back of Car.
- Sew Large Flower in place at top of Car, and Small Flowers randomly over roof of Car as pictured.
- Sew alphabet beads spelling “BUG” in a row on back of Car for license plate.
- Weave in ends.
Frequently Asked Questions
What crochet hook is used for this pattern?
You will need a 2.75mm [US C-2] crochet hook.
Is this project worked in rows or rounds?
The Love Bug Amigurumi is worked in rounds.
Does this crochet project require assembly?
Yes, the project comprises multiple components that need to be sewn together during assembly.
How many components are included in this pattern?
The pattern includes various parts: the main body, fenders, wheels, flowers, and lights.
What type of yarn is used for this design?
The pattern uses AUNT LYDIA’S® “Classic Crochet” and “Metallic Crochet” in specific colors.
Conclusion
Creating the Crochet Love Bug Amigurumi is a delightful way to showcase your crochet skills while crafting a whimsical piece. By following the provided instructions and utilizing a range of colorful yarns, you can create a charming toy or decorative item that is sure to brighten anyone’s day. Happy crocheting!