Hugsy the Hedgehog Crochet Amigurumi Pattern
Crochet enthusiasts will love creating Hugsy the Hedgehog, a charming amigurumi pattern featuring playful ears and soft, rounded features. This delightful crochet project is perfect for those looking to expand their amigurumi skills or simply create a cute stuffed animal to cuddle or give as a gift. With easy-to-follow instructions and lovely color options, Hugsy is sure to become a favorite.
About the Crochet Project
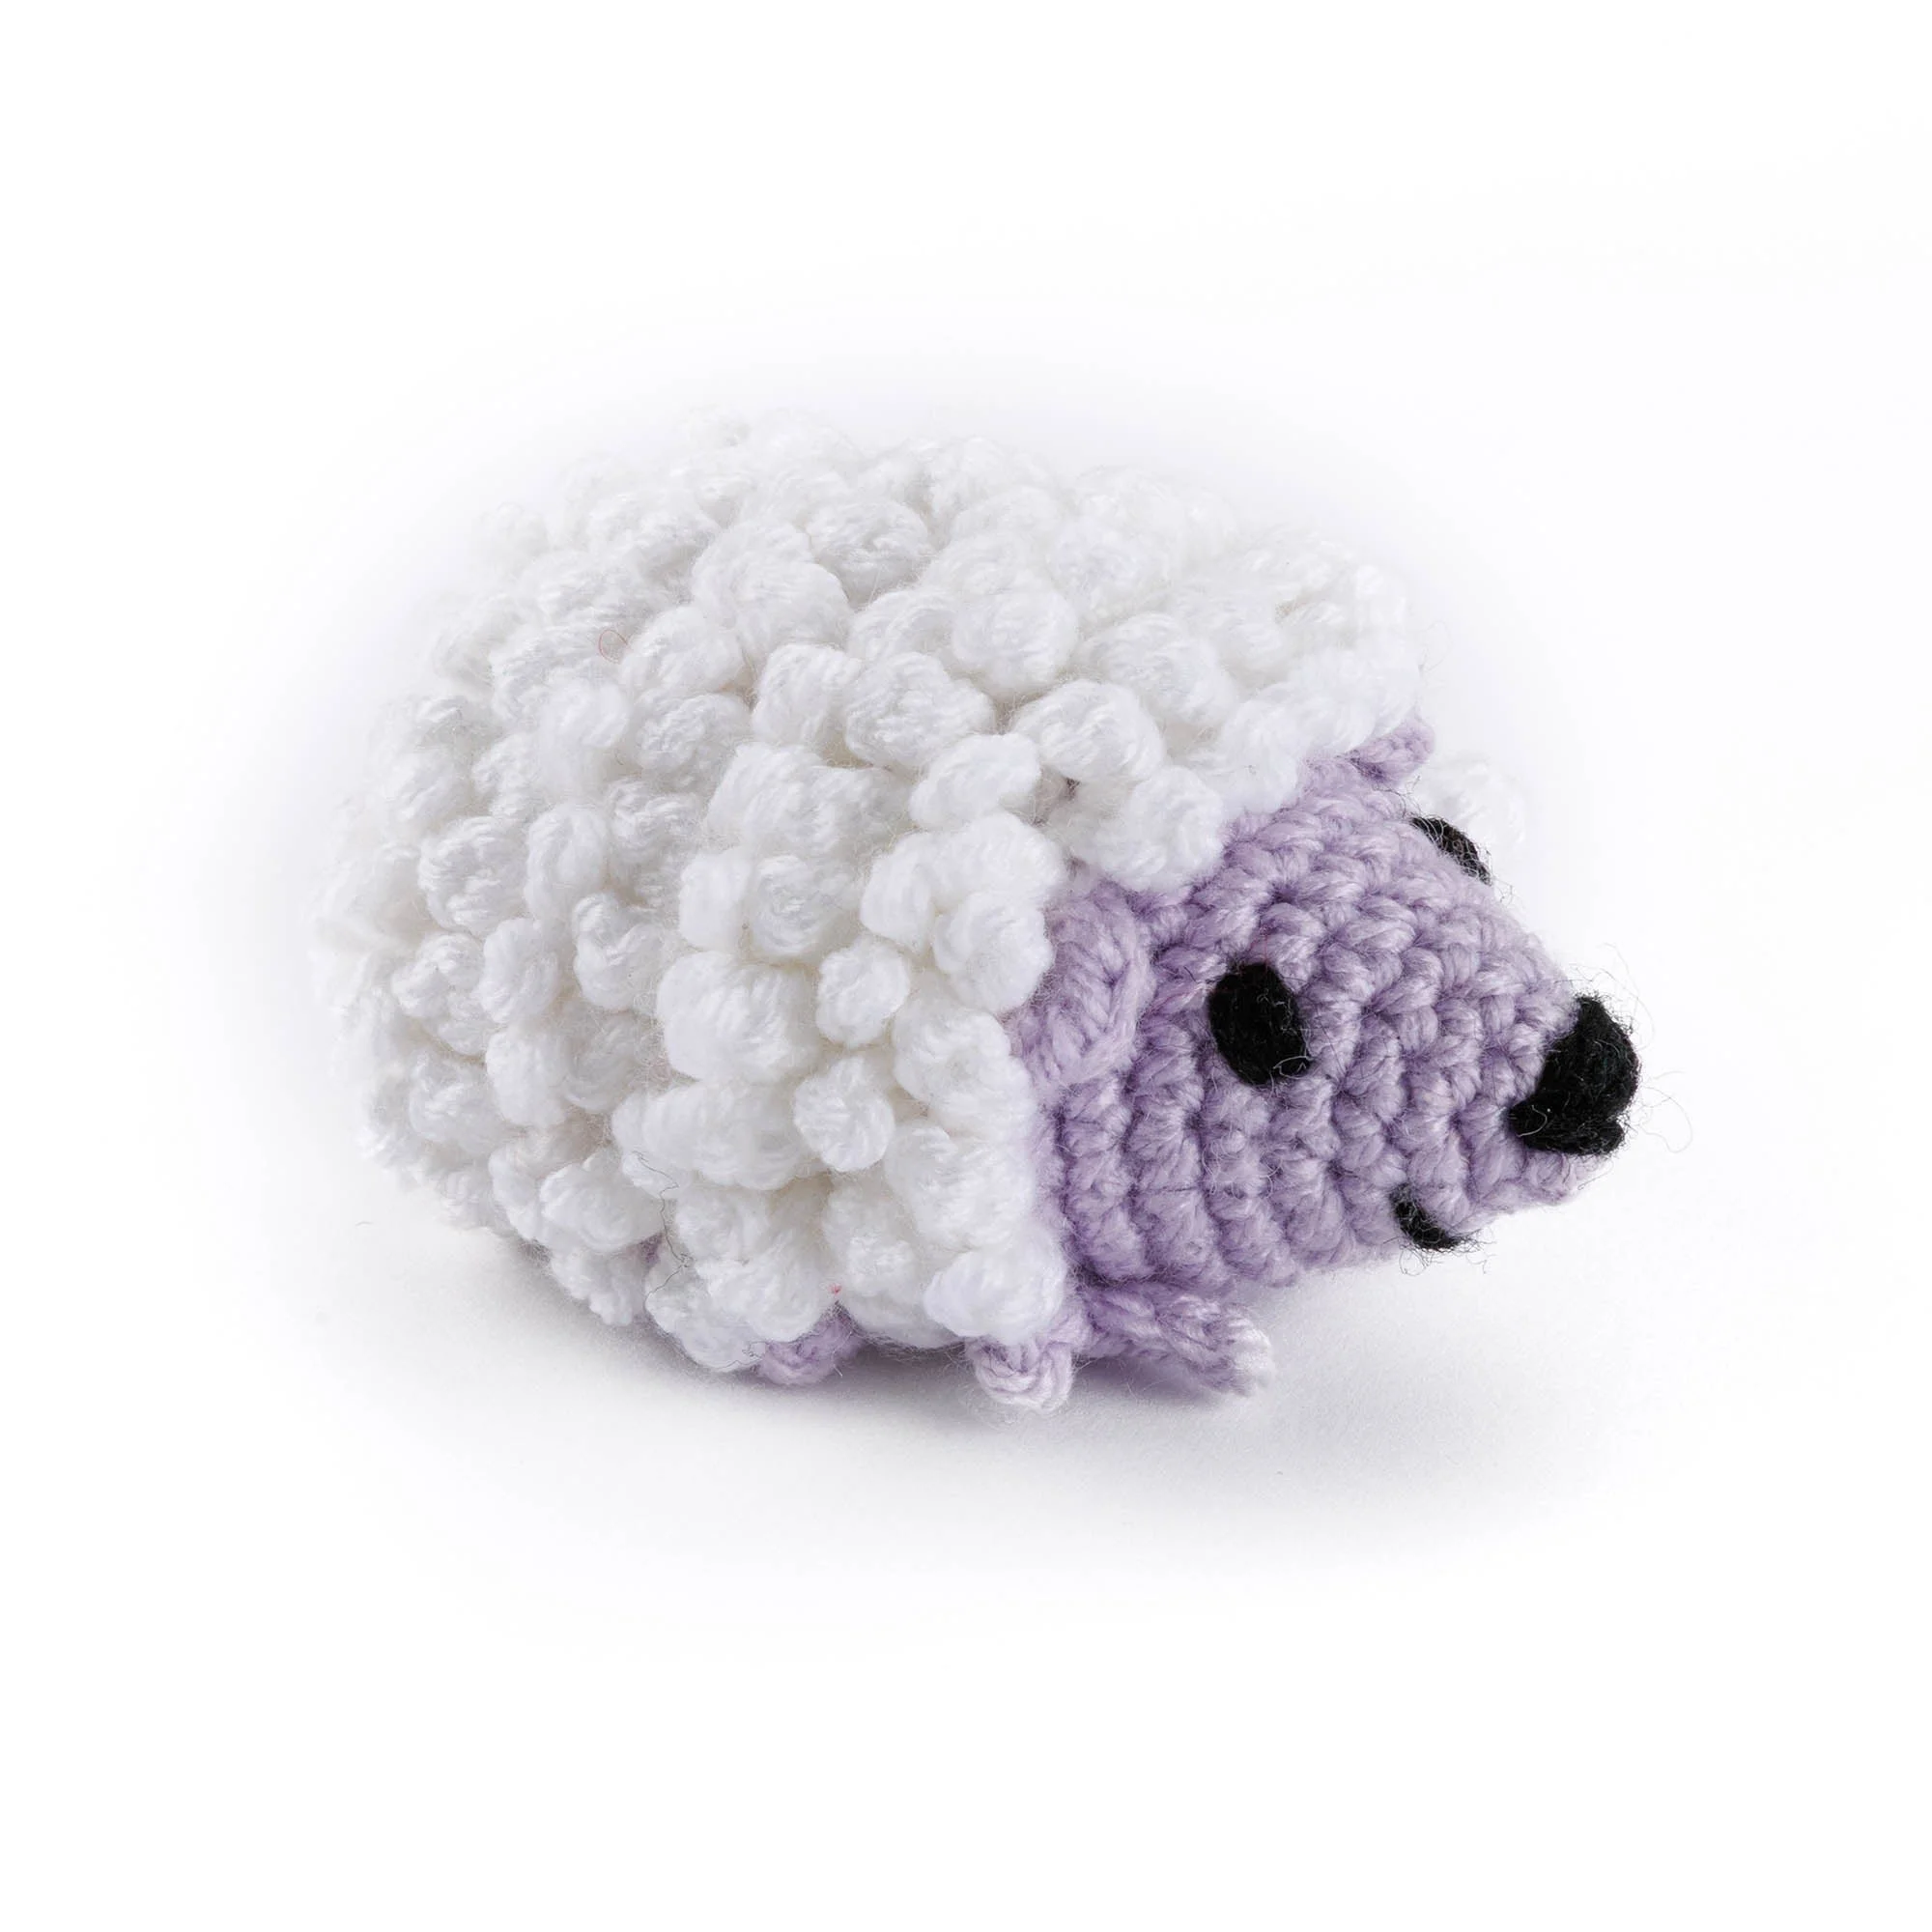
Hugsy the Hedgehog is a fun and whimsical crochet design that captures the essence of this adorable creature. The finished project showcases a plump body, cute little feet, and prominent ears. The project is worked in rounds, which is typical for amigurumi, and features straightforward construction techniques to help you achieve a charming finished product.
Not only is this pattern suitable for experienced crocheters, but it’s also a great choice for enthusiastic beginners looking to further their skills. So grab your yarn and crochet hook, and let’s get started on this lovely hedgehog!
Materials
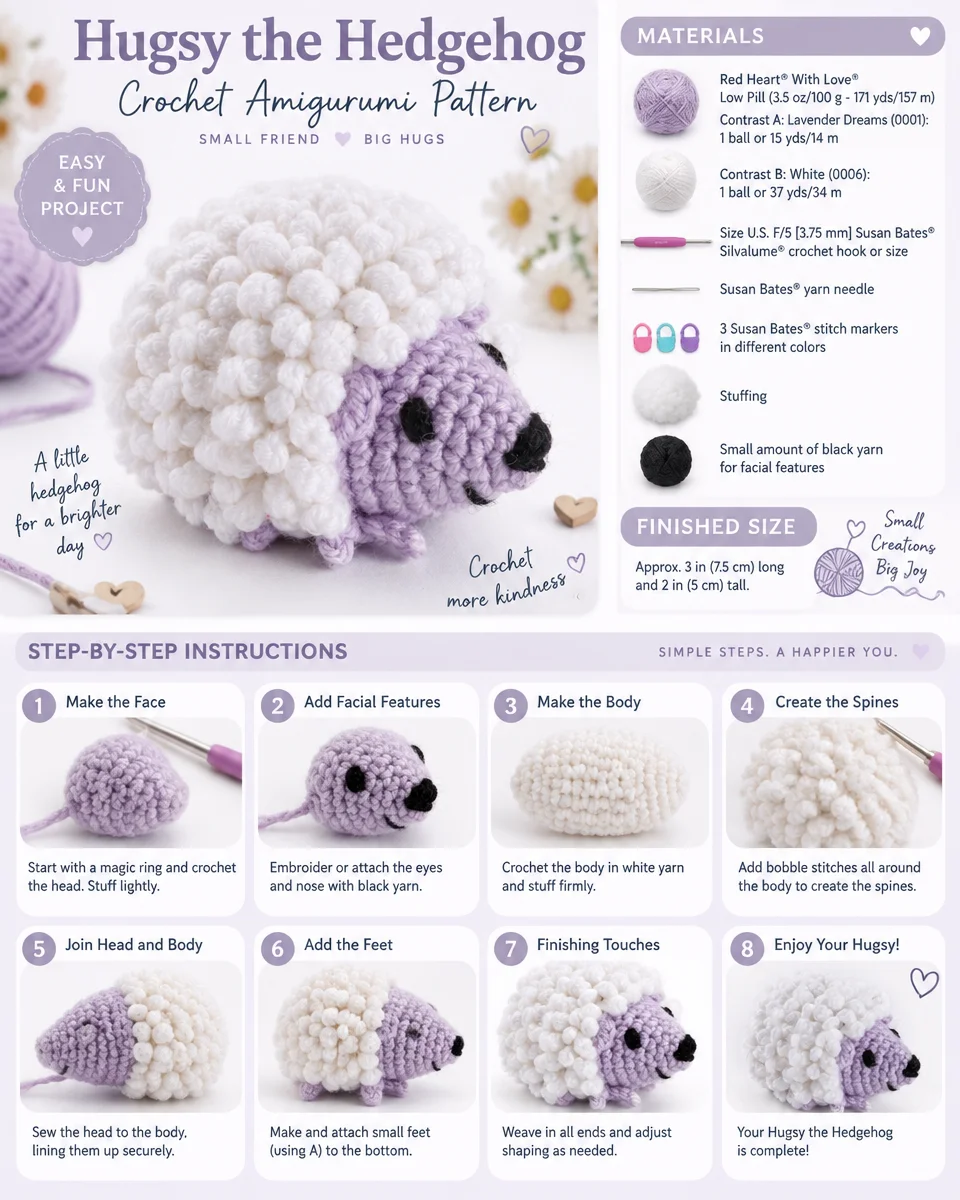
To create Hugsy the Hedgehog, you will need the following materials:
Yarn
- Red Heart® With Love® Low Pill (3.5 oz/100 g; 171 yds/157 m)
- Contrast A: Lavender Dreams (0001): 1 ball or 15 yds/14 m
- Contrast B: White (0006): 1 ball or 37 yds/34 m
Crochet Hook
- Size U.S. F/5 [3.75 mm] Susan Bates® Silvalume® crochet hook or size needed to obtain gauge
Notions
- Susan Bates® yarn needle
- 3 Susan Bates® stitch markers in different colors
- Stuffing
- Small amount of black yarn for facial features
Crochet Abbreviations
The pattern uses a few specific abbreviations that come in handy when crocheting Hugsy. Here are the common ones used in this pattern:
- sc – single crochet
- sl st – slip stitch
- hdc – half double crochet
- pm – place marker
- st – stitch
- tog – together
Pattern Notes
- The pattern is worked in rounds without joining, forming a continuous spiral, which is ideal for amigurumi.
- Use stitch markers to keep track of your rounds as they make counting stitches easier throughout the project.
- For a fluffy look, ensure you stuff the hedgehog well while closing the base.
Instructions
Head
Beg at nose, with A, ch 2.
1st rnd: 5 sc in 2nd ch from hook. 5 sc. Do not join. Work in spiral in continuous rnds. PM on first st and move up each rnd for easier counting.
2nd rnd: (2 sc in next sc. 1 sc in next sc) twice. 2 sc in next sc. 8 sc.
3rd rnd: (2 sc in next sc. 1 sc in next sc) 4 times. 12 sc.
4th rnd: 1 sc in each sc around.
5th rnd: (2 sc in next sc. 1 sc in next sc) 6 times. 18 sc.
6th rnd: 1 sc in each sc around.
7th rnd: (2 sc in next sc. 1 sc in each of next 2 sc) 6 times. 24 sc.
8th rnd: 1 sc in each sc around.
9th rnd: 1 sc in each of next 8 sc.
*Working in front loop only, (Sl st. 3 hdc. Sl st) all in next sc – Ear made. Working in both loops, 1 sc in each of next 6 sc. Rep from * once more. PM on last st for First Front Foot placement. 1 sc in each of next 2 sc. 22 sc and 2 Ears.
Body (cont with Body as follows)
Note: All rounds of Body are worked in back loop only.
10th rnd: Working in back loops only, 1 sc in each sc around, skipping sts of each Ear and working in unworked loop behind each ear. 24 sc. PM on 3rd st for Second Front Foot placement.
Proceed as follows, working in spiral, moving rnd marker up each rnd for easier counting:
11th to 16th rnds: Working in back loops only, 1 sc in each sc around. Stuff Head and Body firmly, creating egg-like shape. Cont to stuff and shape as Body closes.
17th rnd: Working in back loops only, (Sc2tog. 1 sc in each of next 2 sc) 6 times. 18 sts.
18th rnd: Working in back loops only, (Sc2tog. 1 sc in next st) 6 times. 12 sts.
19th rnd: Working in back loops only, (Sc2tog) 6 times. 6 sts.
Fasten off, leaving a 6″ [15 cm] tail. Weave tail through last rnd and pull gently to close opening. Secure tail.
Foot (make 4)
With A, ch 3.
1st row: Sl st in 2nd ch from hook. Sl st in last ch – 1st Toe made.
(Ch 3. Sl st in 2nd ch from hook. Sl st in next ch. Sl st in last ch of previous Toe – Toe made) twice.
Fasten off, leaving 8″ [20.5 cm] tail for sewing.
Attaching Feet
For 2 front feet, position foot on underside of body, placing heel at each front marker with toes pointing forward toward nose. Sew each heel in place, leaving toes free.
For 2 back feet, position each remaining foot 3 rows behind each front foot with toes pointing toward nose. Sew each heel in place, leaving toes free.
Spines
Spines notes
Chain loosely so slip sts can be made easily. The number of spines will vary in each row depending on where you begin and end. Work between 14 and 16 sts in each row. After rows are made, work will continue in spiral rounds.
Join and row work
With Head facing you, join B with sl st in 2nd st to left of Second Front Foot on 10th rnd (to work across back, leaving belly unworked).
1st row: *Ch 4. Sl st in 2nd ch from hook. Sl st in each of next 2 ch. Working in front loop only, sl st in next st on Body – Spine made. Rep from * across, working sl st in back loop behind each Ear and ending in 2nd st before First Front Foot. Turn. 15 Spines.
2nd to 6th rows: *Ch 4. Sl st in 2nd ch from hook. Sl st in each of next 2 ch. Working in front loop only, sl st in next st on Body – Spine made. Rep from * across, ending aligned with first st of last row. Turn.
7th row: Rep 2nd row. Do not turn at end of row.
Transition to Spiral Rounds Around Body
Cont as follows in next Body rnd, working in spiral, PM on first st and move up each rnd for easier counting:
8th to 10th rnds: *Ch 4. Sl st in 2nd ch from hook. Sl st in each of next 2 ch. Working in front loop only, sl st in next st on Body – Spine made. Rep from * around.
Join with sl st in first ch at end of 10th rnd.
Fasten off.
Finishing
Placement note
Note: Use photograph as a guide for placement of facial features.
Eyes
Working on the round of head midway between ears and nose and leaving 4 or 5 sts between eyes, satin stitch over 1 or 2 sts for each eye. Pull yarn tightly before securing to slightly indent each eye.
Nose
Embroider an upside-down triangle of straight sts on Round 1 of head and fill in with satin sts.
Mouth
With straight sts, embroider a short, curved smile under nose over 2 or 3 sts.
Fluff Spines
Fluff Spines as desired. Weave in ends.
Frequently Asked Questions
What crochet hook is required for this pattern?
You’ll need a size U.S. F/5 [3.75 mm] Susan Bates® Silvalume® crochet hook or a size needed to obtain gauge.
How is this project constructed?
Hugsy is constructed in rounds, starting from the nose and building up through the head, body, and limbs—common techniques for amigurumi designs.
Does this project require assembly?
Yes, there is some assembly involved, particularly when attaching the feet to the body.
How many components does this pattern include?
This pattern outlines 5 main components, including the head, body, and four feet.
What colors are used in the pattern?
The primary color used is Lavender Dreams for the body, with White used for the belly and facial features.
Conclusion
Creating Hugsy the Hedgehog is a rewarding crochet project that indulges your creative flair while making a cute and cuddly toy. With the detailed instructions and various delightful aspects such as the contrasting colors and the friendly demeanor, this pattern is sure to be a hit with friends and family alike. Enjoy crocheting, smiling, and gifting Hugsy, your new fuzzy friend!