Crochet Sushi Pattern
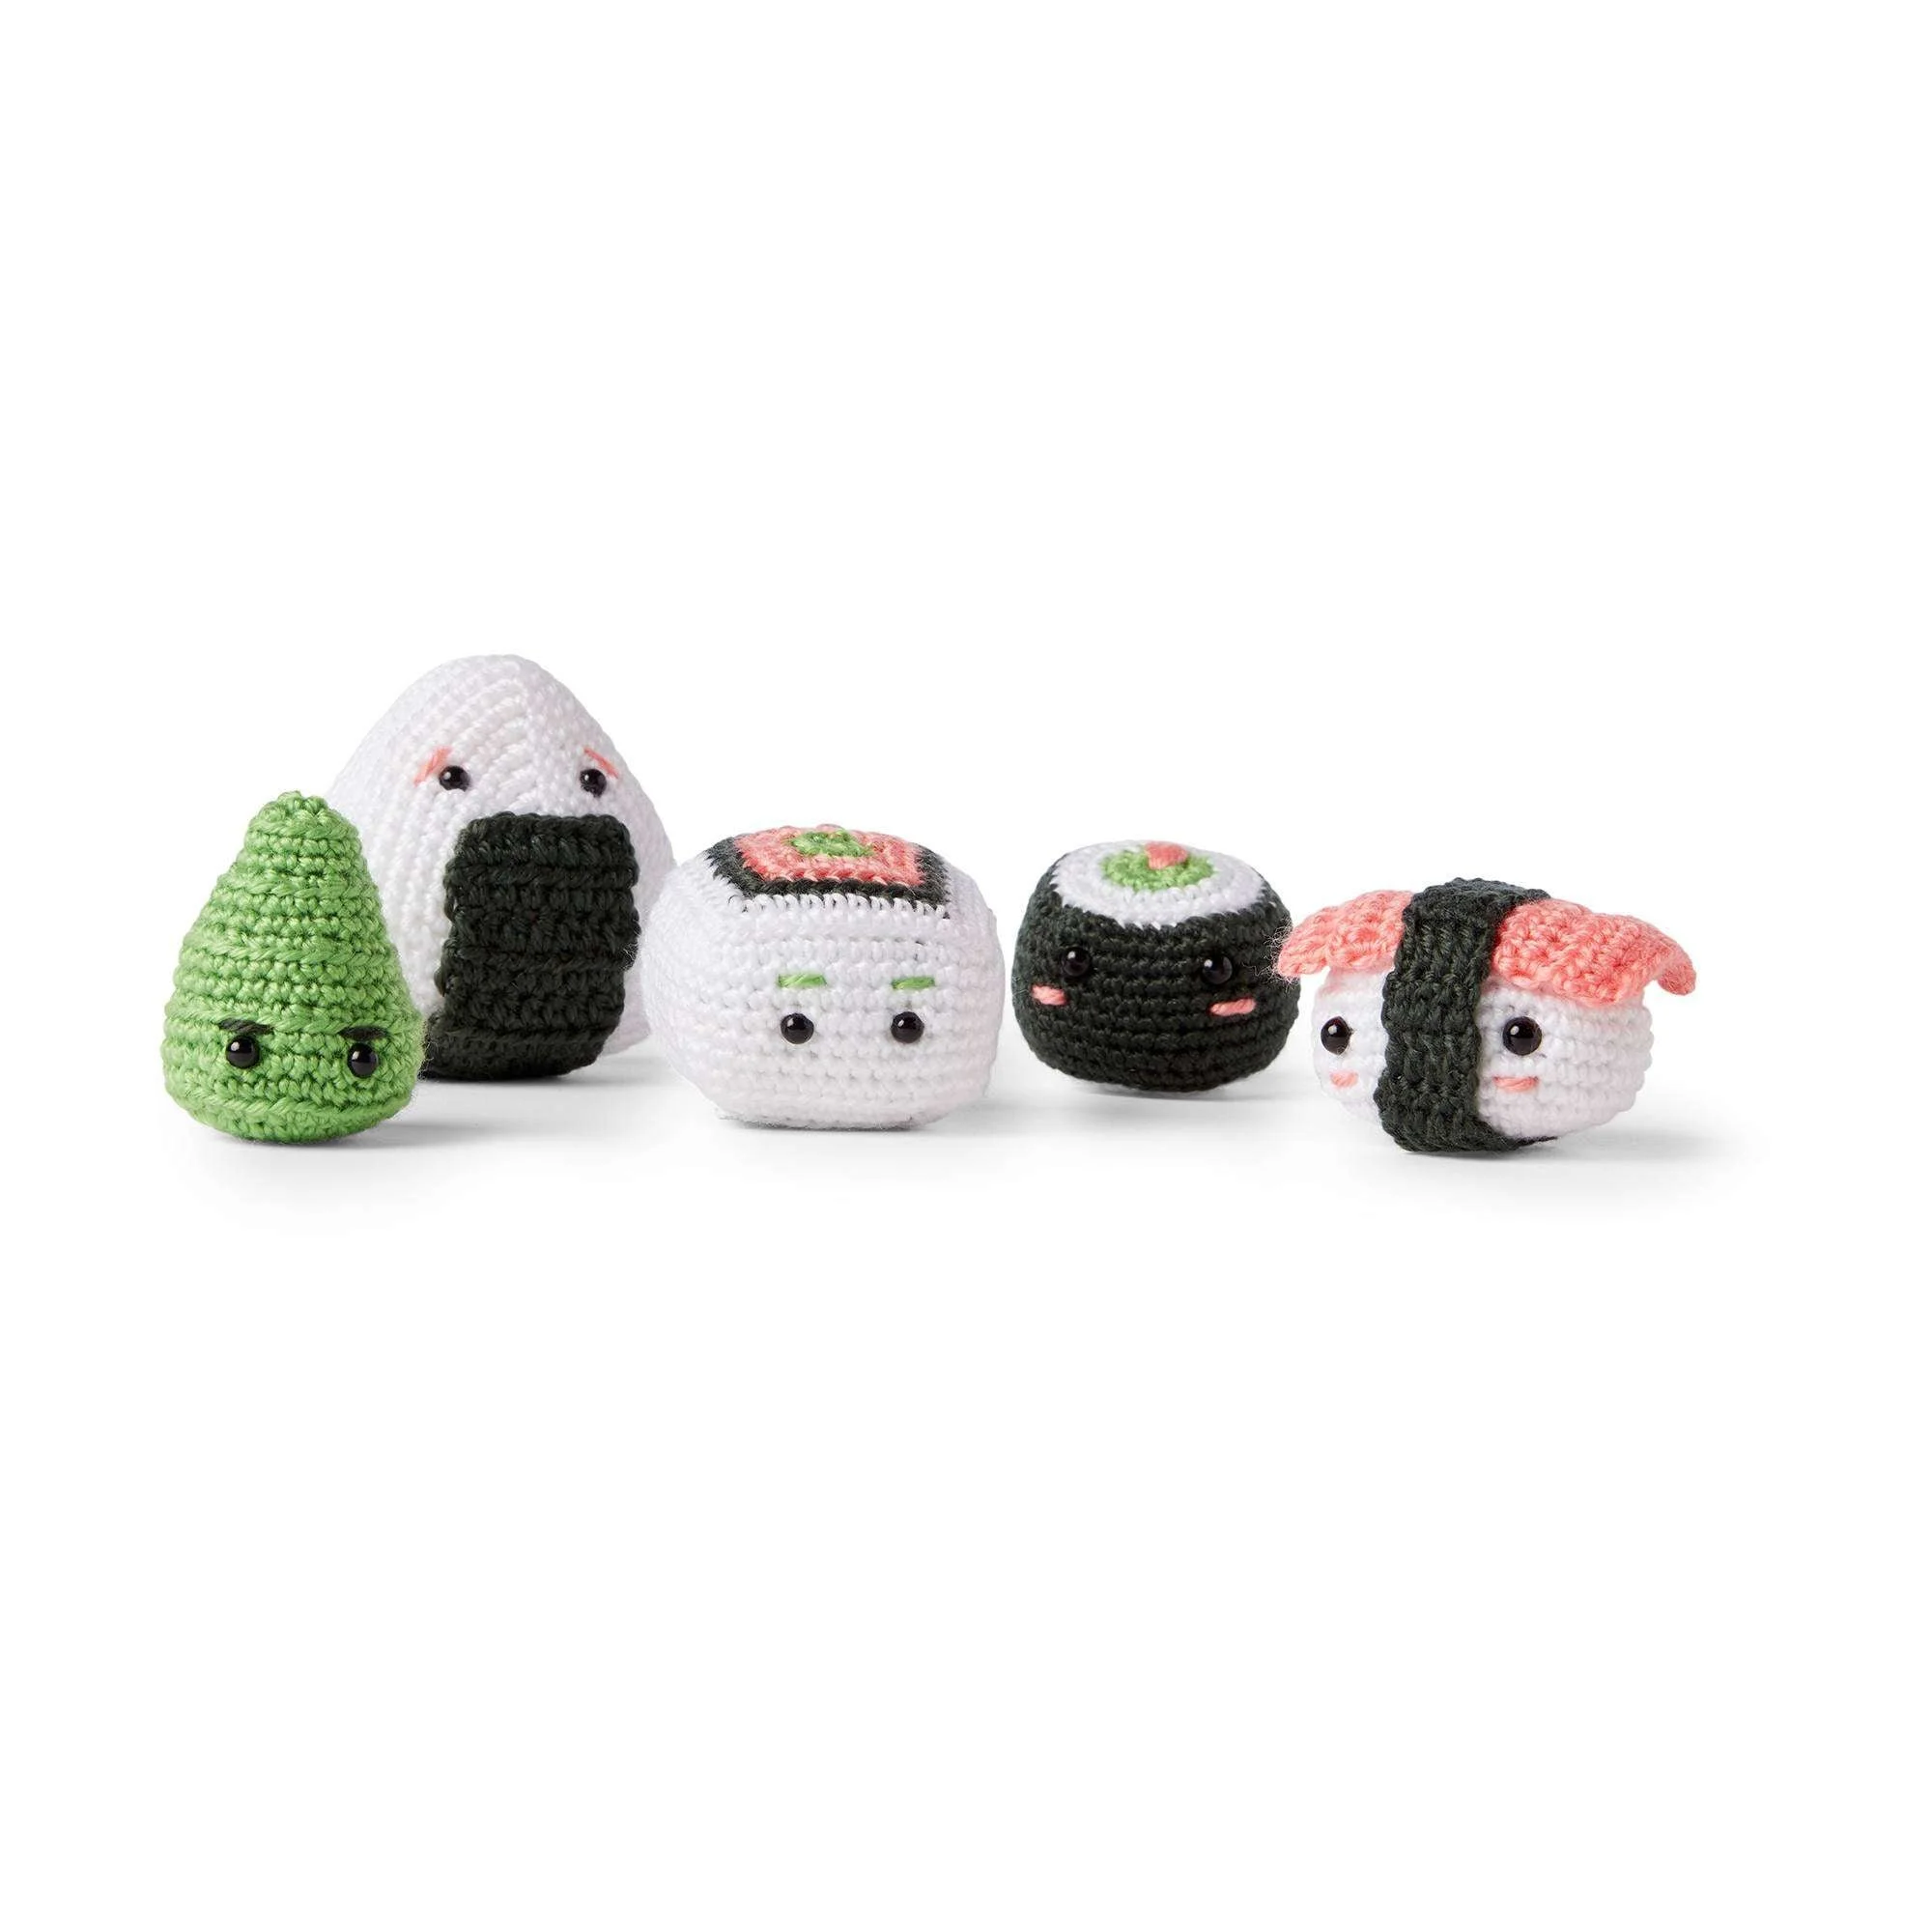
Craving a fun and unique crochet project? Dive into the fun world of amigurumi with this delightful crochet sushi pattern! This charming crochet project includes making three types of sushi: Nigiri, Maki Roll, and Onigiri, each adding a pinch of whimsy to your crochet collection. Let’s roll up our sleeves and learn how to create these adorable sushi treats using colorful yarn and simple crochet techniques.
About the Crochet Project
This crochet sushi pattern allows crafters to create a set of adorable sushi pieces that can serve as decorative items, play toys for children, or even delightful gifts. The pattern is designed to be simple yet engaging, making it an enjoyable project for both novice and experienced crocheters. From fluffy rice to vibrant salmon, every detail is captured to make your sushi look as realistic as possible, minus the raw fish!
Materials
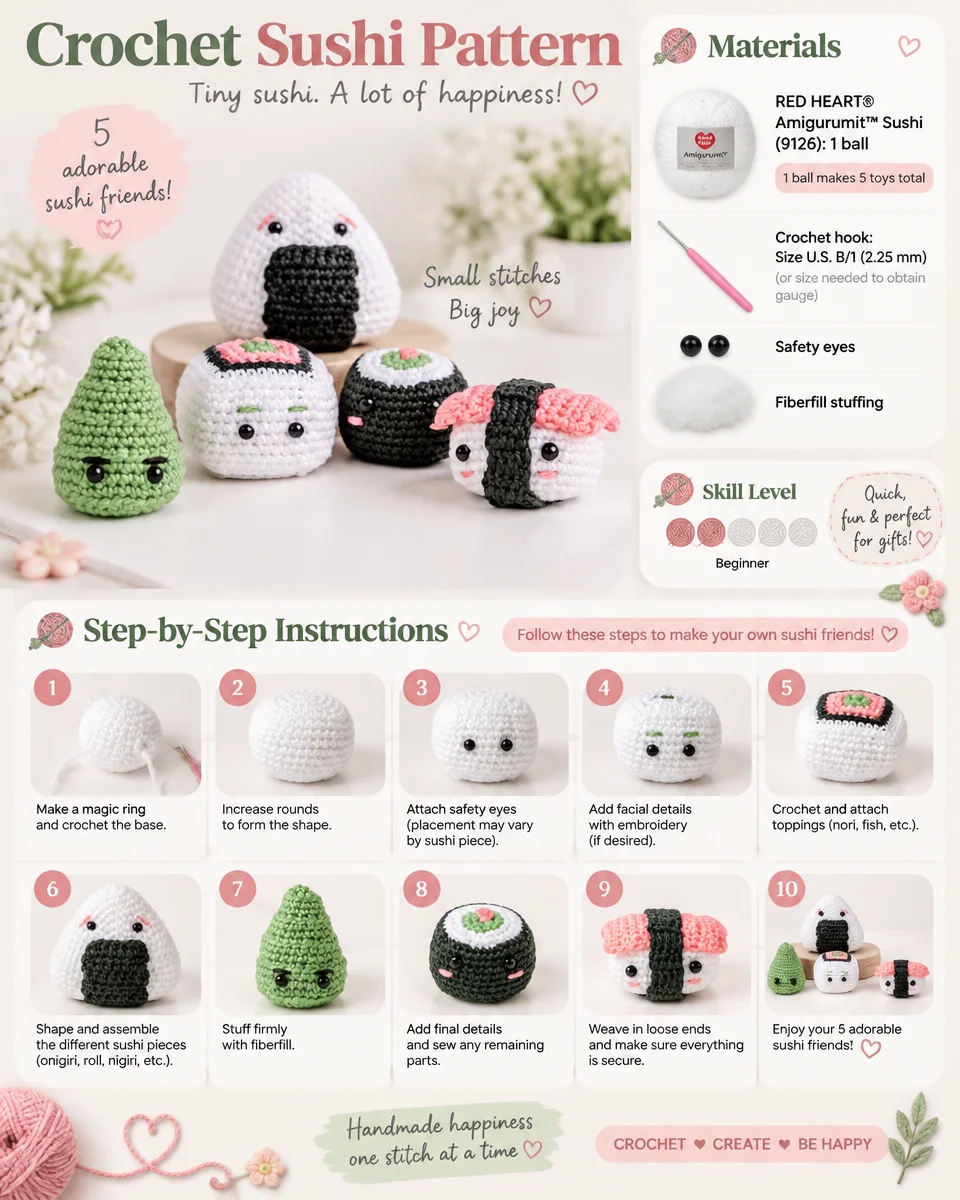
To create your sushi collection, you will need the following materials:
Yarn
- RED HEART® Amigurumit™ Sushi (9126): 1 ball (Note: 1 ball makes 5 toys total)
Crochet Hook
- Size U.S. B/1 (2.25 mm) (or size needed to obtain gauge)
Stuffing
- Fiberfill stuffing to give your sushi a plushy feel.
Safety Eyes
- Safety eyes for adding cute and expressive faces to your sushi creations.
Crochet Abbreviations
Familiarize yourself with the following common crochet abbreviations used in this pattern:
- ch = chain
- sc = single crochet
- hdc = half double crochet
- dc = double crochet
- Rnd = round
- st(s) = stitch(es)
- Rep = repeat
- tog = together (used in decreasing stitches)
Understanding the Pattern Structure
This crochet sushi pattern is divided into several segments: Nigiri, Maki Roll, Onigiri, and Wasabi. Each segment features distinct instructions, detailing how to create the various sushi shapes.
Nigiri
The first part of the project is Nigiri, which consists of rice and a topping. Follow the detailed instructions below to craft your very own Nigiri sushi.
Rice
- With A, ch 2.
- 1st rnd: 8 sc in 2nd ch from hook. Join. 8 sc.
- 2nd rnd: Ch 1. 2 sc in each sc around. Join. 16 sc.
- 3rd rnd: Ch 1. *1 sc in each of next 3 sc. 2 sc in each of next 2 sc. 1 sc in each of next 3 sc. Rep from * around. Join. 20 sc.
- 4th rnd: Ch 1. *1 sc in each of next 3 sc. 2 sc in each of next 3 sc. 1 sc in each of next 4 sc. Rep from * around. Join. 26 sc.
- 5th rnd: Ch 1. *1 sc in each of next 5 sc. 2 sc in each of next 3 sc. 1 sc in each of next 5 sc. Rep from * around. Join. 32 sc.
- 6th rnd: Ch 1. *1 sc in each of next 3 sc. 2 sc in next sc. Rep from * around. Join. 40 sc.
- 7th to 11th rnds: Ch 1. 1 sc in each sc around. Join.
- 12th rnd: Ch 1. *1 sc in each of next 3 sc. Sc2tog. Rep from * around. Join. 32 sc.
- 13th rnd: Ch 1. *1 sc in each of next 6 sc. Sc2tog 3 times. 1 sc in each of next 4 sc. Rep from * around. Join. 26 sts.
- 14th rnd: Ch 1. *1 sc in each of next 5 sc. Sc2tog 2 times. 1 sc in each of next 4 sc. Rep from * around. Join. 22 sts.
- 15th rnd: Ch 1. *1 sc in each of next 3 sc. Sc2tog 3 times. 1 sc in each of next 2 sc. Rep from * around. Join. 16 sts.
- Stuff rice firmly.
- 16th rnd: Ch 1. *Sc2tog. Rep from * around. Join. 8 sts.
- Fasten off, leaving a long tail. Draw end tightly through remaining sts.
Salmon
Now let’s work on the delicious salmon topping.
- With B, ch 11.
- 1st row: 1 hdc in 3rd ch from hook. 1 hdc in each ch to end of chain. Turn. 9 hdc.
- 2nd rnd: Ch 2 (does not count as hdc). 1 hdc in each hdc to end of row. Turn.
- Rep 2nd row until piece from beg measures 3″ [7.5 cm].
- Fasten off.
Seaweed
Complete your Nigiri by making the seaweed wrap.
- With D, ch 7.
- 1st row: 1 dc in 4th ch from hook. 1 dc in each ch to end of chain. Turn. 5 dc.
- 2nd row: Ch 3 (counts as dc). 1 dc in next dc. 1 dc in each dc to end of row. Turn.
- Rep 2nd row until piece measures long enough to wrap around middle of Rice and Salmon as shown in picture.
- Fasten off.
- Wrap seaweed around Salmon and Rice as shown in picture. Seam ends of seaweed in place.
Eyes/Face on Nigiri
Add some character to your Nigiri sushi!
- Secure safety eyes as shown in picture.
- Using B, embroider blushed cheeks under eyes.
Maki Roll
Next on the menu is the Maki Roll!
Maki Roll Shell
- With C, ch 2.
- 1st rnd: 8 sc in 2nd ch from hook. Join. 8 sc.
- 2nd rnd: Ch 1. 2 sc in each sc around. Break C. Join with A. Join. 16 sc.
- 3rd rnd: With A, ch 1. *1 sc in next sc. 2 sc in next sc. Rep from * around. Join. 24 sc.
- 4th rnd: Ch 1. *1 sc in each of next 2 sc. 2 sc in next sc. Rep from * around. Break A. Join with D. 32 sc.
- 5th rnd: With D, ch 1. Working in back loops only, *1 sc in each of next 3 sc. 2 sc in next sc. Rep from * around. Join. 40 sc.
- 6th to 12th rnds: Ch 1. Working in both loops, 1 sc in each sc around. Join.
- 13th rnd: Ch 1. 1 sc in each sc around. Break D. Join with A.
- 14th rnd: Ch 1. Working in back loops only, *1 sc in each of next 3 sc. Sc2tog. Rep from * around. Join. 32 sts.
- 15th rnd: Ch 1. Working in both loops, *1 sc in each of next 2 sc. Sc2tog. Rep from * around. Break A. Join with C. 24 sts.
- Secure safety eyes as shown in picture.
- 16th rnd: *1 sc in next sc. Sc2tog. Rep from * around. Join. 16 sc.
- 17th rnd: Ch 1. *Sc2tog. Rep from * around. Join. 8 sts.
- Fasten off, leaving long tail. Stuff Maki Roll firmly. Draw end tightly through remaining sts.
- With B, embroider blushed cheeks below eyes and matching triangles on top and bottom of Maki Roll.
Onigiri
On to the delightful Onigiri!
Rice
- With A, ch 2.
- 1st rnd: 6 sc in 2nd ch from hook. Join. 6 sc.
- 2nd rnd: Ch 1. *1 sc in next sc. 3 sc in next sc. Rep from * around. Join. 12 sc.
- 3rd rnd: Ch 1. 1 sc in each of next 2 sc. 3 sc in next sc. *1 sc in each of next 3 sc. 3 sc in next sc. Rep from * once more. 1 sc in last sc. Join. 18 sc.
- 4th rnd: Ch 1. 1 sc in each of next 3 sc. 3 sc in next sc. *1 sc in each of next 5 sc. 3 sc in next sc. Rep from * once more. 1 sc in each of last 2 sc. Join. 24 sc.
- 5th rnd: Ch 1. 1 sc in each of next 4 sc. 3 sc in next sc. *1 sc in each of next 7 sc. 3 sc in next sc. Rep from * once more. 1 sc in each of last 3 sc. Join. 30 sc.
- 6th rnd: Ch 1. 1 sc in each of next 5 sc. 3 sc in next sc. *1 sc in each of next 9 sc. 3 sc in next sc. Rep from * once more. 1 sc in each of last 4 sc. Join. 36 sc.
- 7th rnd: Ch 1. 1 sc in each of next 6 sc. 3 sc in next sc. *1 sc in each of next 11 sc. 3 sc in next sc. Rep from * once more. 1 sc in each of last 5 sc. Join. 42 sc.
- 8th rnd: Ch 1. 1 sc in each of next 7 sc. 3 sc in next sc. *1 sc in each of next 13 sc. 3 sc in next sc. Rep from * once more. 1 sc in each of last 6 sc. Join. 48 sc.
- 9th rnd: Ch 1. 1 sc in each of next 8 sc. 3 sc in next sc. *1 sc in each of next 15 sc. 3 sc in next sc. Rep from * once more. 1 sc in each of last 7 sc. Join. 54 sc.
- 10th to 15th rnds: Ch 1. 1 sc in each sc around. Join.
- Secure safety eyes as shown in picture.
- 16th rnd: Ch 1. 1 sc in each of next 8 sc. Sc3tog. *1 sc in each of next 15 sc. Sc3tog. Rep from * once more. 1 sc in each of last 7 sc. Join. 48 sts.
- 17th rnd: Ch 1. 1 sc in each of next 7 sc. Sc3tog. *1 sc in each of next 13 sc. Sc3tog. Rep from * once more. 1 sc in each of last 6 sc. Join. 42 sts.
- 18th rnd: Ch 1. 1 sc in each of next 6 sc. Sc3tog. *1 sc in each of next 11 sc. Sc3tog. Rep from * once more. 1 sc in each of last 5 sc. Join. 36 sts.
- 19th rnd: Ch 1. 1 sc in each of next 5 sc. Sc3tog. *1 sc in each of next 9 sc. Sc3tog. Rep from * once more. 1 sc in each of last 4 sc. Join. 30 sts.
- 20th rnd: Ch 1. 1 sc in each of next 4 sc. Sc3tog. *1 sc in each of next 7 sc. Sc3tog. Rep from * once more. 1 sc in each of last 3 sc. Join. 24 sts.
- 21st rnd: Ch 1. 1 sc in each of next 3 sc. Sc3tog. *1 sc in each of next 5 sc. Sc3tog. Rep from * once more. 1 sc in each of last 2 sc. Join. 18 sts.
- 22nd rnd: Ch 1. 1 sc in each of next 2 sc. Sc3tog. *1 sc in each of next 3 sc. Sc3tog. Rep from * once more. 1 sc in last sc. Join. 12 sts.
- Stuff rice firmly.
- 23rd rnd: Ch 1. *1 sc in next sc. Sc3tog. Rep from * around. Join. 6 sts.
- Fasten off, leaving long tail. Draw end tightly through remaining sts.
Seaweed (for Onigiri)
- With D, ch 9.
- 1st row: 1 hdc in 3rd ch from hook. 1 hdc in each ch to end of ch. Turn. 7 hdc.
- 2nd row: Ch 2 (does not count as hdc). 1 hdc in each hdc to end of row. Turn.
- Rep 2nd row until work from beg measures 2¾” [7 cm].
- Fasten off.
- Sew Seaweed to Rice as shown in picture. With B, embroider eyebrows as shown in picture.
Uramaki Roll
Next, let’s create the Uramaki Roll.
Uramaki Roll Shell
- With C, ch 2.
- 1st rnd: 8 sc in 2nd ch from hook. Break C. Join with B. 8 sc.
- 2nd rnd: With B, ch 1. Working in back loops only, *1 sc in next sc. 3 sc in next sc. Rep from * around. Join. 16 sc.
- 3rd rnd: Ch 1. Working in both loops, 1 sc in each of next 2 sc. *3 sc in next sc. 1 sc in each of next 3 sc. Rep from * to last 2 sc. 3 sc in next sc. 1 sc in last sc. Break B. Join with D. 24 sc.
- 4th rnd: With D, ch 1. Working in back loops only, 1 sc in each of next 3 sc. *3 sc in next sc. 1 sc in each of next 5 sc. Rep from * to last 3 sc. 3 sc in next sc. 1 sc in each of last 2 sc. Break D. Join with A. 32 sc.
- 5th rnd: With A, ch 1. Working in both loops, 1 sc in each of next 4 sc. *3 sc in next sc. 1 sc in each of next 7 sc. Rep from * to last 4 sc. 3 sc in next sc. 1 sc in each of last 3 sc. Join. 40 sc.
- 6th rnd: Ch 1. 1 sc in each of next 5 sc. *3 sc in next sc. 1 sc in each of next 9 sc. Rep from * to last 5 sc. 3 sc in next sc. 1 sc in each of last 4 sc. Join. 48 sc.
- 7th rnd: Ch 1. Working in back loops only, 1 sc in each sc around. Join.
- 8th to 13th rnds: Ch 1. Working in both loops, 1 sc in each sc around. Join.
- Secure safety eyes as shown in picture.
- 14th rnd: Ch 1. Working in back loops only, 1 sc in each of next 5 sc. *Sc3tog. 1 sc in each of next 9 sc. Rep from * to last 7 sc. Sc3tog. 1 sc in each of last 4 sc. Join. 40 sts.
- 15th rnd: Ch 1. Working in both loops, 1 sc in each of next 4 sc. *Sc3tog. 1 sc in each of next 7 sc. Rep from * to last 6 sc. Sc3tog. 1 sc in each of last 3 sc. Break A. Join with D. 32 sts.
- 16th rnd: With D, ch 1. 1 sc in each of next 3 sc. *Sc3tog. 1 sc in each of next 5 sc. Rep from * to last 5 sc. Sc3tog. 1 sc in each of last 2 sc. Break D. Join with B. 24 sts.
- 17th rnd: With B, ch 1. Working in back loops only, 1 sc in each of next 2 sc. *Sc3tog. 1 sc in each of next 3 sc. Rep from * to last 4 sc. Sc3tog. 1 sc in last sc. Join. 16 sts.
- Stuff Uramaki Roll.
- 18th rnd: Ch 1. Working in both loops, 1 sc in next sc. *Sc3tog. 1 sc in next sc. Rep from * to last 3 sc. Sc3tog. Break B. Join with C. 8 sts.
- 19th rnd: Ch 1. Sc2tog around. Join.
- Fasten off, leaving long tail. Draw end tightly through remaining sts.
- With C, embroider eyebrows as shown in picture.
Wasabi
Lastly, let’s create the Wasabi to complete the ensemble!
- With C, ch 2.
- 1st rnd: 6 sc in 2nd ch from hook. Join. 6 sc.
- 2nd rnd: Ch 1. 2 sc in each sc around. Join. 12 sc.
- 3rd rnd: Ch 1. *1 sc in next sc. 2 sc in next sc. Rep from * around. Join. 18 sc.
- 4th rnd: Ch 1. *1 sc in each of next 2 sc. 2 sc in next sc. Rep from * around. Join. 24 sc.
- 5th rnd: Ch 1. *1 sc in each of next 3 sc. 2 sc in next sc. Rep from * around. Join. 30 sc.
- 6th rnd: Ch 1. Working in back loops only, 1 sc in each sc around. Join.
- 7th and 8th rnds: Ch 1. Working in both loops, 1 sc in each sc around. Join.
- 9th rnd: Ch 1. Working in back loops only, *1 sc in each of next 3 sc. Sc2tog. Rep from * around. Join. 24 sc.
- 10th and 11th rnds: Ch 1. Working in both loops, 1 sc in each sc around. Join.
- 12th rnd: Ch 1. Working in back loops only, *1 sc in each of next 2 sc. Sc2tog. Rep from * around. Join. 18 sc.
- Secure safety eyes to Wasabi as shown in picture.
- 13th and 14th rnds: Ch 1. Working in both loops, 1 sc in each sc around. Join.
- 15th rnd: Ch 1. Working in back loops only, *1 sc in next sc. Sc2tog. Rep from * around. Join. 12 sc.
- 16th and 17th rnds: Ch 1. Working in both loops, 1 sc in each sc around. Join.
- Stuff Wasabi firmly.
- 18th rnd: Ch 1. Working in back loops only, *Sc2tog. Rep from * around. Join.
- Fasten off, leaving long end. Draw end tightly through remaining sts.
- With D, embroider eyebrows as shown in picture.
Finishing / Assembly
The final touch is assembling each component to create an adorable sushi set.
Nigiri (Rice Face)
- Secure safety eyes as shown in picture. Using B, embroider blushed cheeks under eyes.
- Wrap seaweed around Salmon and Rice as shown in picture. Seam ends of seaweed in place.
Maki Roll (Face)
- Secure safety eyes as shown in picture.
- With B, embroider blushed cheeks below eyes and matching triangles on top and bottom of Maki Roll.
Onigiri (Face + Seaweed Attachment)
- Secure safety eyes as shown in picture.
- Sew seaweed to rice as shown in picture. With B, embroider eyebrows as shown in picture.
Uramaki Roll
- Secure safety eyes as shown in picture.
- With C, embroider eyebrows as shown in picture.
Wasabi
- Secure safety eyes to Wasabi as shown in picture.
- With D, embroider eyebrows as shown in picture.
Frequently Asked Questions
What crochet hook is used for this pattern?
The recommended crochet hook for this pattern is Size U.S. B/1 (2.25 mm), or the size needed to obtain the desired gauge.
Is this project worked in rows or rounds?
This project is worked entirely in rounds, which is typical for amigurumi patterns.
Are there safety eyes required for the sushi projects?
Yes, safety eyes are used for each sushi piece to give them an adorable, expressive look.
How many toys can be made from one ball of yarn?
According to the materials list, one ball of RED HEART® Amigurumit™ Sushi (9126) makes a total of five toys.
Does this crochet project require assembly?
Yes, the assembled components need sewing and finishing touches to create the complete sushi look.
Conclusion
Creating your own crocheted sushi set is a satisfying and fun project. Not only do you get to enjoy the crafting experience, but you’ll also have a delightful set of sushi to display or gift. With simple stitches and vibrant colors, this crochet sushi pattern is sure to impress! Happy crocheting!