I Am Fire Crochet Dragon Amigurumi Pattern
Creating your own crochet dragon is a delightful project that brings out creativity and skill in any crocheter! This I Am Fire Crochet Dragon Amigurumi Pattern presents a fun and charming way to showcase your amigurumi-making abilities. Below, you’ll find everything you need to create your very own fire-breathing dragon, from materials to instructions.
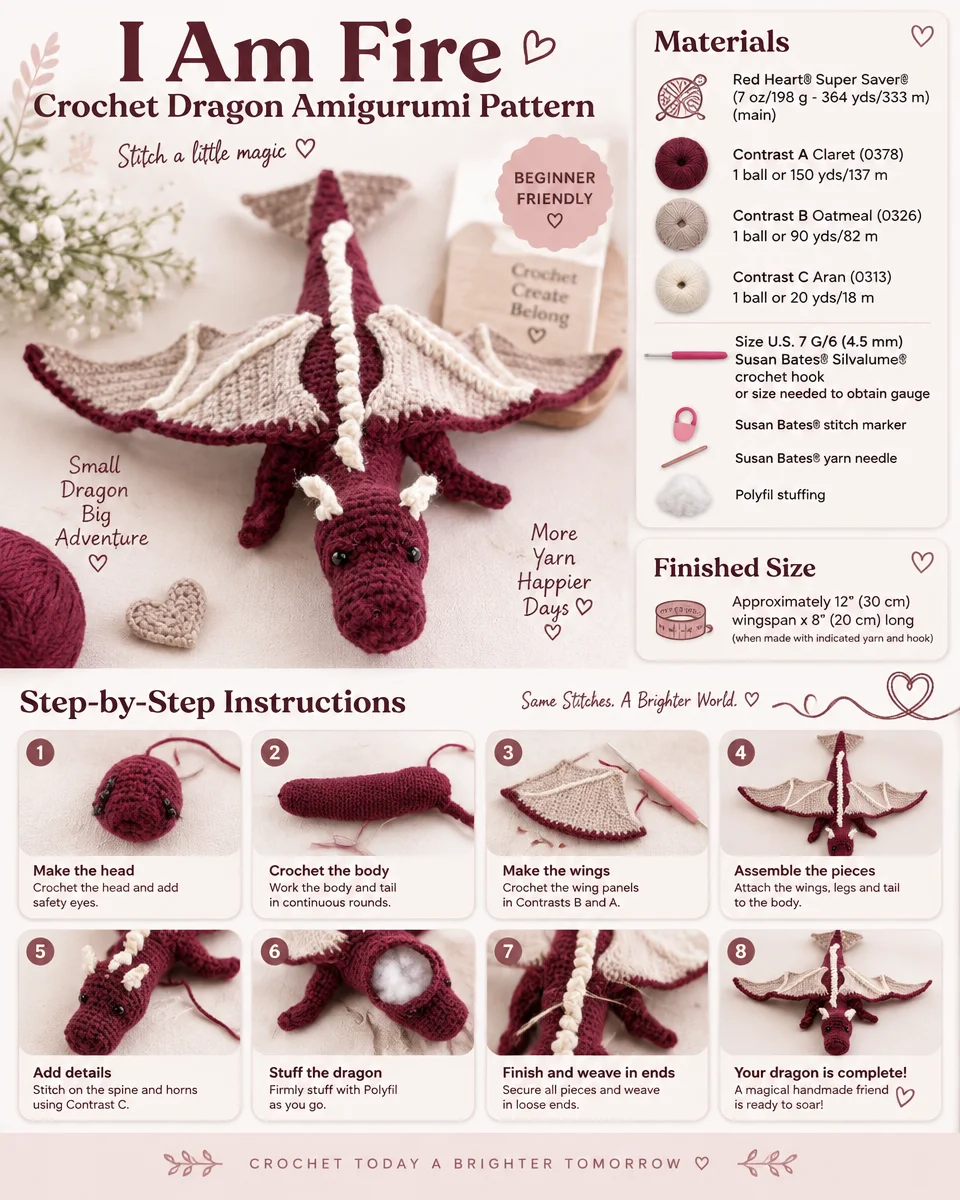
About This Amigurumi Design
The I Am Fire Dragon is not just a simple crochet project; it includes multiple components, all intricately designed to form a complete and adorable dragon. From its impressive wings to its spiky back, this amigurumi dragon features fun details that make it stand out.
Materials
To embark on this fiery project, gather the following materials:
Yarn
- Red Heart® Super Saver®: (7 oz/198 g; 364 yds/333 m) (main color)
- Contrast A: Claret (0378) – 1 ball or 150 yds/137 m
- Contrast B: Oatmeal (0326) – 1 ball or 90 yds/82 m
- Contrast C: Aran (0313) – 1 ball or 20 yds/18 m
Crochet Hook
- Size U.S. 7 G/6 (4.5 mm) Susan Bates® Silvalume® crochet hook or size needed to obtain gauge
Notions
- Susan Bates® stitch marker
- Susan Bates® yarn needle
- Polyfil stuffing
- Pair of ¼” [5 mm] safety eyes
Crochet Abbreviations
- sc: single crochet
- hdc: half double crochet
- dc: double crochet
- sl st: slip stitch
- ch: chain
- st(s): stitch(es)
- sc2tog: single crochet two together
Pattern Notes
- This pattern is crafted in rounds, starting from the head and working down through the body, ending with the legs and tail.
- Be sure to stuff the head, body, tail, and legs firmly to maintain the shape.
Head
Begin at the head with Contrast A.
- Foundation: Chain 5.
- 1st rnd: 1 sc in 2nd ch from hook. 1 sc in each of next 2 ch. 3 sc in last ch. Working into the opposite side of foundation ch, 1 sc in each of next 2 ch. 2 sc in last ch. (10 sc)
- 2nd rnd: 2 sc in first sc, 1 sc in each of the next 2 sc. 2 sc in each of the next 3 sc. 1 sc in each of the next 2 sc. 2 sc in each of the last 2 sc. (16 sc)
- 3rd to 8th rnds: 1 sc in each sc around.
- Stuff head firmly. Attach safety eyes as per manufacturer’s instructions.
Body
Continue from the head:
- 9th rnd: (2 sc in next sc, 1 sc in next sc) 3 times. 2 sc in next sc. 1 sc in each of the last 9 sc. (20 sc)
- 10th rnd: (2 sc in next sc, 1 sc in next sc) 5 times. 2 sc in next sc. 1 sc in each of the last 9 sc. (26 sc)
- 11th to 14th rnds: 1 sc in each sc around.
- 15th rnd: 1 sc in each of the next 2 sc, (sc2tog, 1 sc in next sc) 5 times, sc2tog, 1 sc in each of the last 7 sc. (20 sts)
- 16th to 19th rnds: 1 sc in each st around.
- 20th rnd: 1 sc in each of the next 2 sc, (sc2tog, 1 sc in next sc) 3 times, sc2tog, 1 sc in each of the last 7 sc. (16 sts)
- 21st to 26th rnds: 1 sc in each st around.
- 27th rnd: 1 sc in each of the next 3 sc, 3 sc in next sc, 1 sc in each of the next 7 sc, 3 sc in next sc, 1 sc in each of the last 4 sc. (20 sc)
- 28th and 29th rnds: 1 sc in each sc around.
- 30th rnd: 1 sc in each of the next 5 sc, 3 sc in next sc, 1 sc in each of the next 9 sc, 3 sc in next sc, 1 sc in each of the last 4 sc. (24 sc)
- 31st and 32nd rnds: 1 sc in each sc around.
- 33rd rnd: 1 sc in each of the next 7 sc, 3 sc in next sc, 1 sc in each of the next 11 sc, 3 sc in next sc, 1 sc in each of the last 4 sc. (28 sc)
- 34th and 35th rnds: 1 sc in each sc around.
- 36th rnd: 1 sc in each of the next 8 sc, 3 sc in next sc, 1 sc in each of the next 13 sc, 3 sc in next sc, 1 sc in each of the last 5 sc. (32 sc)
- 37th to 48th rnds: 1 sc in each sc around. Stuff body firmly.
Tail
- 49th rnd: 1 sc in each of the next 6 sc, sc2tog. Repeat from * around. (28 sts)
- 50th to 52nd rnds: 1 sc in each st around.
- 53rd rnd: 1 sc in each of the next 5 sc, sc2tog. Repeat from * around. (24 sts)
- 54th to 56th rnds: 1 sc in each st around.
- 57th rnd: 1 sc in each of the next 4 sc, sc2tog. Repeat from * around. (20 sts)
- 58th to 60th rnds: 1 sc in each st around.
- 61st rnd: 1 sc in each of the next 3 sc, sc2tog. Repeat from * around. (16 sts)
- 62nd to 64th rnds: 1 sc in each st around. Stuff tail firmly.
- 65th rnd: 1 sc in each of the next 2 sc, sc2tog. Repeat from * around. (12 sts)
- 66th to 68th rnds: 1 sc in each st around.
- 69th rnd: 1 sc in next sc, sc2tog. Repeat from * around. (8 sts)
- 70th to 72nd rnds: 1 sc in each st around.
- 73rd rnd: (sc2tog) 4 times. (4 sts)
- 74th rnd: 1 sc in each st around. Fasten off.
Wing (Make 2 Alike)
Mainsails (Make 3)
- With Contrast B, ch 2.
- 1st row: 1 sc in 2nd ch from hook. Turn. (1 sc)
- 2nd row: Ch 1, 2 sc in sc. Turn. (2 sc)
- 3rd row: Ch 1, 2 sc in first sc, 1 sc in last sc. Turn. (3 sc)
- 4th to 15th rows: Ch 1, 2 sc in first sc. 1 sc in each sc to end of row. Turn. (15 sc at end of 15th row)
- 16th row: Ch 2, 2 hdc in first sc, 1 hdc in each of the next 2 sc, 1 sc in each of the next 2 sc, sl st in each of the next 5 sc, 1 sc in each of the next 2 sc, 1 hdc in each of the next 2 sc, 2 hdc in last sc. Fasten off.
Join and/or shape as required according to pattern.
Assembly
Sew the wings to the body at the appropriate places as indicated in the pattern images.
Back Spines (Make 1)
- With Contrast C, ch 36.
- 1st row: Sl st in 2nd ch from hook. 1 dc in next ch, sl st in next ch. Repeat from * to end of chain. Fasten off.
- Sew back spines to body.
Tail Spade (Make 2 Alike)
- With Contrast B, ch 2.
- 1st row: 1 sc in 2nd ch from hook. Turn. (1 sc)
- 2nd row: Ch 1, 2 sc in sc. Turn. (2 sc)
- 3rd row: Ch 1, 2 sc in first sc, 1 sc in last sc. Turn. (3 sc)
- 4th to 7th rows: Ch 1, 2 sc in first sc, 1 sc in each sc to end of row. Turn. (7 sc at end of 7th row)
- Fasten off.
- Sew tail spades to the tip of the tail.
Horns (Make 2 Alike)
- With Contrast C, ch 5.
- 1st row: Sl st in 2nd ch from hook. Sl st in each of the next 2 ch, 1 sc in last ch. Fasten off.
- Sew horns to head.
Legs (Make 4 Alike)
- Back and Front (Make Alike): With Contrast A, ch 15.
- 1st rnd: 2 hdc in 3rd ch from hook, 1 hdc in each of the next 2 ch, 1 sc in each of the next 2 ch, sc3tog, 1 sc in each of the next 2 ch, sl st in each of the next 2 ch, (sl st, ch 2, sl st) all in last ch.
- Working into the opposite side of foundation ch, sl st in each of the next 5 ch, 3 sc in next ch, 1 sc in each of the next 2 ch, 1 hdc in each of the next 3 ch, 3 hdc in last ch. Join with sl st to first hdc. Fasten off, leaving a long tail for sewing.
- Holding back and front together, sew pieces together to form leg, stuffing leg with loose ends from beginning chain. Sew legs to body.
Finishing / Face Embroidery
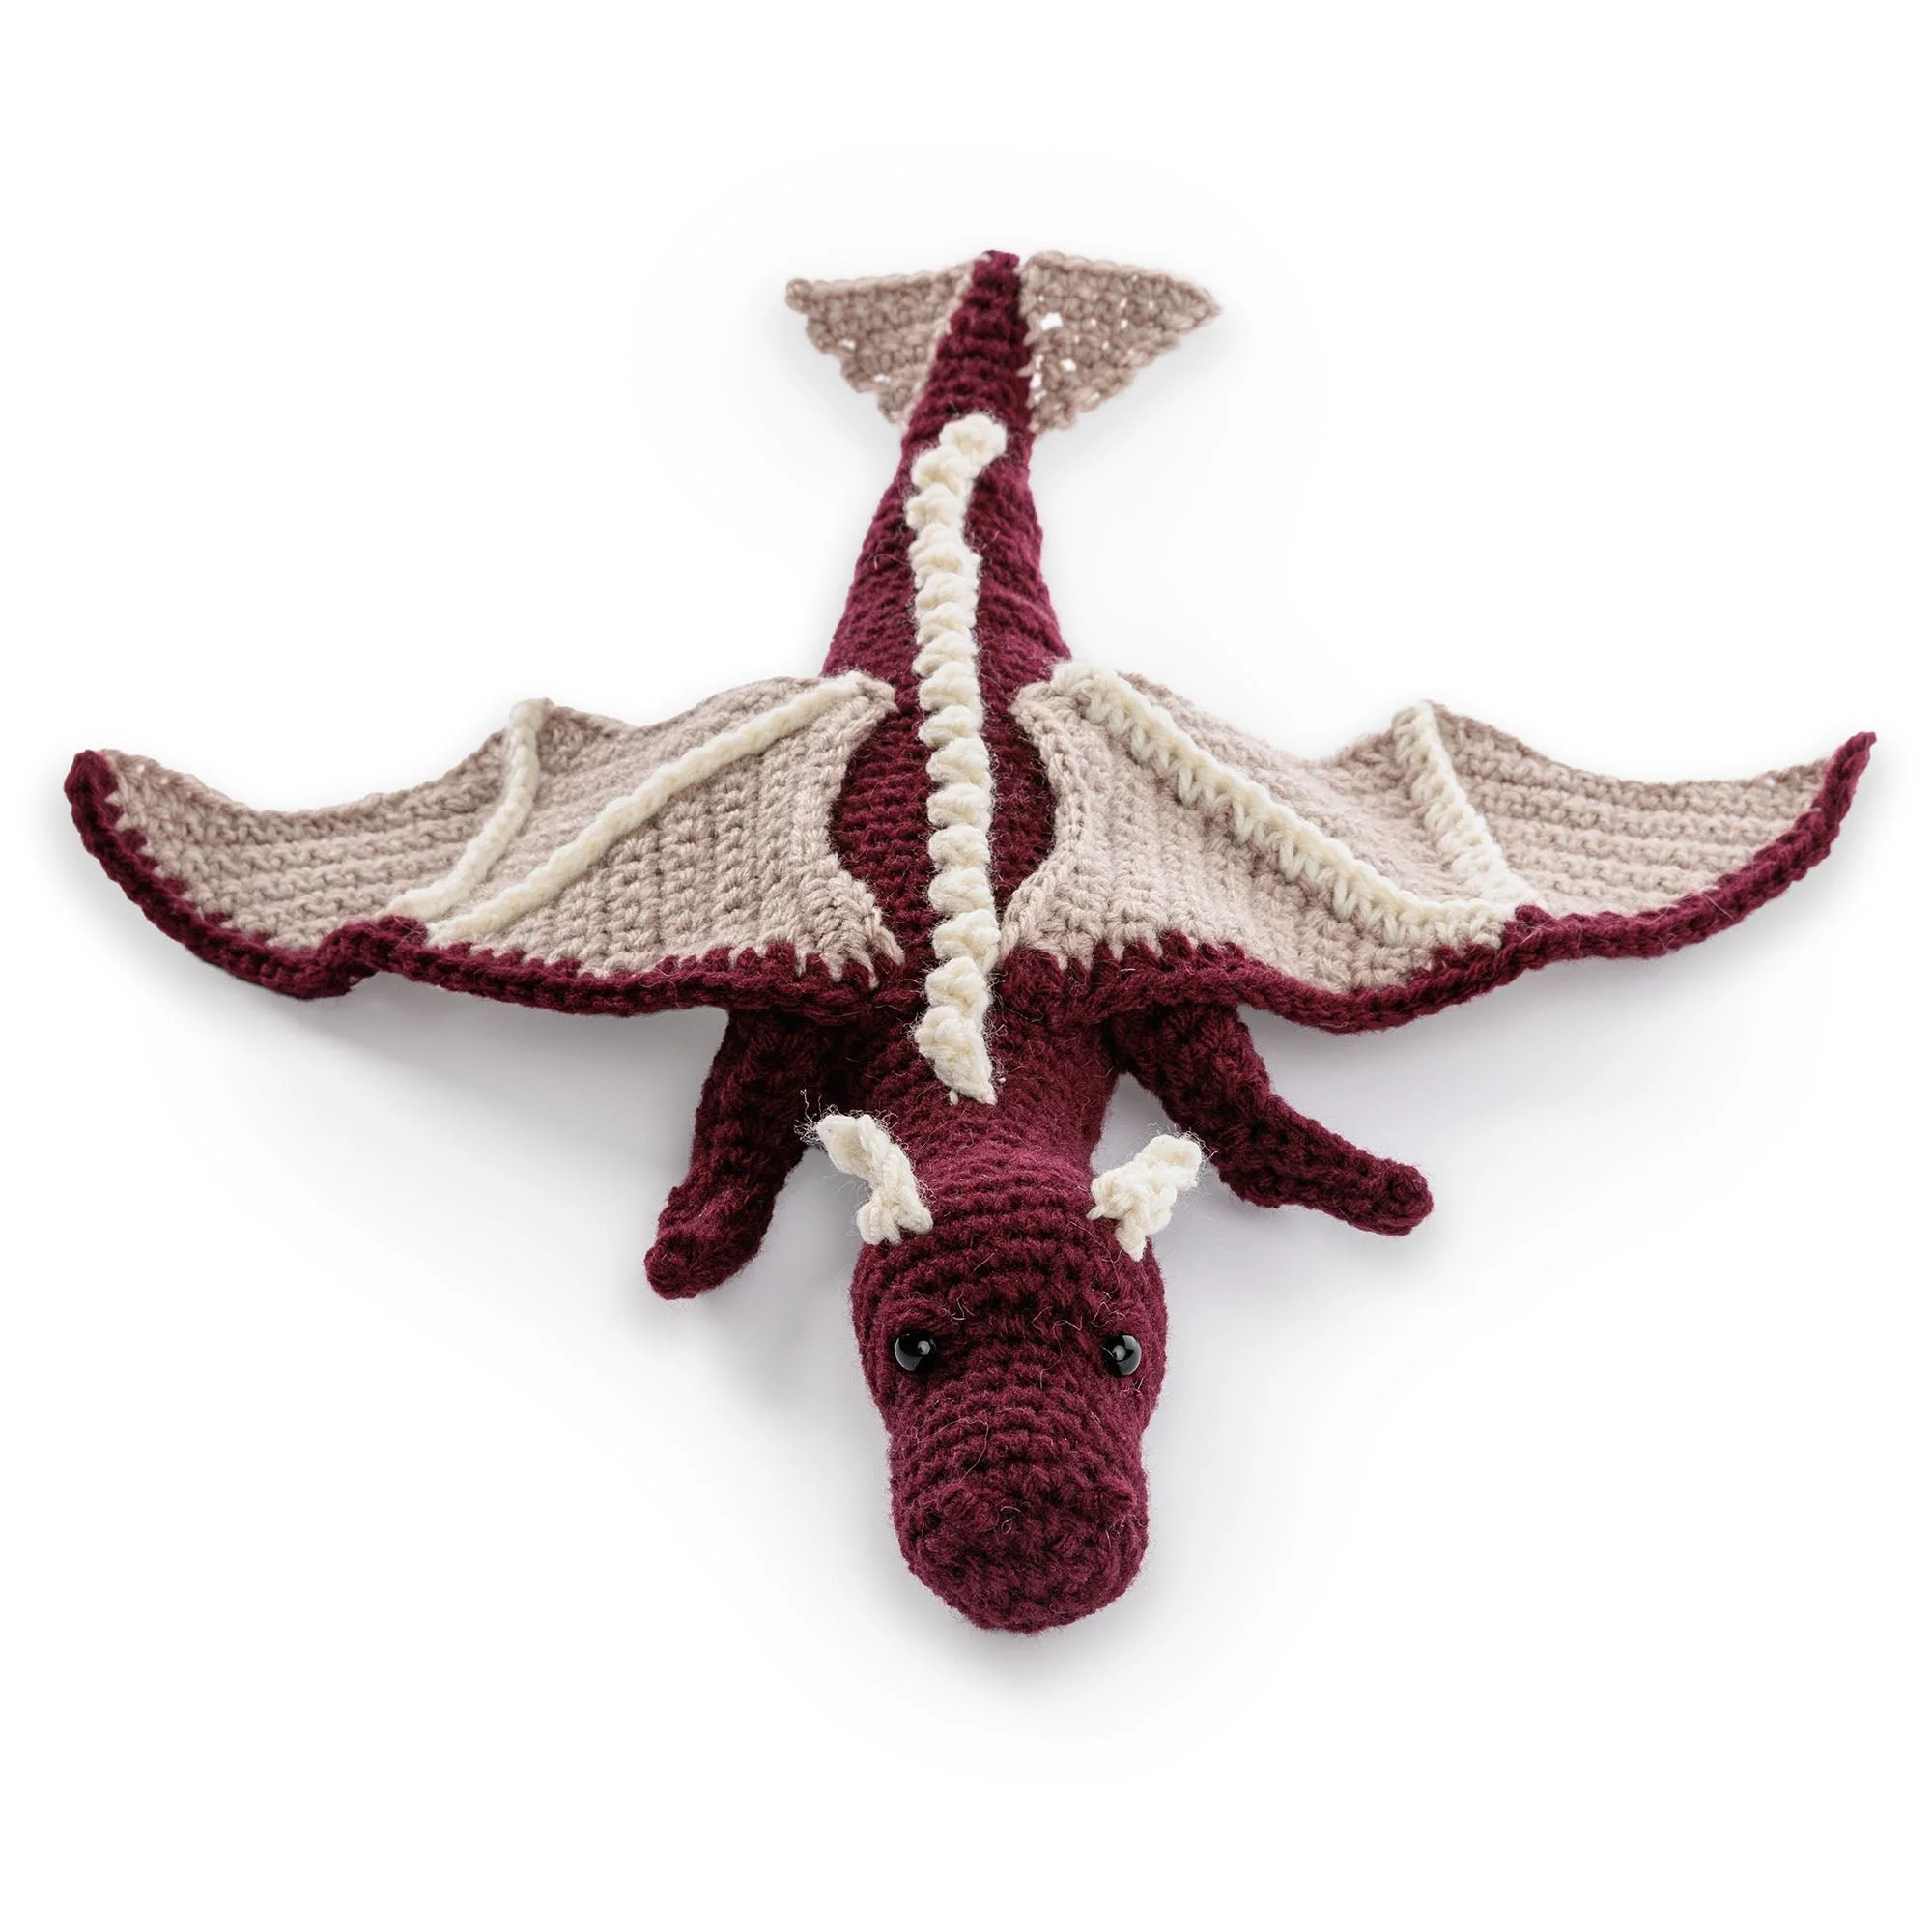
Using Contrast A, embroider eyelids with straight stitches and nostrils with French knots, as shown in your reference photo.
Frequently Asked Questions
What crochet hook is used for this pattern?
The pattern calls for a Size U.S. 7 G/6 (4.5 mm) crochet hook, or any hook size needed to achieve gauge.
Is this project worked in rows or rounds?
This project is primarily worked in rounds, starting with the head and working down through the body and tail.
Does this crochet project require assembly?
Yes, several pieces such as the wings, back spines, legs, and tail spades need to be sewn together to complete the dragon.
How much yarn will I need for this pattern?
You will need Red Heart® Super Saver® yarn, including main color and contrasts A, B, and C totaling approximately 258 yds for a finished dragon.
What safety eyes do I need?
You will need a pair of ¼” [5 mm] safety eyes for this project.
Conclusion
With the I Am Fire Crochet Dragon Amigurumi Pattern, you can create a stunning and unique piece that showcases your crochet skills. Each component of this pattern contributes to the final product’s whimsical charm and character, making it a delightful addition to any collection or a perfect gift. Happy crocheting!