Crochet Bear Amigurumi Pattern
Creating a delightful crochet bear amigurumi is a wonderful way to explore the joys of crochet. This forgiving project is ideal for those looking to create a handmade toy that will charm both children and adults alike. The adorable bear, with its endearing face and cuddly body, is sure to become a cherished companion.
About the Crochet Bear
This crochet bear is designed using the magic loop method, allowing you to work seamlessly from the bottom up for the body and head. It features a charming snout, two floppy ears, and adorable arms and feet. With simple construction techniques and basic stitches, this bear is a manageable yet rewarding project.
Materials
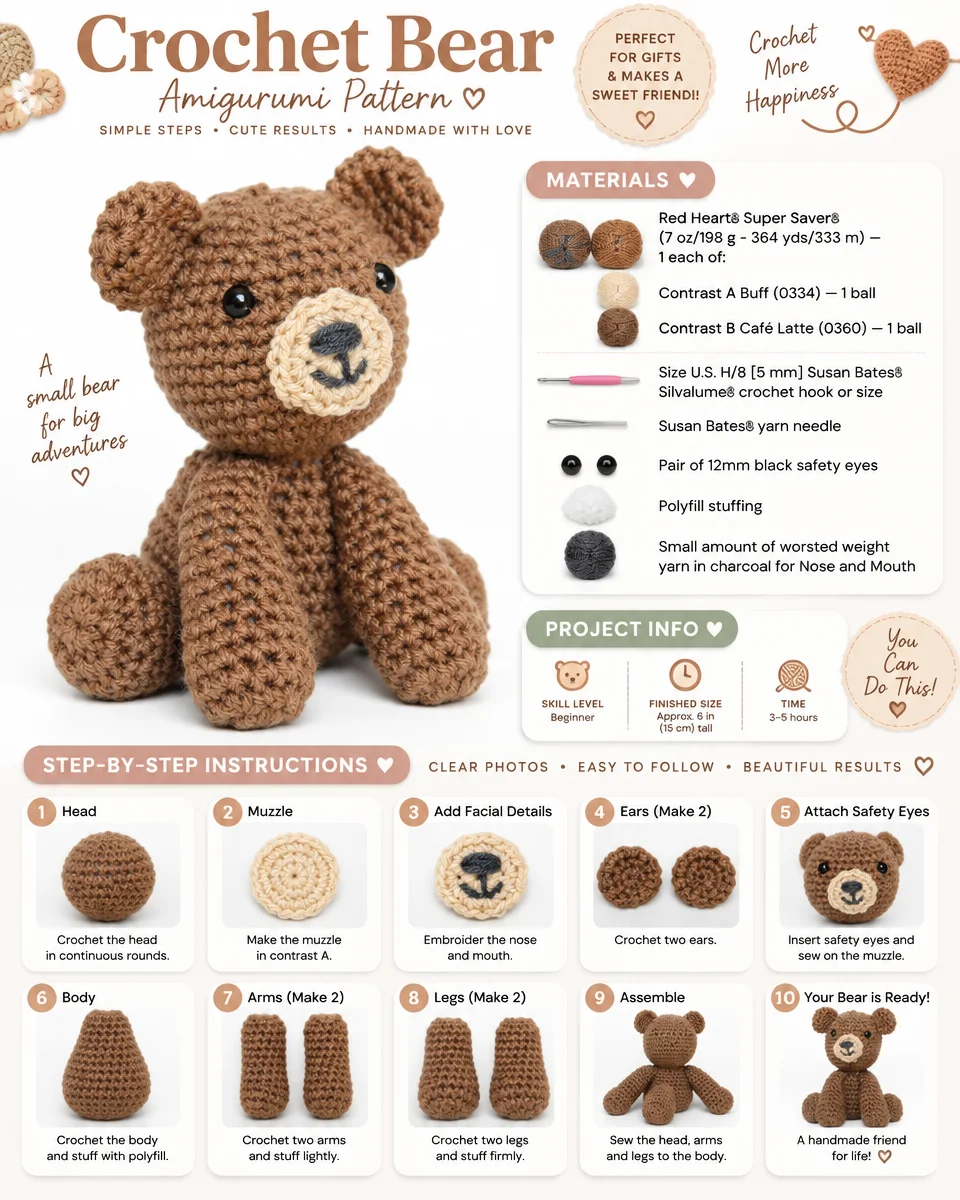
Yarn
- Red Heart® Super Saver® (7 oz/198 g; 364 yds/333 m)
- Contrast A Buff (0334) — 1 ball
- Contrast B Café Latte (0360) — 1 ball
- Small amount of worsted weight yarn in charcoal for nose and mouth.
Crochet Hook
- Size U.S. H/8 [5 mm] Susan Bates® Silvalume® crochet hook or size needed to obtain gauge.
Notions
- Susan Bates® yarn needle
- Pair of 12mm black safety eyes
- Polyfill stuffing
Crochet Abbreviations
- ch: chain
- sc: single crochet
- sc2tog: single crochet two together
- ** rnd**: round
Construction Overview
Work sections using the magic loop where stated:
- Snout (with A)
- Body/Head (one piece, bottom up; with B)
- Ears (make 2) (with B)
- Feet (make 2) (with B)
- Arms (make 2) (with B)
- Tail (with B)
- Assembly: stitch/attach pieces and add face features (safety eyes, mouth/nose)
Instructions
Snout (make with Contrast A)
Using A, begin using the magic loop method demonstrated here.
1st rnd: Ch 1. 10 sc in ring. Join.
2nd rnd: Ch 1. 2 sc in each sc around. Join. 20 sc.
Fasten off, leaving a long tail.
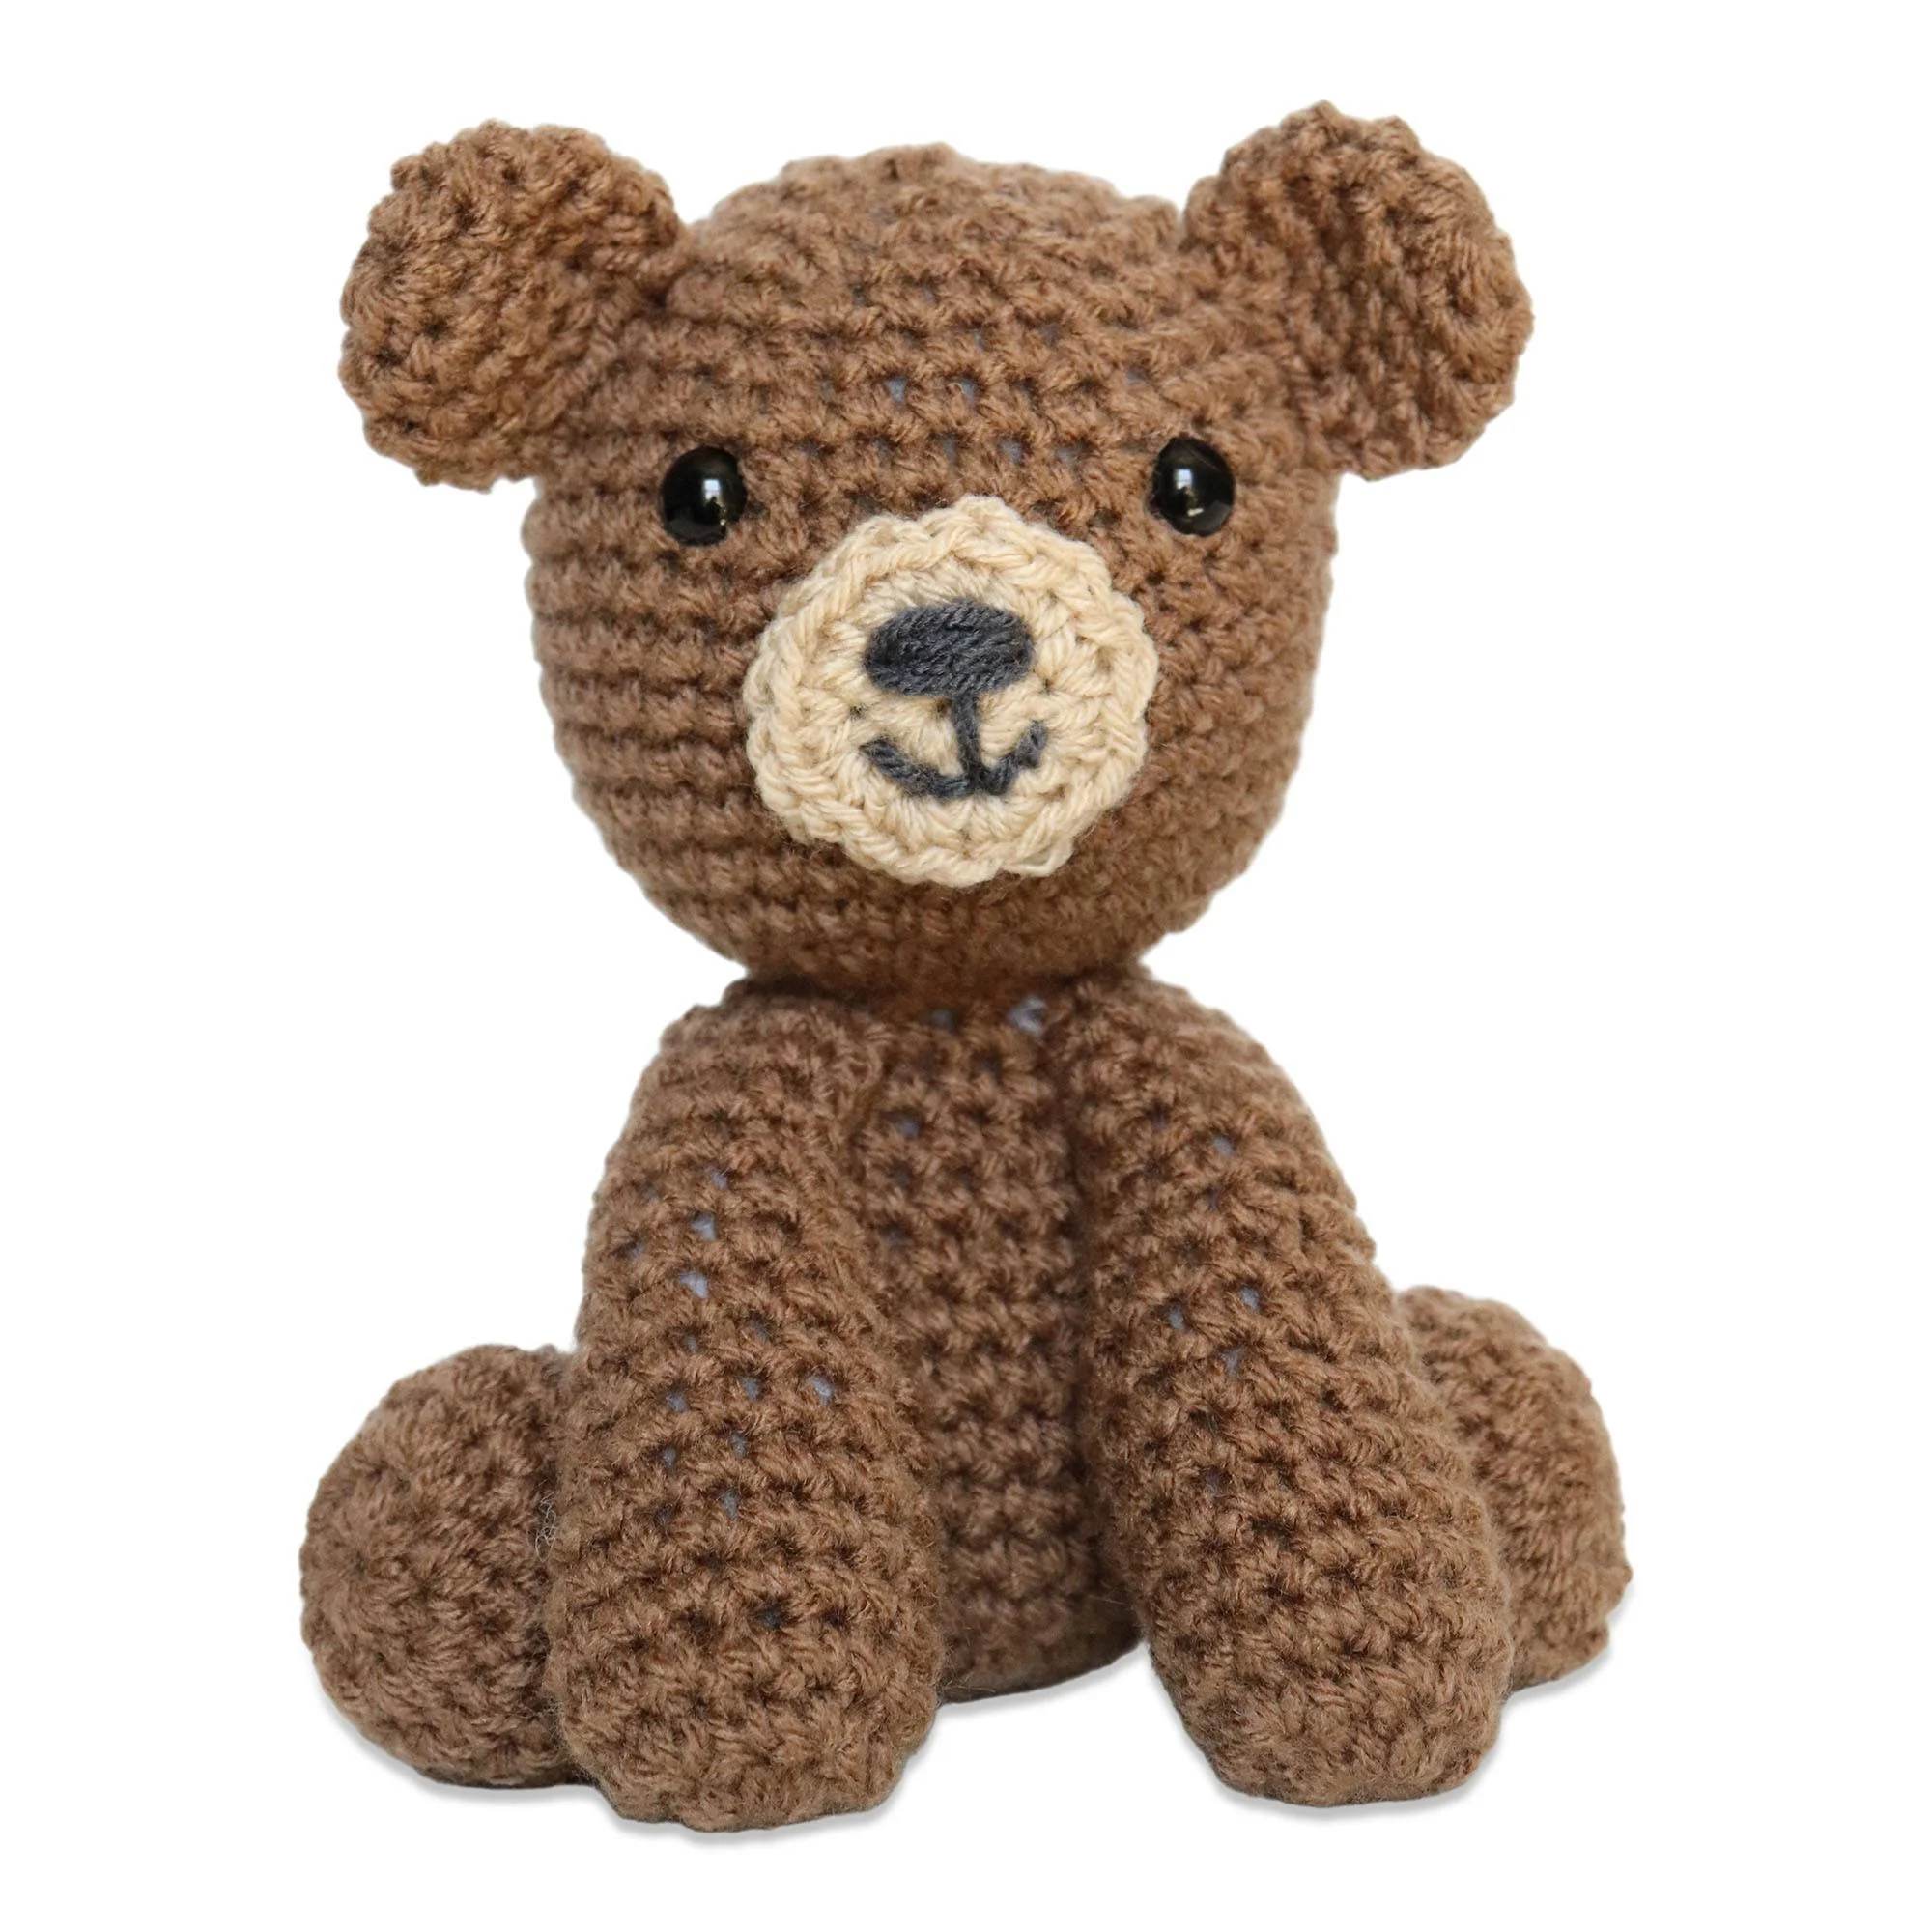
With charcoal yarn, stitch on mouth as shown in the photo. Loop yarn between 2 sts approximately 10 times to make the nose.
Body/Head (worked in one piece bottom up; with Contrast B)
Note: Body and head are worked in one piece from the bottom up.
With B, begin using the magic loop method.
1st rnd: Ch 1. 10 sc in ring. Join.
2nd rnd: Ch 1. 2 sc in each sc around. Join. 20 sc.
3rd rnd: Ch 1. 2 sc in first sc. 1 sc in next sc. *2 sc in next sc. 1 sc in next sc. Rep from * around. Join. 30 sc.
4th to 10th rnds: Ch 1. 1 sc in each sc around. Join.
11th rnd: Ch 1. *Sc2tog. 1 sc in each of next 3 sc. Rep from * around. Join. 24 sts.
12th rnd: As 4th rnd.
13th rnd: Ch 1. *Sc2tog. 1 sc in each of next 2 sc. Rep from * around. Join. 18 sts.
14th rnd: As 4th rnd.
15th rnd: Ch 1. *Sc2tog. 1 sc in next sc. Rep from * around. 12 sts.
16th rnd: As 4th rnd.
17th rnd: Ch 1. 2 sc in each sc around. Join. 24 sc.
18th rnd: Ch 1. 2 sc in first sc. 1 sc in next sc. *2 sc in next sc. 1 sc in next sc. Rep from * around. Join. 36 sc.
19th to 26th rnds: As 4th rnd.
27th rnd: Ch 1. *Sc2tog. 1 sc in each of next 4 sc. Rep from * around. Join. 30 sts.
28th rnd: As 4th rnd.
29th rnd: Ch 1. *Sc2tog. 1 sc in each of next 3 sc. Rep from * around. Join. 24 sts.
Before proceeding to complete head, stitch snout to face between 20th and 24th rnds. Add safety eyes between 24th and 25th rnds, approximately 6 sts apart and centered over the snout. Begin stuffing with polyfill. Continue stuffing with polyfill while working the rest of the head.
30th rnd: As 4th rnd.
31st rnd: As 13th rnd. 18 sts.
32nd rnd: As 15th rnd. 12 sts.
33rd rnd: Ch 1. *Sc2tog. Rep from * around. 6 sts.
Fasten off, leaving a long tail.
Ears (make 2) (with Contrast B)
With B, begin using the magic loop method.
1st rnd: Ch 1. 8 sc in ring. Join.
2nd rnd: Ch 1. 2 sc in first sc. 1 sc in next sc. *2 sc in next st. 1 sc in next st. Rep from * around. Join. 12 sc.
3rd and 4th rnds: Ch 1. 1 sc in each st around. Join.
5th rnd: Ch 1. *Sc2tog. 1 sc in next st. Rep from * around. Join. 8 sts.
Do not stuff. Stitch ears to head as shown in the photo, approximately 4 rnds down from the top.
Feet (make 2) (with Contrast B)
With B, begin using the magic loop method.
1st rnd: Ch 1. 10 sc in ring. Join.
2nd rnd: Ch 1. 2 sc in each sc around. Join. 20 sc.
3rd and 4th rnds: Ch 1. 1 sc in each sc around. Join.
5th rnd: Ch 1. *Sc2tog. 1 sc in each of next 3 sc. Rep from * around. Join. 16 sts.
6th rnd: As 3rd rnd.
7th rnd: Ch 1. *Sc2tog. 1 sc in each of next 2 sc. Rep from * around. Join. 12 sts.
8th rnd: Ch 1. *Sc2tog. 1 sc in next sc. Rep from * around. Join. 8 sts.
Fasten off, leaving a long tail.
Stuff feet with polyfill. Attach feet to each side at bottom of body. Note that feet should stick out sideways to give bear support to sit up.
Arms (make 2) (with Contrast B)
With B, begin using the magic loop method.
1st rnd: Ch 1. 10 sc in ring. Join.
2nd rnd: Ch 1. 2 sc in first sc. 1 sc in next sc. *2 sc in next sc. 1 sc in next sc. Rep from * around. Join. 15 sc.
3rd to 6th rnds: Ch 1. 1 sc in each sc around. Join.
7th rnd: Ch 1. *Sc2tog. 1 sc in each of next 3 sc. Rep from * around. Join. 12 sc.
8th to 9th rnds: As 3rd rnd.
10th rnd: Ch 1. *Sc2tog. 1 sc in each of next 2 sc. Rep from * around. Join. 9 sc.
11th to 15th rnds: As 3rd rnd.
Fasten off, leaving a long tail.
Stuff arms with polyfill. Stitch to bear at neck so arms hang down in front of feet as shown in the photo.
Tail (with Contrast B)
With B, begin using the magic loop method.
1st rnd: Ch 1. 10 sc in ring. Join.
2nd rnd: Ch 1. 2 sc in first sc. 1 sc in next sc. *2 sc in first sc. 1 sc in next sc. Rep from * around. Join. 15 sc.
3rd rnd: Ch 1. 1 sc in each sc around. Join.
4th rnd: Ch 1. *Sc2tog. 1 sc in next sc. Rep from * around. Join. 10 sc.
5th rnd: Ch 1. *Sc2tog. Rep from * around. Join. 5 sc.
Fasten off, leaving a long tail.
Stuff with polyfill and stitch to the center back of the body.
Final Assembly / Finishing
- Stitch snout to face between 20th and 24th rnds.
- Add safety eyes between 24th and 25th rnds, approximately 6 sts apart and centered over the snout.
- Stitch ears to head, approximately 4 rnds down from the top (do not stuff ears).
- Attach feet to each side at the bottom of the body; feet should stick out sideways for sitting support.
- Stitch arms to bear at the neck so arms hang down in front of feet as shown in the photo.
- Stitch the tail to the center back of the body.
Frequently Asked Questions
What crochet hook is used for this pattern?
The pattern calls for a U.S. H/8 [5 mm] Susan Bates® Silvalume® crochet hook or size needed to obtain gauge.
Is this project worked in rows or rounds?
This crochet bear amigurumi is worked entirely in rounds.
Does this crochet project require assembly?
Yes, this project requires assembly of the various parts, including the head, eyes, ears, arms, feet, and tail.
Conclusion
The Crochet Bear Amigurumi Pattern is not only a fun and engaging project but also a wonderful way to create a special gift or a cherished toy. By following the instructions step by step, you will create an adorable bear that can be displayed or played with for years to come. Enjoy the process and happy crocheting!