Crochet Amigurumi Brother and Sister Bears Pattern
Amigurumi is a charming crochet technique that brings adorable stuffed animals to life. In this tutorial, we will create a delightful set of brother and sister bears using the Red Heart® Amigurumi Prints yarn. This pattern is perfect for anyone looking to make a special gift for a child or simply to enjoy the soothing rhythm of crochet.
About This Amigurumi Design
The brother and sister bears feature an engaging design that allows you to customize each bear with different colors and accessories, such as a turtle neck for the boy bear and a whimsical skirt or flower for the girl bear. The use of soft yarn adds a cuddly texture, making these bears perfect for hugging.
Materials
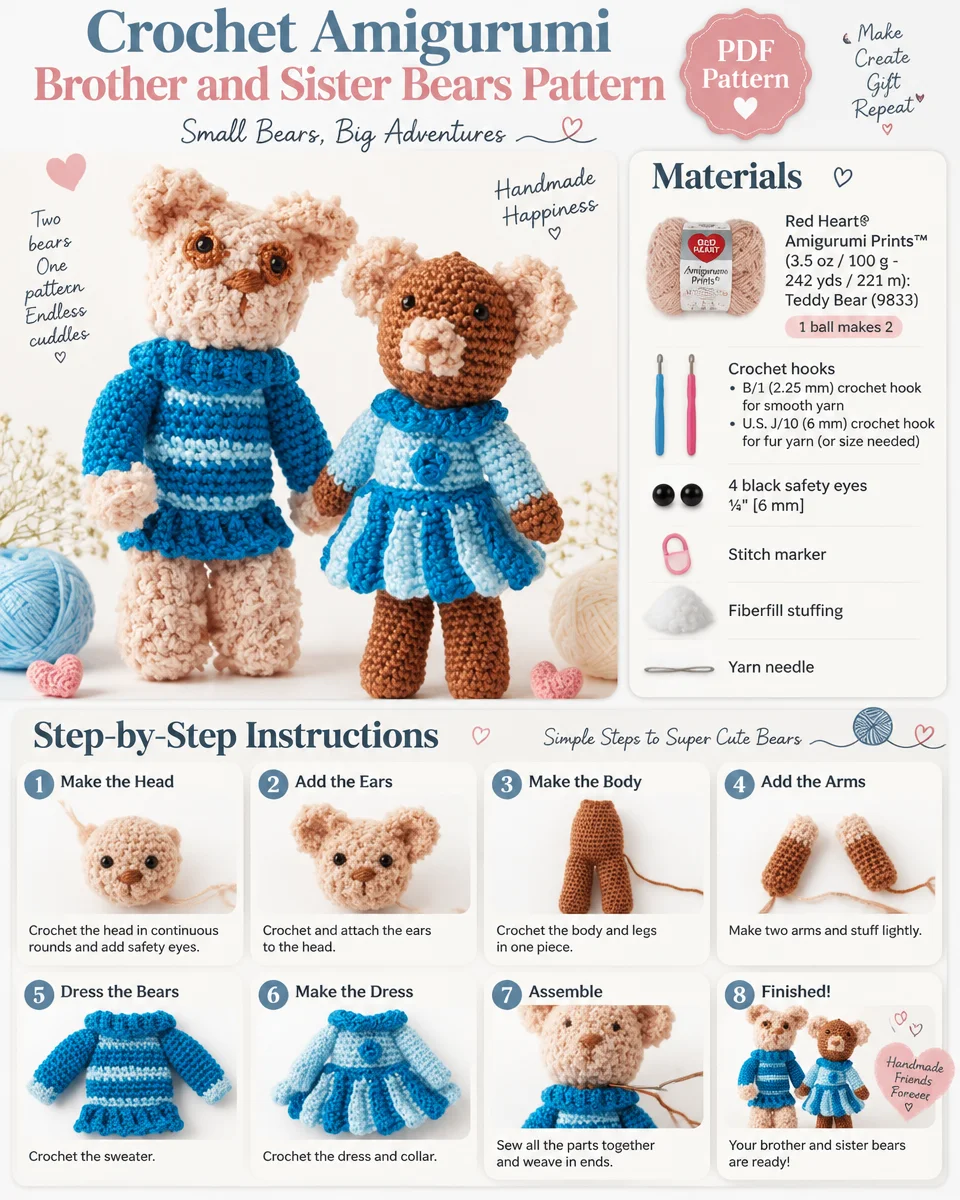
To create your brother and sister bears, be sure to gather the following materials:
Yarn
- Red Heart® Amigurumi Prints™ (3.5 oz / 100 g; 242 yds / 221 m): Teddy Bear (9833)
1 ball makes 2 bears
Crochet Hook
- B/1 (2.25 mm) crochet hook for smooth yarn
- U.S. J/10 (6 mm) crochet hook for fur yarn (or size needed to obtain gauge)
Safety Eyes
- 4 black safety eyes ¼” [6 mm]
Notions
- Stitch marker
- Fiberfill stuffing
- Yarn needle
Color Assignments
For the brother bear (Boy Version 1):
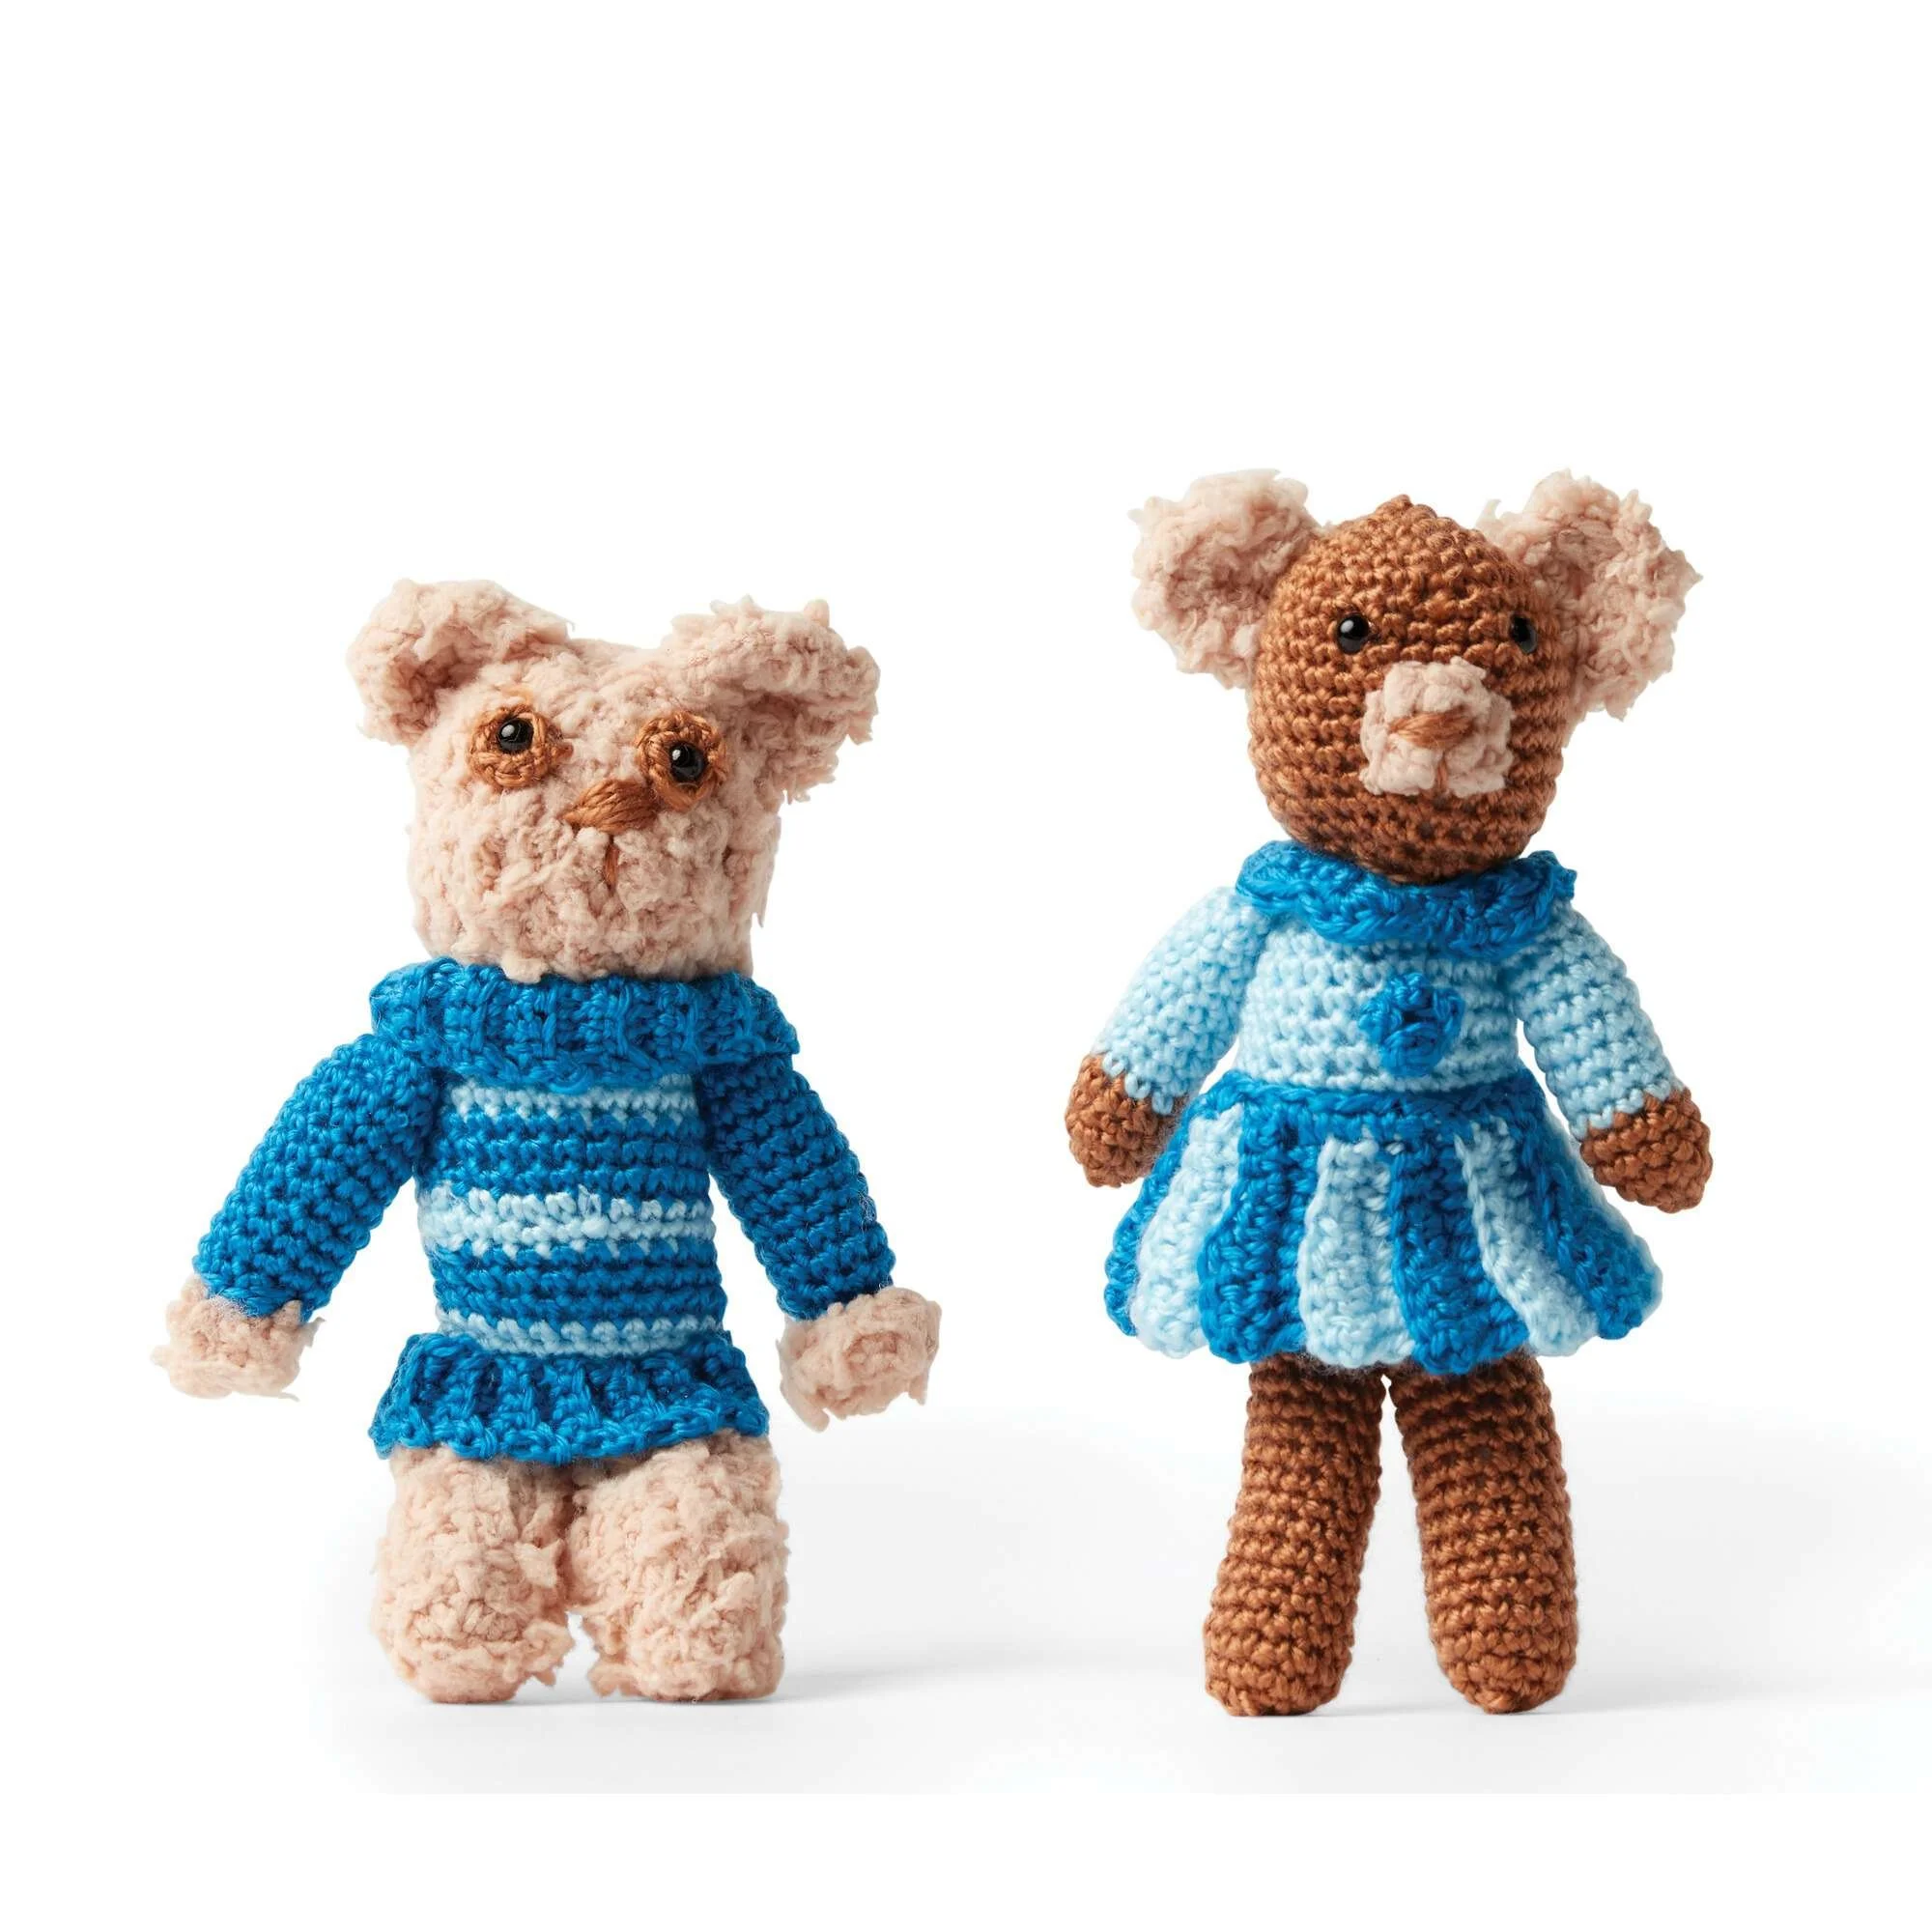
- Beige Fur = Color 1
- Royal Blue = Color 2
- Light Blue = Color 3
- Tan = Color 4
For the sister bear (Girl Version 2):
- The same color codes apply (Color 1–4 correspond as above).
Crochet Abbreviations
- ch = chain
- sc = single crochet
- sl st = slip stitch
- dc = double crochet
- PM = place marker
- Sc2tog = single crochet two together
- hdc = half double crochet
- sts = stitches
Pattern Notes
- This pattern includes instructions for both the boy and girl bears, allowing for creative customization.
- Be sure to stuff your pieces firmly but not so much that they distort the shape.
Head
Boy Version 1
-
Outer Eye (Make 2)
With the smaller hook and Color 4, ch 2.
1st rnd: 6 sc in 2nd ch from hook. Join with sl st to first sc.
Fasten off, leaving a long end. -
Head
With the larger hook and Color 1, begin at the top of the head, ch 2.
1st rnd: 6 sc in 2nd ch from hook. Do not join at end of rnd. PM for the beginning of rnd.
2nd rnd: 2 sc in each sc around. 12 sc.
3rd rnd: *1 sc in next sc. 2 sc in next sc. Rep from * around. 18 sc.
4th to 9th rnds: 1 sc in each sc around.
10th rnd: (Sc2tog) 9 times. 9 sts.
Stuff head. Set aside.
Following the manufacturer’s instructions, attach safety eye through the center of the outer eye. Snap in place.
Sew Outer Eye in place to Head, pushing the plastic point into the head.
With Color 4, using a satin stitch, embroider the nose and a straight stitch to embroider underneath.
Girl Version 2
- Head
With the larger hook and Color 4, begin at the top of the head, ch 2.
1st rnd: 6 sc in 2nd ch from hook. Do not join at end of rnd. PM for the beginning of rnd.
2nd rnd: 2 sc in each sc around. 12 sc.
3rd rnd: *1 sc in next sc. 2 sc in next sc. Rep from * around. 18 sc.
4th rnd: 1 sc in each sc around.
5th rnd: *1 sc in each of the next 2 sc. 2 sc in next sc. Rep from * around. (24 sc).
6th rnd: *1 sc in each of the next 3 sc. 2 sc in next sc. Rep from * around. (30 sc).
7th to 12th rnds: 1 sc in each sc around.
13th rnd: *1 sc in each of the next 3 sc. Sc2tog. Rep from * around. 24 sts.
14th rnd: 1 sc in each sc around. Insert eyes 5 sc apart between rnds 6 and 7.
15th rnd: *1 sc in each of next 2 sc. Sc2tog. Rep from * around. 18 sts.
16th rnd: *1 sc in next sc. Sc2tog. Rep from * around. 12 sts. Fasten off. Stuff head.
Arms
Boy Version 1
- Arm (make 2)
With the smaller hook and Color 2, ch 2.
1st rnd: 6 sc in 2nd ch from hook. Do not join at end of rnd. PM for the beginning of rnd.
2nd rnd: 2 sc in each sc around. 12 sc.
3rd to 12th rnds: 1 sc in each sc around. Fasten off, leaving a long end of yarn.
Stuff Arms.
Girl Version 2
- Arm (make 2)
With the smaller hook and Color 2, ch 2.
1st rnd: 5 sc in 2nd ch from hook. Do not join at end of rnd. PM for the beginning of rnd.
2nd rnd: 2 sc in each sc around. 10 sc.
3rd and 4th rnds: 1 sc in each sc around. Join Color 3 at the end of the 4th rnd.
5th to 13th rnds: 1 sc in each sc around. Fasten off, leaving a long end of yarn. Stuff Arms.
Flatten the top of the arm and sew in place.
Legs
Boy Version 1
- Leg (make 2)
With the larger hook and Color 1, ch 2.
1st rnd: 6 sc in 2nd ch from hook. Do not join at end of rnd. PM for beginning of rnd.
2nd rnd: *1 sc in next sc. 2 sc in next sc. Rep from * around. 9 sc.
3rd to 8th rnds: 1 sc in each sc around. Fasten off at the end of the last row.
Stuff leg.
Girl Version 2
- Leg (make 2)
With the smaller hook and Color 4, ch 2.
1st rnd: 6 sc in 2nd ch from hook. Do not join at end of rnd. PM for the beginning of rnd.
2nd rnd: 2 sc in each sc around. 12 sc.
3rd to 16th rnds: 1 sc in each sc around. Fasten off, leaving a long end of yarn. Stuff Legs.
Body
Boy Version 1
- Body
With the smaller hook and Color 3, ch 2.
1st rnd: 6 sc in 2nd ch from hook. Do not join at end of rnd. PM for the beginning of rnd.
2nd rnd: 2 sc in each sc around. 12 sc.
3rd rnd: *1 sc in next sc. 2 sc in next sc. Rep from * around. 18 sc.
4th rnd: *1 sc in each of the next 2 sc. 2 sc in next sc. Rep from * around. 24 sc.
5th to 8th rnds: 1 sc in each sc around. Join Color 2 at the end of the last rnd.
9th to 11th rnds: With Color 2, 1 sc in each sc around. Join Color 3 at the end of the last rnd.
12th to 13th rnds: With Color 3, 1 sc in each sc around. Join Color 2 at the end of the last rnd.
14th to 16th rnds: With Color 2, 1 sc in each sc around. Join Color 3 at the end of the last rnd.
17th to 19th rnds: With Color 3, 1 sc in each sc around. Do not fasten off.
Stuff Body.
Girl Version 2
- Body
Follow directions for Boy’s Version Body with the following color changes:
1st to 14th rnds: Color 3.
15th to 19th rnds: Color 2.
Finish the same as Boy’s Version.
Ears
Boy Version 1
- Ear (make 2)
With the larger hook and Color 1, ch 4.
1st row: 9 dc in the 4th ch from hook. Turn.
2nd row: Ch 1. 1 sc in each dc to the end of the row. Fasten off.
Sew in place to Head.
Girl Version 2
- Ear (make 2)
With the larger hook and Color 1, ch 2.
1st row: 6 sc in the 2nd ch from hook. Turn.
2nd row: Ch 1. *1 sc in the next sc. 2 sc in the next sc. Rep from * to the end of the row. Fasten off.
Sew in place.
Accessories
Turtle Neck (Boy)
- With the smaller hook and Color 2, ch 10.
1st row: 1 sc in 2nd ch from hook and each ch to end of the chain. Turn. 9 sc.
2nd to 30th rows: Ch 1. Working in back loops only, 1 sc in each sc to the end of the row. Turn. Fasten off at the end of the last row, leaving a long end to sew the center back seam.
Sew turtle neck around neck.
Bottom Edge of Sweater (Boy)
- With the smaller hook and Color 2, ch 6.
1st row: 1 sc in 2nd ch from hook and each ch to the end of the chain. Turn. 5 sc.
2nd to 32nd rows: Working in back loops only, 1 sc in each sc to the end of the row. Turn.
Fasten off at the end of the last row, leaving a long end.
Sew in place around 17th rnd of Body. Sew back seam.
Collar (Girl)
- With the smaller hook and Color 2, ch 18.
1st row: 1 sc in 2nd ch from hook and each ch to the end of the chain. Turn. 17 sc.
2nd row: *Sl st in next sc. 3 sc in next sc. Rep from * to last sc. Sl st in last sc. Fasten off.
Sew Collar around neck.
Flower (Girl)
- With the smaller hook and Color 2, ch 2.
1st rnd: [(Sl st. Ch 2) 4 times. Sl st] in 2nd ch from hook. Fasten off.
Pull the beginning strand to tighten and sew in place.
Skirt (Girl) (Worked Side to Side)
-
Skirt Notes
Ch 2 at the beginning of the row does not count as a stitch.
Do not break color that is not in use; carry it up the side of the work. -
Skirt Instructions
With the smaller hook and Color 3, ch 10.
1st row: 1 sc in 2nd ch from hook. 1 sc in each of the next 2 ch. 1 hdc in each of the next 3 ch. 1 dc in each of the next 3 ch. Turn.
2nd row: Ch 2. Working in back loops only, 1 dc in each of the next 3 dc. 1 hdc in each of the next 3 hdc. 1 sc in each of the next 3 sc. Join Color 2. Turn.
3rd row: With Color 2, ch 1. Working in back loops only, 1 sc in each of the first 3 sc. 1 hdc in each of the next 3 hdc. 1 dc in each of the next 3 dc. Turn.
4th row: Ch 2. Working in back loops only, 1 dc in each of the first 3 dc. 1 hdc in each of the next 3 hdc. 1 sc in each of the next 3 sc. Turn.
5th row: With Color 3, as 3rd row.
6th row: With Color 3, as 4th row.
7th to 28th rows: Keeping the continuity of the stripe pattern, repeat 3rd to 6th rows. Fasten off Color 3. -
Skirt Finishing/Attachment
With Color 2, work in sc along the waist, covering carry-alongs.
Sew the center back seam.
Put the skirt on the bear.
Sew to the 11th rnd of the Body.
Assembly of Head/Body/Legs
Boy Version 1
- Sew Head to the top of the Body, pushing the neck down so it is sewn at the 5th rnd of the Body.
- Center the Head, fold the bottom of the Body flat. Working through both thicknesses, work 12 sc across the bottom of the Body. Fasten off.
- Flatten the bottom of the leg. With Color 1 sew legs in place across 12 sc of the Body.
Girl Version 2
- Follow the assembly instructions as detailed for the boy version, adapting with any additional features like the collar and skirt.
Frequently Asked Questions
What crochet hook is used for this pattern?
You will need a B/1 (2.25 mm) crochet hook for smooth yarn and a U.S. J/10 (6 mm) crochet hook for the fur yarn.
Is this project worked in rows or rounds?
The amigurumi bears are primarily worked in rounds.
Does this crochet project require assembly?
Yes, both bears require assembly, including sewing the head, arms, and legs to the body, along with adding accessories.
Conclusion
The Crochet Amigurumi Brother and Sister Bears Pattern offers a fun and engaging project that allows for plenty of creativity. With just some basic crochet skills and the right materials, you can create two adorable bears that are not only perfect for gifting but also great companions for any child. Happy crocheting!