Betsy & Bruno Crochet Sloth Pattern
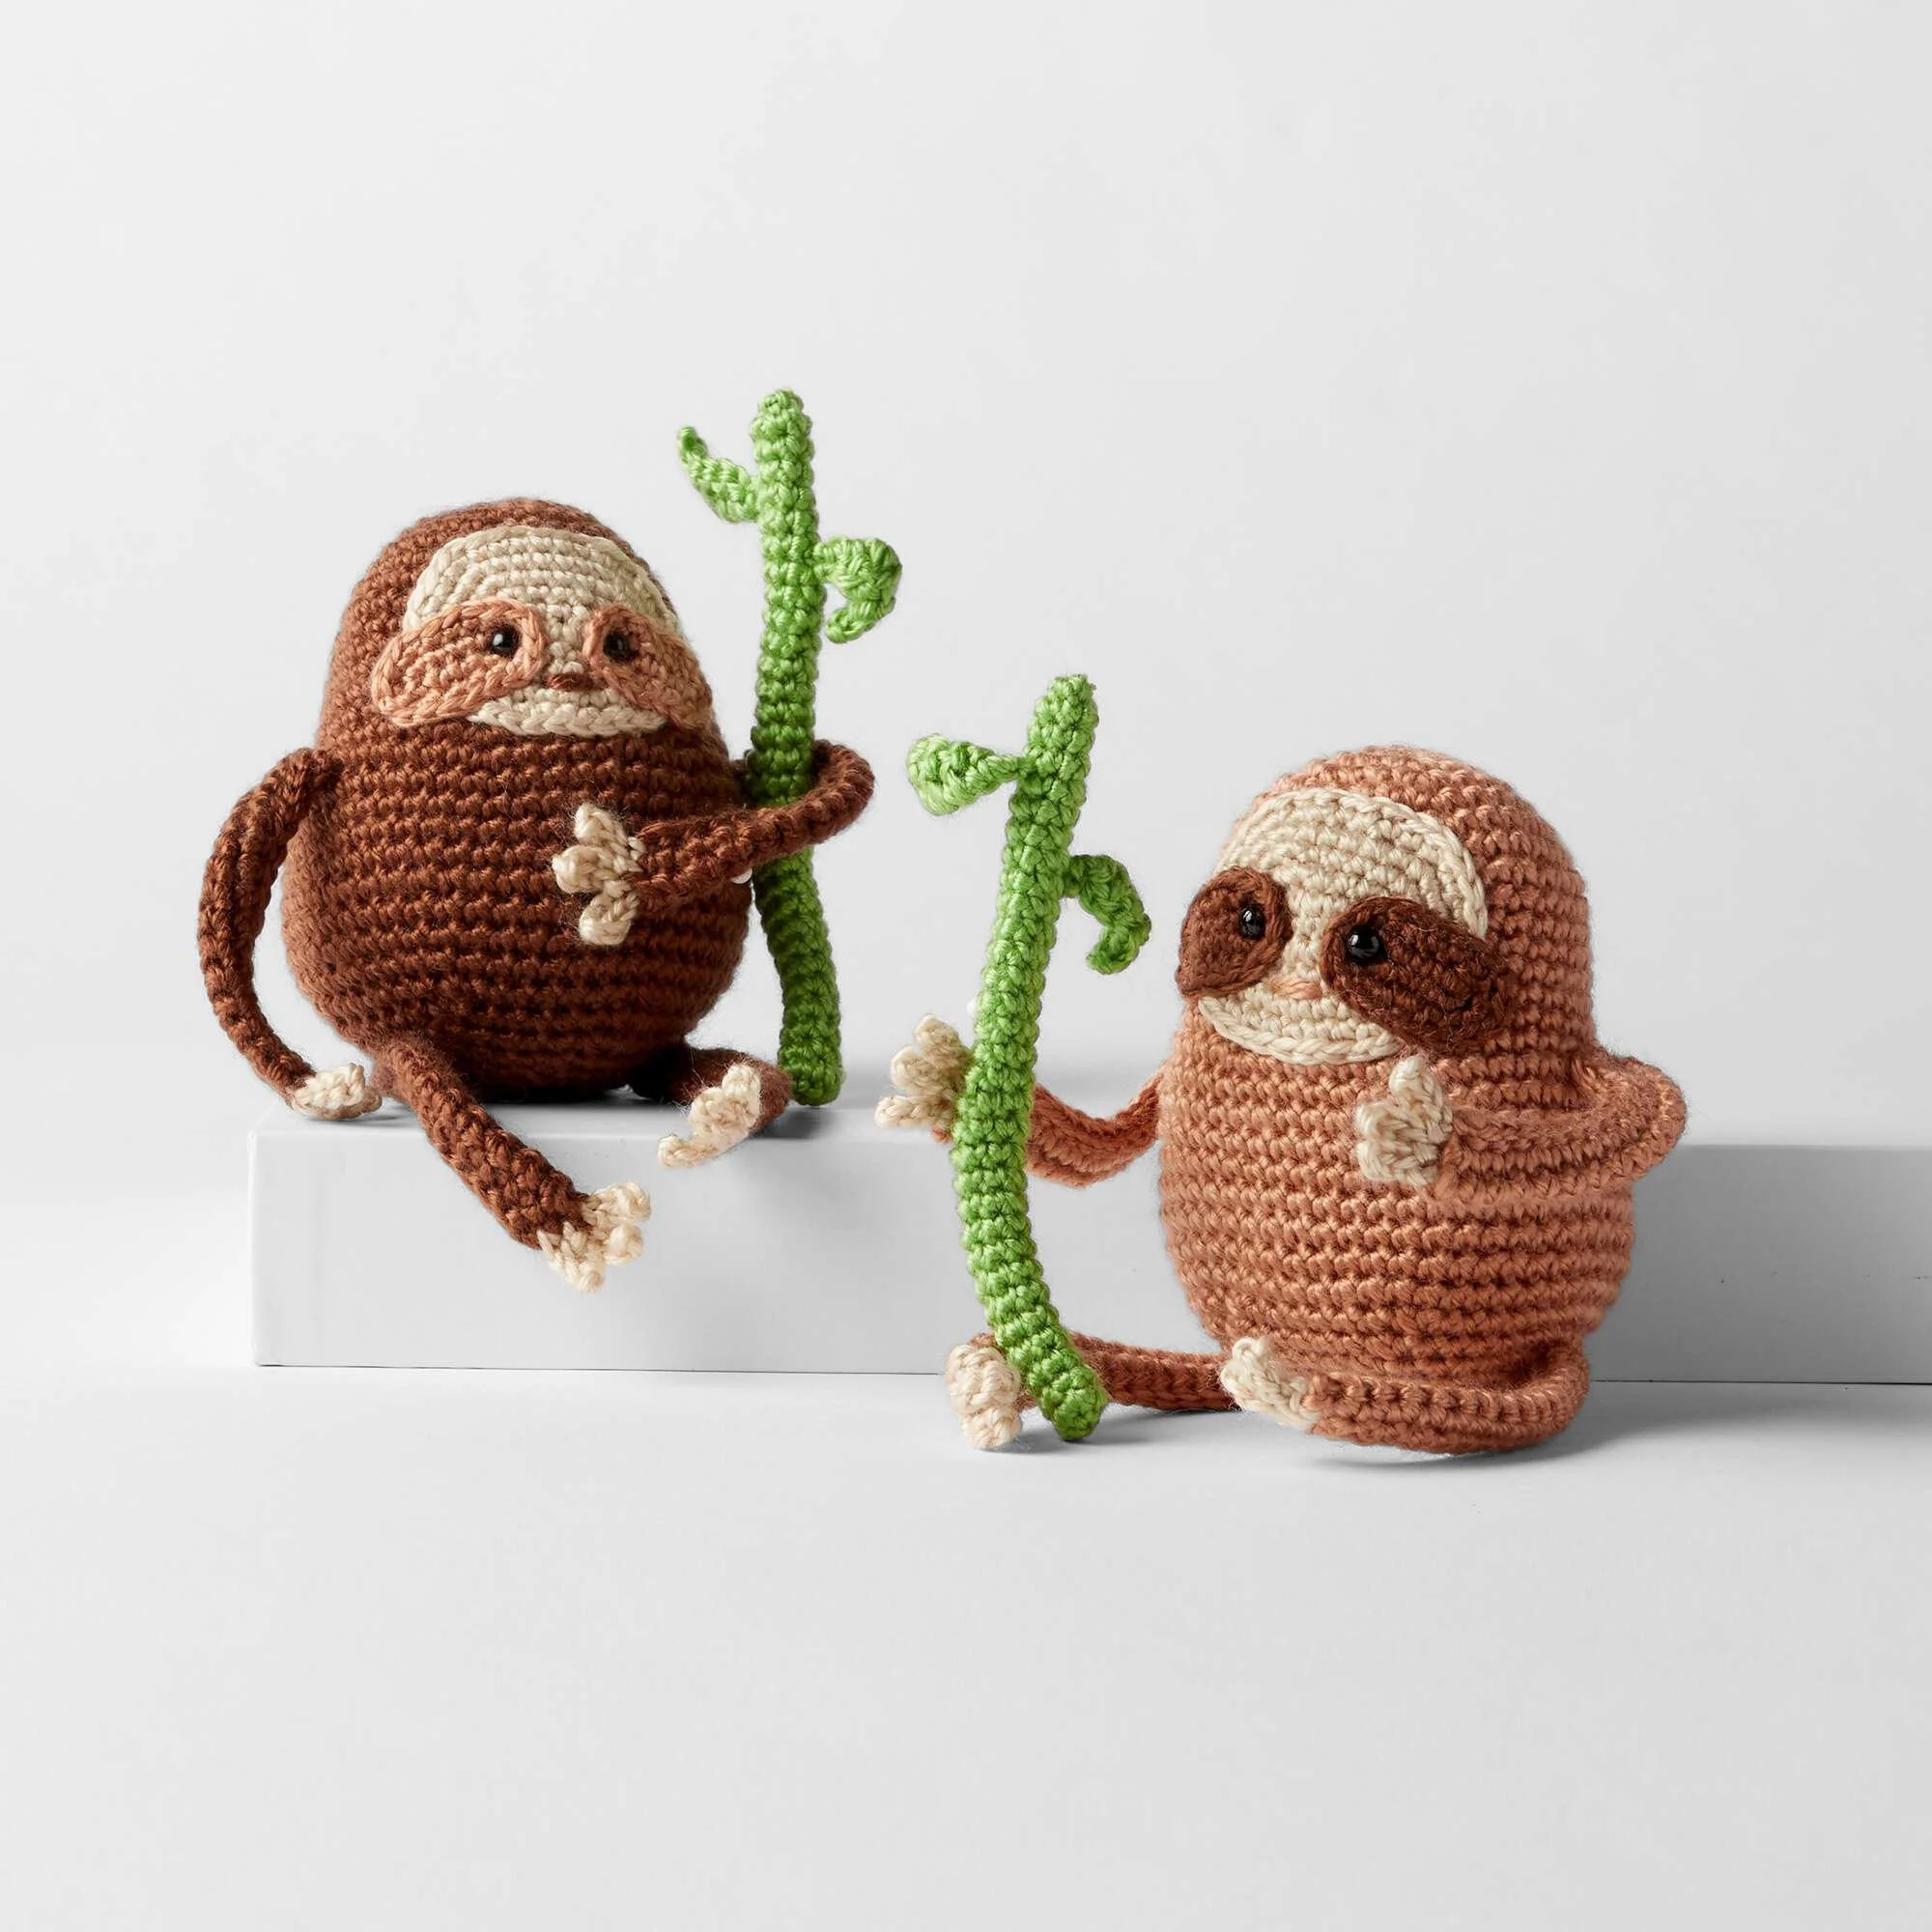
Crocheting cuddly animals is a delightful way to express creativity, and the Betsy & Bruno Crochet Sloth Pattern is a perfect project that adds a touch of whimsy to your collection. This adorable amigurumi sloth is not only a fun crochet pattern to follow but also a perfect gift for children and animal lovers alike. In this article, we’ll take you through everything you need to know to successfully create your very own sloth—whether it’s Betsy with her cozy cream and tan colors or Bruno, who sports a charming brown look.
Materials
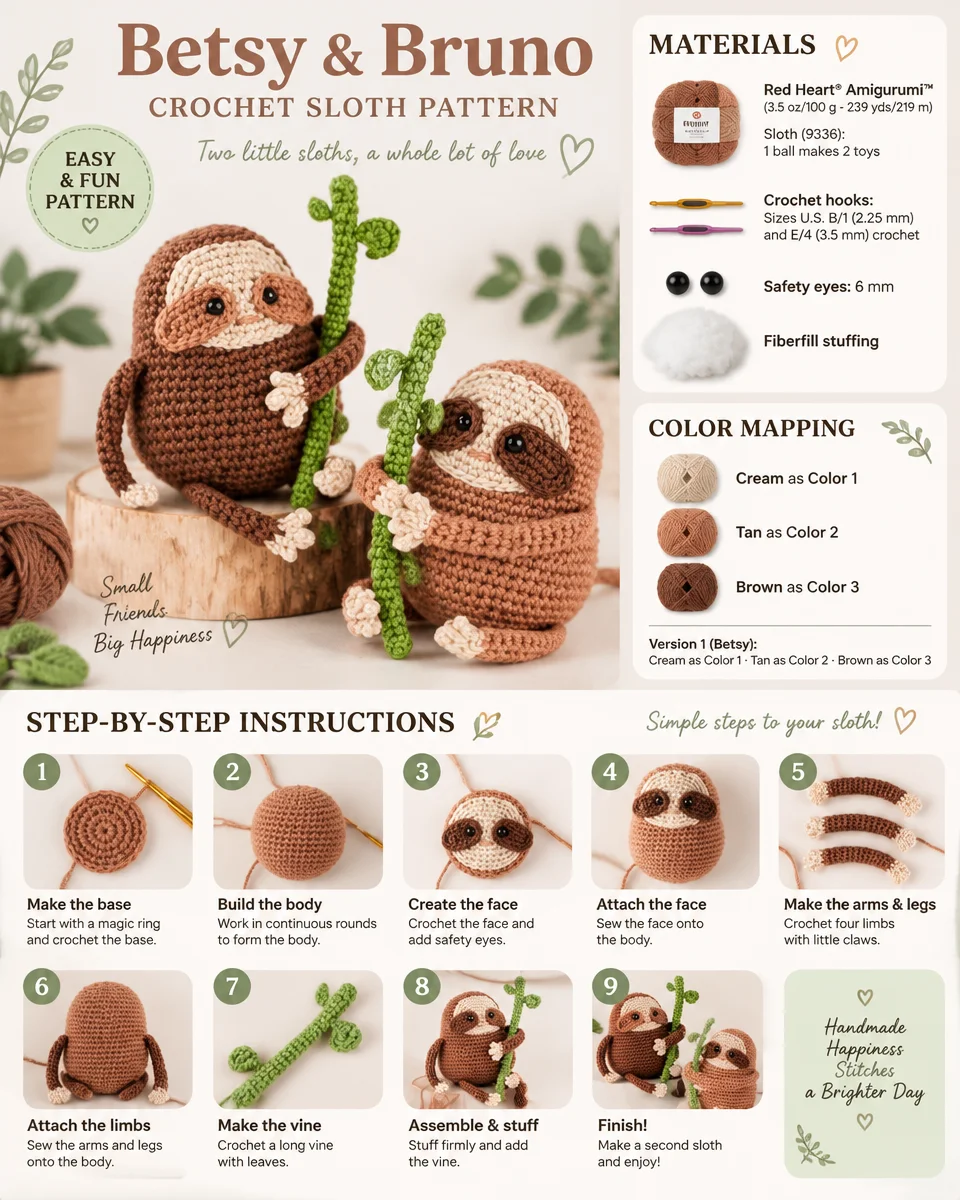
Before diving into the pattern, gather the following supplies:
Yarn
- Red Heart® Amigurumi™ (3.5 oz/100 g; 239 yds/219 m)
- Color Options:
- For Version 1 (Betsy):
- Cream as Color 1
- Tan as Color 2
- Brown as Color 3
- Green as Color 4
- For Version 2 (Bruno):
- Cream as Color 1
- Brown as Color 2
- Tan as Color 3
- Green as Color 4
- For Version 1 (Betsy):
- Color Options:
Crochet Hooks
- Sizes U.S. B/1 (2.25 mm) and E/4 (3.5 mm) crochet hooks or size needed to obtain gauge.
Other Supplies
- Safety eyes: 6 mm
- Fiberfill stuffing
Crochet Abbreviations
Here are some common crochet abbreviations used in this pattern:
- ch: chain
- sc: single crochet
- sc2tog: single crochet two together
- sl st: slip stitch
- hdc: half double crochet
- dc: double crochet
About the Crochet Project
The Betsy & Bruno Crochet Sloth Pattern consists of multiple components. The sloth’s construction involves creating distinct parts: a face, body, arms, legs, and accessories like a branch adorned with leaves. Each piece is crocheted separately and then assembled together to create the charming final product. This makes it a comprehensive and fulfilling project, perfect for those looking to improve their amigurumi skills.
Understanding the Shape
Like many amigurumi projects, this sloth is primarily constructed in rounds, which is typical for creating toy-like figures. As you follow the instructions, you’ll notice how increases and decreases shape the different features of the sloth. This combination of rounds and careful color placement brings this adorable creature to life.
Working the Pattern
Face
The Face is the same for both Betsy and Bruno, utilizing the specified colors for each version.
Face Instructions:
- With Color 1 and the smaller hook, ch 6.
- 1st rnd: 1 sc in 2nd ch from hook. 1 sc in each of next 3 ch. 3 sc in last ch. Working into opposite side of chain, 1 sc in each of next 3 ch. 2 sc in last ch. Join. (12 sc)
- 2nd rnd: Ch 1. 1 sc in each of next 5 sc. 3 sc in next sc. 1 sc in each of next 5 sc. 3 sc in last sc. Join. (16 sc)
- 3rd rnd: Ch 1. 1 sc in each of next 6 sc. 3 sc in next sc. 1 sc in each of next 7 sc. 3 sc in next sc. 1 sc in next sc. Join. (20 sc)
- 4th rnd: Ch 1. 1 sc in each of next 7 sc. 3 sc in next sc. 1 sc in each of next 9 sc. 3 sc in next sc. 1 sc in each of next 2 sc. Join. (24 sc)
- 5th rnd: Ch 1. 1 sc in each of next 8 sc. 3 sc in next sc. 1 sc in each of next 11 sc. 3 sc in next sc. 1 sc in each of next 3 sc. Join. (28 sc)
Fasten off.
Eye Patches (Make 2)
Eye Patch Instructions:
- With Color 2 and smaller hook, ch 5.
- 1st rnd: 2 sc in 2nd ch from hook. 1 sc in next 2 ch. 5 sc in last ch. Working into opposite side of chain, 1 sc in next 2 ch. 3 sc in last ch. Join. (14 sc)
- 2nd rnd: Ch 1. 1 sc in each of next 6 sc. 3 sc in next sc. 1 sc in each of next 6 sc. 3 sc in last sc. Join. (18 sc)
Fasten off.
Body
Body Instructions:
- With Color 3 and larger hook, ch 2.
- 1st rnd: 6 sc in 2nd ch from hook. Join. (6 sc)
- 2nd rnd: Ch 1. 2 sc in each sc around. Join. (12 sc)
- 3rd rnd: Ch 1. *1 sc in next sc. 2 sc in next sc. Rep from * around. Join. (18 sc)
- 4th rnd: Ch 1. *1 sc in each of next 2 sc. 2 sc in next sc. Rep from * around. Join. (24 sc)
- 5th rnd: Ch 1. *1 sc in each of next 3 sc. 2 sc in next sc. Rep from * around. Join. (30 sc)
- 6th rnd: Ch 1. *1 sc in each of next 4 sc. 2 sc in next sc. Rep from * around. Join. (36 sc)
- 7th to 14th rnds: Ch 1. 1 sc in each sc around. Join.
- 15th rnd: Ch 1. *1 sc in each of next 5 sc. 2 sc in next sc. Rep from * around. Join. (42 sc)
- 16th rnd: Ch 1. *1 sc in each of next 6 sc. 2 sc in next sc. Rep from * around. Join. (48 sc)
- 17th to 24th rnds: Ch 1. 1 sc in each sc around. Join.
- 25th rnd: Ch 1. *1 sc in each of next 6 sc. Sc2tog. Rep from * around. Join. (42 sc)
- 26th rnd: Ch 1. *1 sc in each of next 5 sc. Sc2tog. Rep from * around. Join. (36 sc)
- 27th rnd: Ch 1. *1 sc in each of next 4 sc. Sc2tog. Rep from * around. Join. (30 sc)
- 28th rnd: Ch 1. *1 sc in each of next 3 sc. Sc2tog. Rep from * around. Join. (24 sc)
- 29th rnd: Ch 1. *1 sc in each of next 2 sc. Sc2tog. Rep from * around. Join. (18 sc)
- Sew Face onto Body as shown in picture.
- Sew Eye Patches onto Face as shown in picture.
- Secure safety eyes to Eye Patches as shown in picture.
- Stuff Body firmly.
- 30th rnd: Ch 1. *1 sc in next sc. Sc2tog. Rep from * around. Join. (12 sc)
- 31st rnd: Ch 1. Sc2tog around. Join. (6 sc)
Fasten off, leaving a long end. Draw end tightly through remaining stitches.
Arms and Legs (Make 4)
Arms and Legs Instructions:
- With Color 3 and larger hook, ch 17.
- 1st row: 1 sc in 2nd ch from hook. 1 sc in each ch to end of chain. Turn. (16 sc)
- 2nd row: Ch 1. 1 sc in each sc to end of row. Turn.
- Repeat the 2nd row twice more.
- Do not fasten off. Fold piece in half lengthwise. Sl st through both thicknesses along edge. Fasten off.
Toes
Toes Instructions:
- With smaller hook, join Color 1 with sl st to the end of Arm or Leg.
- *Ch 4. 1 sl st in 2nd ch from hook. 1 sl st in each of next 2 ch. 1 sl st in end of Arm or Leg. Rep from * twice more.
- Fasten off.
Assembly
To assemble your sloth, sew the Arms and Legs to the Body as shown in the picture guide provided with the pattern.
Branch
Branch Instructions:
- With Color 4 and smaller hook, ch 6. Join with sl st to the first ch making sure not to twist chain.
- 1st rnd: Ch 1. 1 sc in each ch around. Join.
- 2nd rnd: Ch 1. 1 sc in each sc around. Join.
- Repeat the 2nd rnd until work from beginning measures 5″ [12.5 cm].
- Fasten off, leaving a long tail. Draw end tightly through remaining stitches.
Leaves (Make 2)
Leaf Instructions:
- With Color 4 and smaller hook, ch 8.
- 1st row: 1 sc in 2nd ch from hook. 1 hdc in next ch. 1 dc in each of next 3 ch. 1 hdc in next ch. 1 sc in next ch. Fasten off.
Sew Leaves onto Branch as shown in picture.
Frequently Asked Questions
What crochet hook is used for this pattern?
The pattern uses sizes U.S. B/1 (2.25 mm) and E/4 (3.5 mm) crochet hooks or size needed to obtain gauge.
Is this project worked in rounds or rows?
This project is primarily worked in rounds to create the body and other components of the sloth.
Does this crochet project require assembly?
Yes, the arms, legs, face, and other components must be sewn together to complete the sloth.
Conclusion
The Betsy & Bruno Crochet Sloth Pattern is an engaging project that not only challenges crocheters but also results in an adorable finished product. Whether you opt for Betsy with her soft cream shades or choose Bruno in bold brown, this sloth will undoubtedly become a treasured addition to any child’s playtime or a charming home décor piece. Grab your yarn, and let the crafting begin!