Crochet Fox Pattern
Create your very own adorable crochet fox with this delightful Crochet Fox Pattern! This amigurumi toy is perfect for kids or as a cute decorative piece for your home. With its charming design and easy-to-follow instructions, you’ll have a lovely fox ready to play in no time.
About This Crochet Project
This project is designed to create a small, stuffed fox toy using the amigurumi technique—a Japanese word that translates to “crocheted or knitted stuffed toy.” The finished fox can be made in two color versions, allowing you to choose a style that best fits your decor or gift-giving needs.
Color Versions
You can choose from one of the following two color schemes:
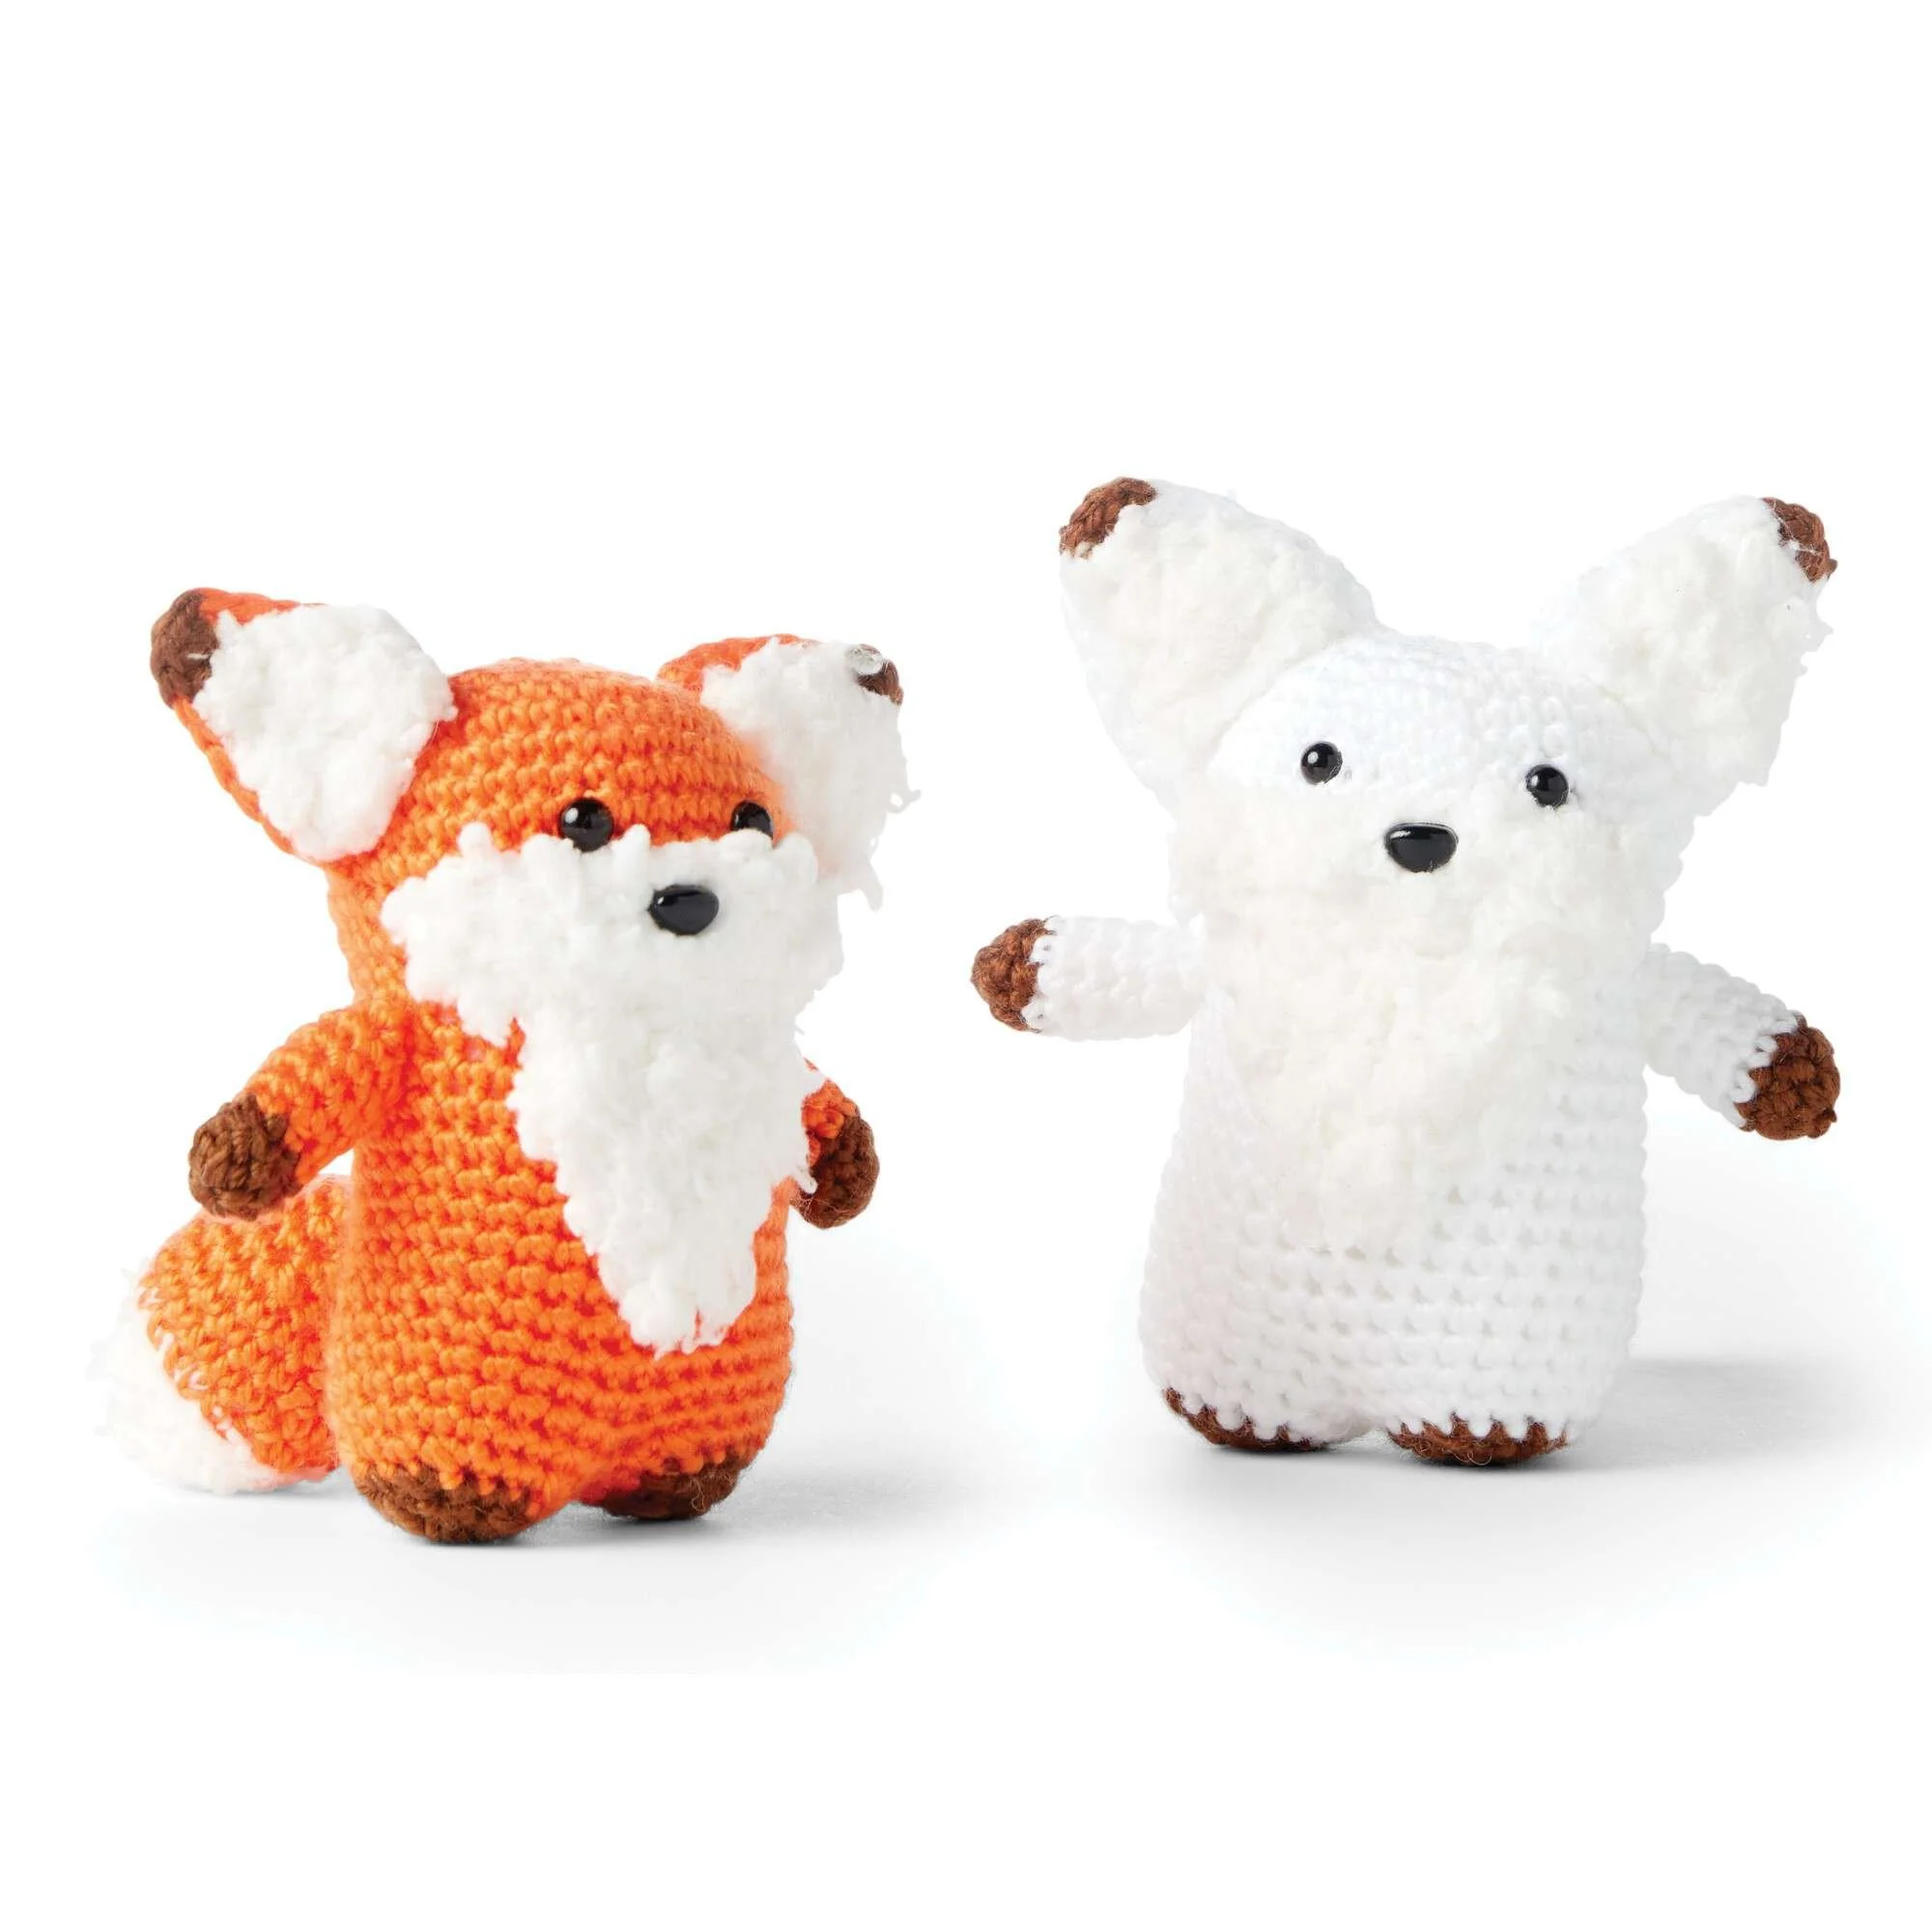
- Version 1: Orange as Color 1, Brown as Color 2, White Texture as Color 3
- Version 2: White as Color 1, Brown as Color 2, White Texture as Color 3
Materials
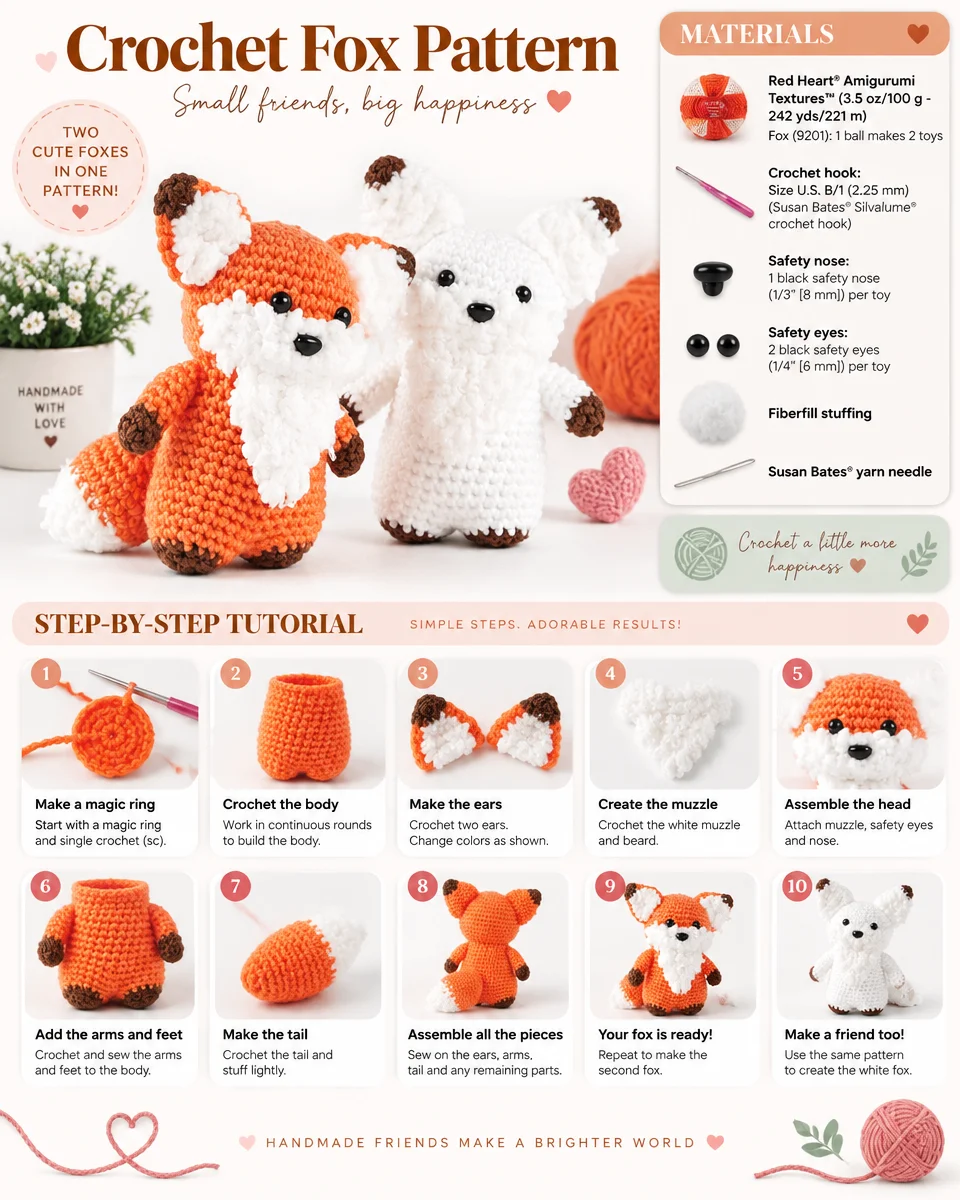
To create your crochet fox, you will need the following materials:
- Yarn:
- Red Heart® Amigurumi Textures™ (3.5 oz/100 g; 242 yds/221 m)
- Fox (9201): 1 ball makes 2 toys
- Crochet Hook:
- Size U.S. B/1 (2.25 mm) (Susan Bates® Silvalume® crochet hook) or size needed to obtain gauge
- Safety Nose:
- 1 black safety nose (1/3″ [8 mm]) per toy
- Safety Eyes:
- 2 black safety eyes (1/4″ [6 mm]) per toy
- Fiberfill Stuffing
- Notion:
- Susan Bates® yarn needle
Crochet Abbreviations
In this pattern, the following abbreviations are used:
- ch: Chain
- sc: Single crochet
- sl st: Slip stitch
- st: Stitch
- RS: Right side
- WS: Wrong side
- Sc2tog: Single crochet two together
Instructions
Ears (make 2)
Front Ear (make 1 for each ear set)
With Color 1, ch 8.
- 1st row: (RS). 1 sc in 2nd ch from hook. 1 sc in each ch to end of chain. Turn. 7 sc
- 2nd row: Ch 1. Sc2tog. 1 sc in each of next 3 sc. Sc2tog. Turn. 5 sts.
- 3rd row: Ch 1. 1 sc in each st to end of row. Turn.
- 4th row: Ch 1. Sc2tog. 1 sc in next sc. Sc2tog. Turn. 3 sts.
- 5th row: Ch 1. 1 sc in each st to end of row. Turn.
- 6th row: Ch 1. Sc3tog. Fasten off.
Back Ear
Rep from Front Ear instructions as given for Front Ear.
Inner Ear
With Color 3, ch 5, leaving a long end for sewing.
- 1st row: 1 sc in 2nd ch from hook. 1 sc in each ch to end of chain. Turn. 4 sc
- 2nd row: Ch 1. (Sc2tog) twice. Turn. 2 sts.
- 3rd row: Ch 1. 1 sc in each of next 2 sts. Turn.
- 4th row: Ch 1. Sc2tog. Fasten off.
Sew Inner Ear to RS of Front Ear.
Ear Assembly/Coloring (per ear)
With WS of Front and Back Ears tog and working through both thicknesses, join Color 1 with sl st to bottom right corner of ear.
- 1st row (around ear edging): With Color 1, work 6 sc evenly up side of Ear. Join Color 2. Do not break Color 1.
- With Color 2, 4 sc in top corner of Ear. Break Color 2.
- With Color 1, 6 sc evenly down side of ear.
Fasten off, leaving a long end for sewing.
Facial Fur
With Color 3, ch 12.
- 1st row: 1 sc in 2nd ch from hook. 1 sc in each ch to end of chain. Turn. 11 sc
- 2nd rnd: Ch 1. Sc2tog. 1 sc in each of next 7 sts. Sc2tog. 9 sts.
Fasten off, leaving a long end for sewing.
Chest Fur
With Color 3, ch 8.
- 1st row: 1 sc in 2nd ch from hook. 1 sc in each ch to end of chain. Turn. 7 sc
- 2nd row: Ch 1. Sc2tog. 1 sc in each of next 3 sc. Sc2tog. Turn. 5 sts.
- 3rd row: Ch 1. 1 sc in each st to end of row. Turn.
- 4th row: Ch 1. Sc2tog. 1 sc in next sc. Sc2tog. Turn. 3 sts.
- 5th row: Ch 1. 1 sc in each st to end of row. Fasten off, leaving long end for sewing.
Head and Body
With Color 1, ch 2.
Rnd 1–25
- 1st rnd: 8 sc in 2nd ch from hook. Join. 8 sc
- 2nd rnd: Ch 1. 2 sc in each sc around. Join. 16 sc
- 3rd rnd: Ch 1. *1 sc in next sc. 2 sc in next sc. Rep from * around. Join. 24 sc
- 4th rnd: Ch 1. *1 sc in each of next 2 sc. 2 sc in next sc. Rep from * around. Join. 32 sc
- 5th rnd: Ch 1. 1 sc in each sc around. Join. (st count not restated)
- 6th rnd: Ch 1. *1 sc in each of next 3 sc. 2 sc in next sc. Rep from * around. Join. 40 sc
- 7th to 11th rnds: Ch 1. 1 sc in each sc around. Join. (st count not restated)
- 12th rnd: Ch 1. *1 sc in each of next 3 sc. Sc2tog. Rep from * around. Join. 32 sts
- 13th rnd: Ch 1. *1 sc in each of next 2 sc. Sc2tog. Rep from * around. Join. 24 sts
- 14th rnd: Ch 1. *1 sc in each of next 2 sc. 2 sc in next st. Rep from * around. Join. 32 sc
- 15th to 25th rnds: Ch 1. 1 sc in each sc around. Join. Do not fasten off.
Assembly: Head/Body Exterior, Eyes, Ears, Legs Division
- Sew Facial Fur and Chest Fur to Body and Head as shown in the picture.
- Attach safety eyes and nose as shown in the picture.
- Sew Ears onto Head as shown in the picture.
- Stuff the Head and Body firmly.
Divide for Legs
Join separate length of Color 1 with sl st to the first sc. Ch 4. Skip the next 16 sc. Join with sl st to next sc. Fasten off.
Left Leg (make 1)
-
1st rnd: Ch 1. 1 sc in each of the first 16 sc. 1 sc in each of the next 4 ch. Join. 20 sc
-
2nd rnd: Ch 1. *1 sc in each of the next 2 sc. Sc2tog. Rep from * around. Break Color 1. Join Color 2. 15 sts.
-
3rd rnd: With Color 2, ch 1. *1 sc in next sc. Sc2tog. Rep from * around. Join. 10 sts.
-
4th rnd: Ch 1. (Sc2tog) 5 times. Join. 5 sts. Fasten off, leaving a long end. Stuff leg firmly. Draw the end through rem sts. Pull tightly. Fasten securely.
Right Leg (make 1)
Join Color 1 with sl st to the last sc of the 25th rnd of Body.
1 sc in the same sp as sl st.
1 sc into the opposite side of each of the next 4 ch.
1 sc in each of the next 15 sc. Join. 20 sc
Rep from Left Leg instructions marked ** to ** as given for Left Leg.
Arms (make 2)
With Color 2, ch 2.
- 1st rnd: 8 sc in 2nd ch from hook. Join. 8 sc
- 2nd rnd: Ch 1. 1 sc in each sc around. Join with Color 1. Break Color 2
- 3rd rnd: With Color 1, ch 1. 1 sc in each sc around. Join.
Rep 3rd rnd 4 times more.
Fasten off, leaving a long end for sewing. Stuff arms firmly. Sew arms to body as shown in the picture.
Tail
With Color 3, ch 2.
- 1st rnd: 8 sc in 2nd ch from hook. Join. 8 sc
- 2nd rnd: Ch 1. 2 sc in each sc around. Join. 16 sc
- 3rd rnd: Ch 1. 1 sc in each sc around. Join with Color 1. Break Color 3
- 4th rnd: With Color 1, ch 1. *1 sc in next sc. 2 sc in next sc. Rep from * around. Join. 24 sc
- 5th to 7th rnds: Ch 1. 1 sc in each sc around. Join.
- 8th rnd: Ch 1. *1 sc in each of next 2 sc. Sc2tog. Rep from * around. 18 sts.
- 9th rnd: Ch 1. *1 sc in next sc. Sc2tog. Rep from * around. Join. 12 sts.
- 10th and 11th rnds: Ch 1. 1 sc in each st around. Join.
Fasten off, leaving a long end for sewing. Stuff tail firmly. Sew tail to body as shown in the picture.
Frequently Asked Questions
What crochet hook is used for this pattern?
The recommended crochet hook is Size U.S. B/1 (2.25 mm) (Susan Bates® Silvalume® crochet hook) or size needed to obtain gauge.
How much yarn is needed for one fox?
You can make two toys from one ball of Red Heart® Amigurumi Textures™ yarn, which contains 242 yards (221 meters) in a 3.5 oz (100 g) ball.
Does this crochet project require assembly?
Yes, once all parts are crocheted, they will need to be sewn together, including attaching the ears, eyes, and tail to the body.
Is this project worked in rows or rounds?
The crochet fox pattern is primarily worked in rounds.
Are there multiple components in this project?
Yes, this amigurumi design includes a head, body, legs, arms, ears, and a tail, making it a multi-component project.
Conclusion
With this Crochet Fox Pattern, you can create a charming and huggable toy that’s perfect for children or as a gift for those who love unique handmade items. Follow the instructions, choose your favorite color scheme, and enjoy crafting your very own crochet fox! Happy crocheting!