Flying Saucer Crochet Snowman Pattern
Create a delightful and whimsical Flying Saucer Crochet Snowman that stands out as a fun winter decoration or gift. This charming ornament combines creativity with crochet skills, making it an enjoyable project for intermediate crocheters. Whether you place it on a shelf, give it as a thoughtful present, or hang it on your tree, this snowman will surely spread holiday cheer!
About This Crochet Project
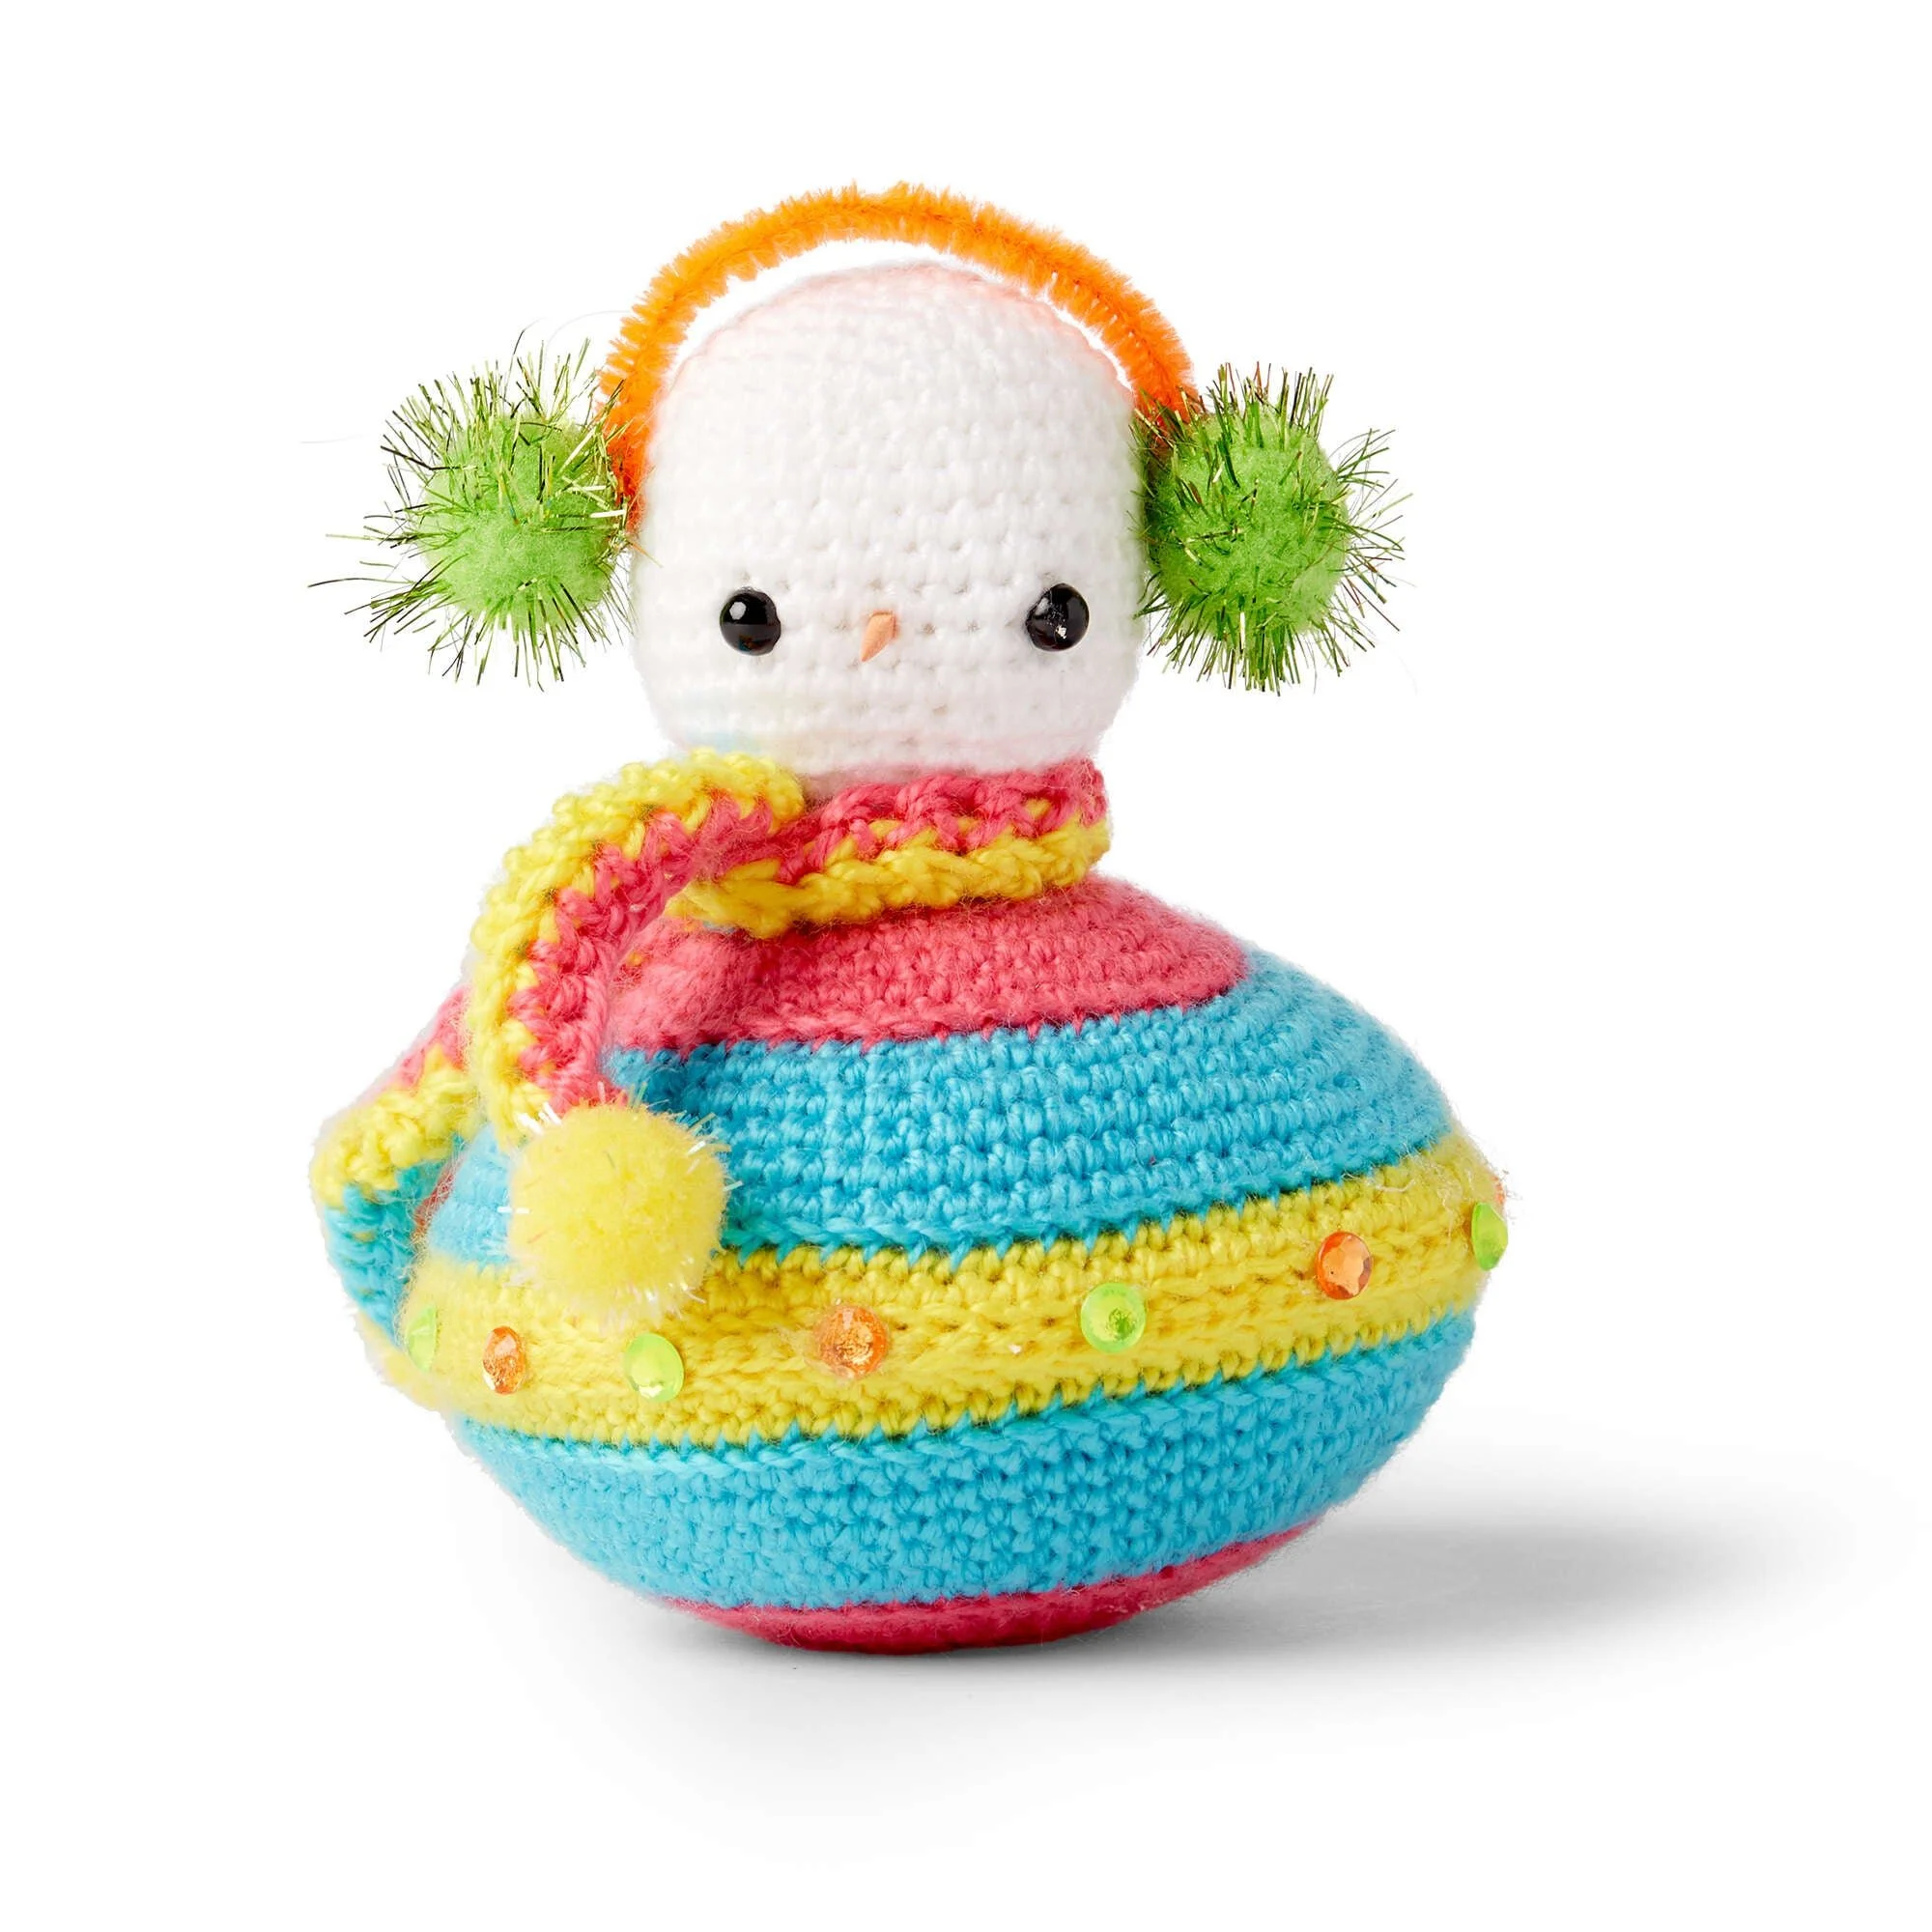
The Flying Saucer Crochet Snowman pattern blends the festive spirit of winter with a playful twist of UFO aesthetics. The snowman features a fun scarf, earmuffs, and a distinct flying saucer base that serves as part of its design. This amigurumi project involves several crochet techniques, including color changes and the use of safety eyes for a cute face, making it an engaging pattern for those looking to enhance their crochet skills.
Materials
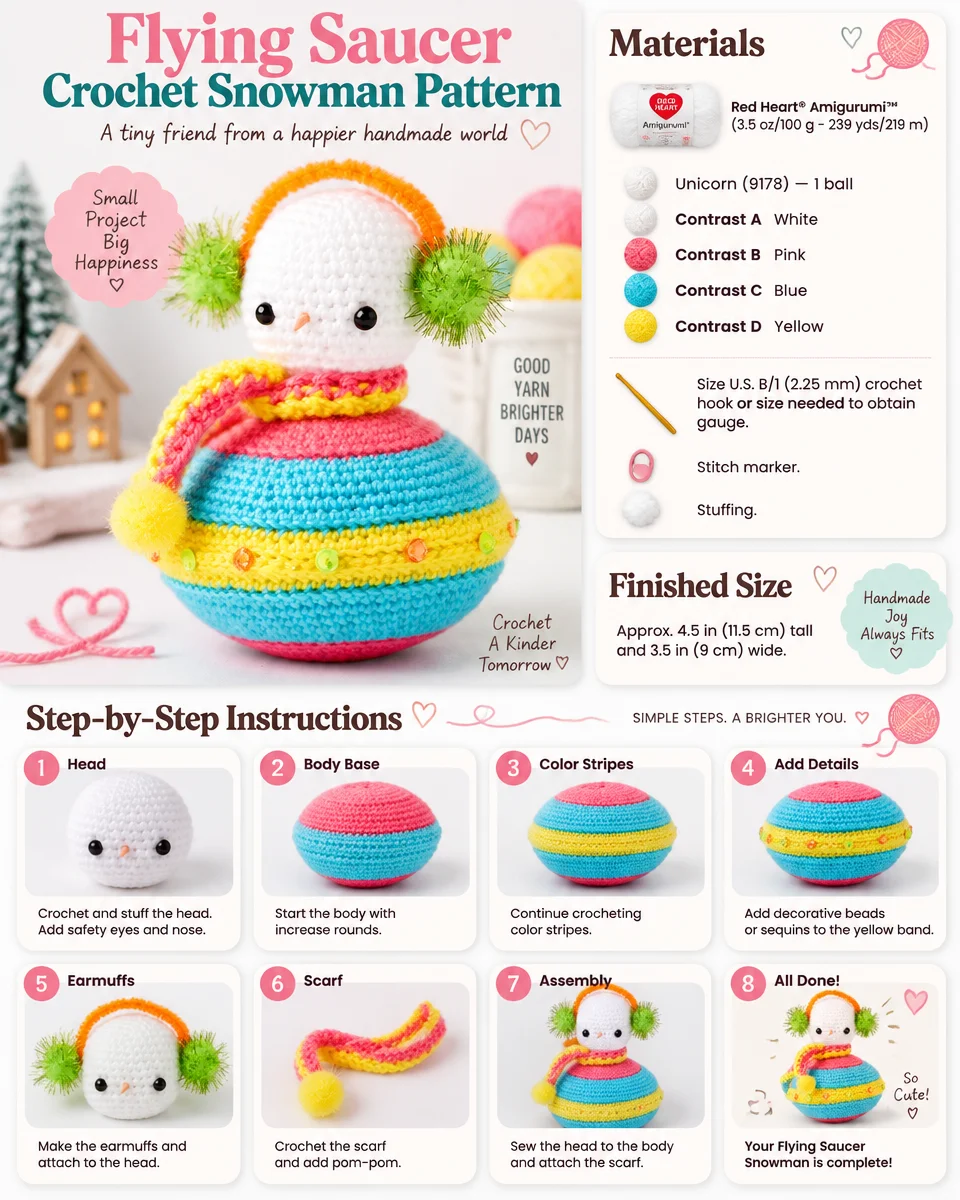
To create your Flying Saucer Crochet Snowman, you’ll need the following materials:
Yarn
- Red Heart® Amigurumi™ (3.5 oz/100 g; 239 yds/219 m) in the following colors:
- Contrast A: White (1 ball)
- Contrast B: Pink
- Contrast C: Blue
- Contrast D: Yellow
Crochet Hook
- Size U.S. B/1 (2.25 mm) crochet hook or size needed to obtain gauge.
Notions
- Stitch marker
- Stuffing
- Two ½” [6 mm] safety eyes
- Four 1” [2.5 cm] pompoms in color of your choice (for ear muffs and ends of scarf)
- Orange toothpick (for nose)
- Small piece of chenille stem in color of your choice (for headband portion of ear muffs)
- ½” [6 mm] rhinestones, sequins or beads
- Craft glue (for flying saucer lights)
- Glue sticks
- Optional: Piece of heavy cardboard approx. 5” [12.5 cm] square for stuffing/stiffening ornament
Skill Level
Intermediate – This project requires basic to intermediate crochet skills, including familiarity with changing colors and working in the round.
Pattern Notes
- To change color, work to last 2 loops on hook and draw new color through last 2 loops, keeping the color change to the wrong side of the work.
Scarf
Instructions
- With D, ch 43.
- 1st row: With D, 1 hdc in 3rd ch from hook and in each ch to end of chain. Join C. Turn. (41 hdc)
- 2nd row: With C, ch 1. 1 hdc in each st to end of row. Turn. Fasten off C.
- 3rd row: Working along the opposite side of foundation ch, join B with sl st in the first ch. Ch 1. 1 hdc in each ch to end of row. Fasten off B, leaving a long end.
- Thread end through the short edge and pull tightly to form a tapered (puckered) end. Weave in end securely. Use a scrap of yarn to taper (pucker) the other short end. Sew pompom to each end of the scarf.
Top Section
Note: Do not join at the end of rounds. Work in continuous rounds (spiral). Place a marker at the end of each round to indicate where it ends. Move marker up as each round is completed.
Head
Begin at the top of the head with A, ch 2.
- 1st rnd: 6 sc in 2nd ch from hook. Do not join. (6 sc)
- 2nd rnd: 2 sc in each of next 6 sc. (12 sc)
- 3rd rnd: (1 sc in next st, 2 sc in next st) 6 times. (18 sc)
- 4th rnd: (1 sc in each of next 2 sts, 2 sc in next st) 6 times. (24 sc)
- 5th rnd: (1 sc in each of next 3 sts, 2 sc in next st) 6 times. (30 sc)
- 6th rnd: (1 sc in each of next 4 sts, 2 sc in next st) 6 times. (36 sc)
- 7th to 14th rnds: 1 sc in each st around. (36 sts)
- 15th rnd: (1 sc in each of next 4 sts, sc2tog) 6 times. (30 sts)
- 16th rnd: (1 sc in each of next 3 sts, sc2tog) 6 times. (24 sts)
- Attach safety eyes between 11th and 12th rnds, approximately 5 sts apart. Begin stuffing head.
- 17th rnd: (1 sc in each of next 2 sts, sc2tog) 6 times. (18 sts)
- 18th rnd: (1 sc in each st, sc2tog) 6 times. (12 sts)
- 19th and 20th rnds: 1 sc in each st around. Sl st in next st. Join B. Fasten off A. Finish stuffing head.
Top of Saucer
Note: Join all rounds with sl st to the first sc.
- 1st rnd: With B, ch 1. (2 sc in next st) 12 times. Join. (24 sc)
- 2nd rnd: Ch 1. (2 sc in next st, 1 sc in next st) 12 times. Join. (36 sc)
- 3rd rnd: Ch 1. (1 sc in each of next 11 sts, 2 sc in next st) 3 times. Join. (39 sc)
- 4th rnd: Ch 1. 1 sc in each st around. Join. (39 sc)
- 5th rnd: Ch 1. (1 sc in each of next 12 sts, 2 sc in next st) 3 times. Join. (42 sc)
- 6th rnd: Ch 1. 1 sc in each st around. Join. Fasten off. (42 sc)
- 7th rnd: Join C, with sl st in back loop of the first st. Ch 1. Working in back loops only, (1 sc in each of next 6 sts, 2 sc in next st) 6 times. Join. (48 sc)
- 8th rnd: Ch 1. (1 sc in each of next 2 sts, 2 sc in next st) 16 times. Join. (64 sc)
- 9th rnd: Ch 1. 1 sc in each st around. Join. (64 sc)
- 10th rnd: Ch 1. (1 sc in each of next 15 sts, 2 sc in next st) 4 times. Join. (68 sc)
- 11th rnd: Ch 1. 1 sc in each st around. Join. (68 sc)
- 12th rnd: Ch 1. (1 sc in each of next 16 sts, 2 sc in next st) 4 times. Join. (72 sc)
- 13th rnd: Ch 1. 1 sc in each st around. Join. Fasten off. (72 sc)
- 14th rnd: Join D with sl st in back loop of the first st. Ch 1. Working in back loops only, 1 sc in each st around. Join. (72 sc)
- 15th rnd: Ch 1. 1 sc in each st around. Join. Fasten off. (72 sc)
Bottom Section
With B, ch 2.
- 1st rnd: 6 sc in 2nd ch from hook. Join. (6 sc)
- 2nd rnd: Ch 1. 2 sc in each of next 6 sts. Join. (12 sc)
- 3rd rnd: Ch 1. 2 sc in each of next 12 sts. Join. (24 sc)
- 4th rnd: Ch 1. (1 sc in each of next st, 2 sc in next st) 12 times. Join. (36 sc)
- 5th rnd: Ch 1. (1 sc in each of next 5 sts, 2 sc in next st) 6 times. Join. (42 sc)
- 6th and 7th rnds: Ch 1. sc in each st around. Join. Fasten off. (42 sc)
- 8th rnd: Join C with sl st in back loop of the first st. Ch 1. (1 sc in each of next 6 sts, 2 sc in next st) 6 times. Join. (48 sc)
- 9th rnd: Ch 1. (1 sc in each of next 2 sts, 2 sc in next st) 16 times. Join. (64 sc)
- 10th rnd: Ch 1. sc in each st around. Join. (64 sc)
- 11th rnd: Ch 1. (1 sc in each of next 15 sts, 2 sc in next st) 4 times. Join. (68 sc)
- 12th rnd: Ch 1. sc in each st around. Join. (68 sc)
- 13th rnd: Ch 1. (1 sc in each of next 16 sts, 2 sc in next st) 4 times. Join. (72 sc)
- 14th rnd: Ch 1. sc in each st around. Join. Fasten off. (72 sc)
- 15th rnd: Join D with sl st in back loop of the first st. Ch 1. Working in back loops only, 1 sc in each st around. Join. (72 sc)
- 16th rnd: Ch 1. 1 sc in each st around. Join. Do not fasten off D. (72 sc)
Finishing
Make Cardboard Insert (Optional)
- Place the bottom section flat on a piece of heavy cardboard and trace around it, adding approximately 1⁄8″ [3 mm] in diameter.
- Cut out the circle and check for fit by holding it together with top and bottom sections. Cardboard can be trimmed for a better fit as needed.
Assemble Saucer
- With right side facing, hold the top and bottom sections together.
- With D, working in the back loop of the top layer and front loop of the bottom layer, whipstitch edges of sections together approximately halfway around.
- Insert the optional cardboard and stuff the bottom and top of the saucer, keeping the cardboard at the center to separate the top and bottom stuffing.
- Continue to whipstitch edges of sections together, stuffing as you go.
Nose
Break the orange toothpick in half (plain toothpick can be colored with an orange permanent marker). Dip the broken end of the toothpick in strong craft glue and insert between the stitches of the head, centered approximately 1 row below the eyes.
Earmuffs
Break a 2″ [5 cm] length of chenille stem. Bend the stem to fit over the snowman’s head. With strong craft glue, glue a pompom to each end of the chenille stem. Allow glue to dry for several hours or overnight. Hint: Protect your work surface from glue with a piece of waxed paper. When glue is dry, place earmuffs on the snowman’s head and glue the pompoms in place.
Saucer Lights
With craft glue, glue rhinestones, sequins, or beads evenly spaced around the D-colored edge of the flying saucer.
Scarf
Tie the scarf around the snowman’s neck.
Hanging Loop (Optional)
If desired, attach thread or fishing line to the top of the snowman for a hanging loop.
Frequently Asked Questions
What crochet hook is used for this pattern?
You will need a size U.S. B/1 (2.25 mm) crochet hook or size needed to obtain gauge.
Is this project worked in rows or rounds?
This project features both rows for the scarf and rounds for the top section, head, and bottom section.
Does this crochet project require assembly?
Yes, assembly is required to attach the parts, including the head to the saucer, and to add embellishments like the scarf and earmuffs.
Conclusion
The Flying Saucer Crochet Snowman pattern offers a delightful blend of creativity and holiday spirit, perfect for those wanting to create a charming decoration or gift. With detailed instructions, fun embellishments, and an engaging design, this project is sure to bring joy to your crochet experience. Happy stitching!