Crochet Amigurumi Santa Ornaments Pattern
The holiday season is a time filled with joy, celebration, and a touch of creativity. What better way to add a personal touch to your festive decor than by making your own crochet ornaments? In this article, we’ll guide you through crafting adorable Amigurumi Santa Ornaments. Not only are these ornaments a delightful addition to your tree, but they also make excellent gifts for family and friends.
About This Crochet Project
Crocheting Amigurumi figures has gained popularity due to its charm and the easily customizable designs. These Santa ornaments are worked in rounds, making them ideal for crocheters who are familiar with basic stitches. This project is easy and entertaining, allowing you to indulge in the festive spirit while engaging in a satisfying craft.
Materials
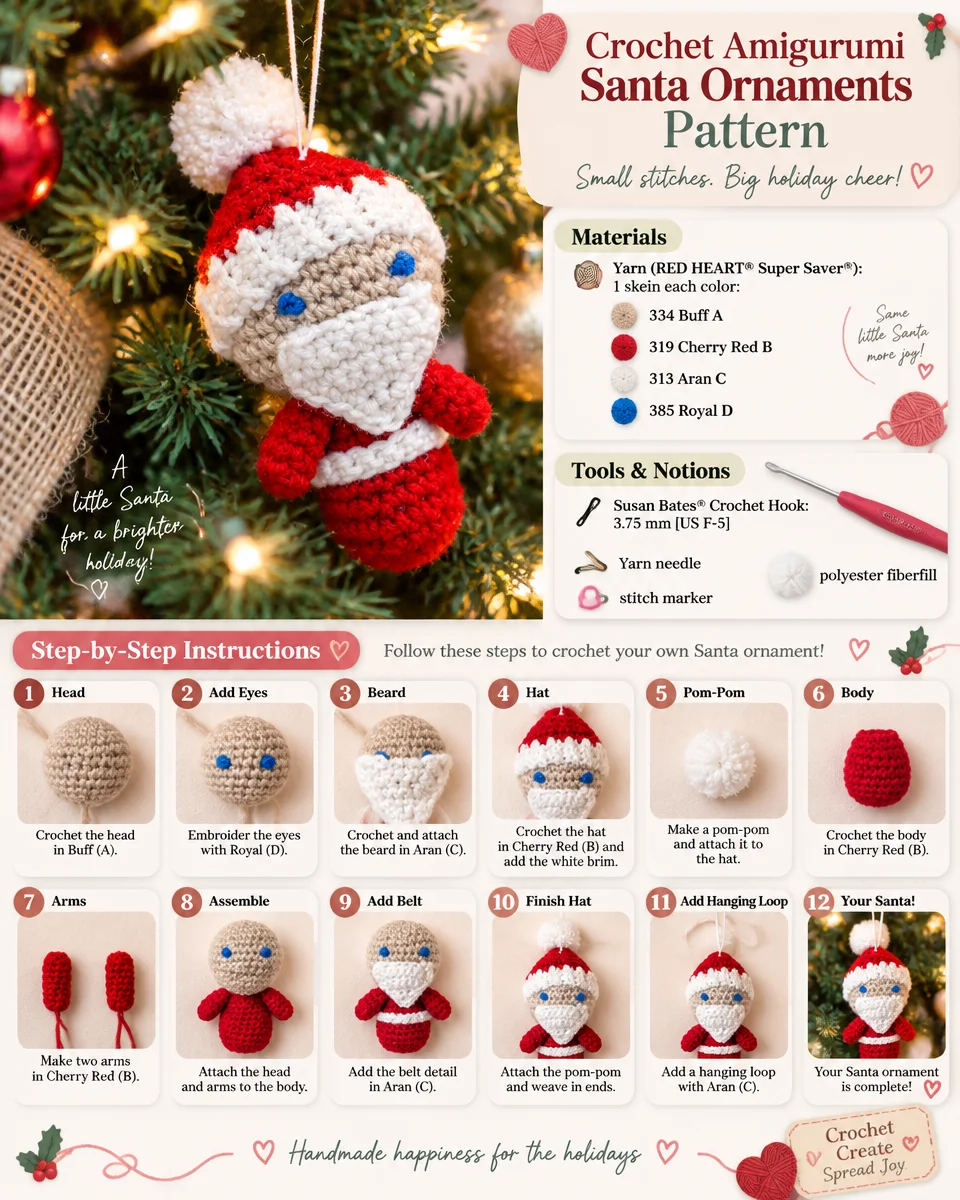
To create your Crochet Amigurumi Santa Ornaments, you will need the following materials:
Yarn
- Yarn (RED HEART® Super Saver®): 1 skein each color
- 334 Buff A
- 319 Cherry Red B
- 313 Aran C
- 385 Royal D
Crochet Hook
- Susan Bates® Crochet Hook: 3.75 mm [US F-5]
Notions and Tools
- Yarn needle
- Stitch marker
- Polyester fiberfill
- White embroidery floss
Skill Level
EASY
Size
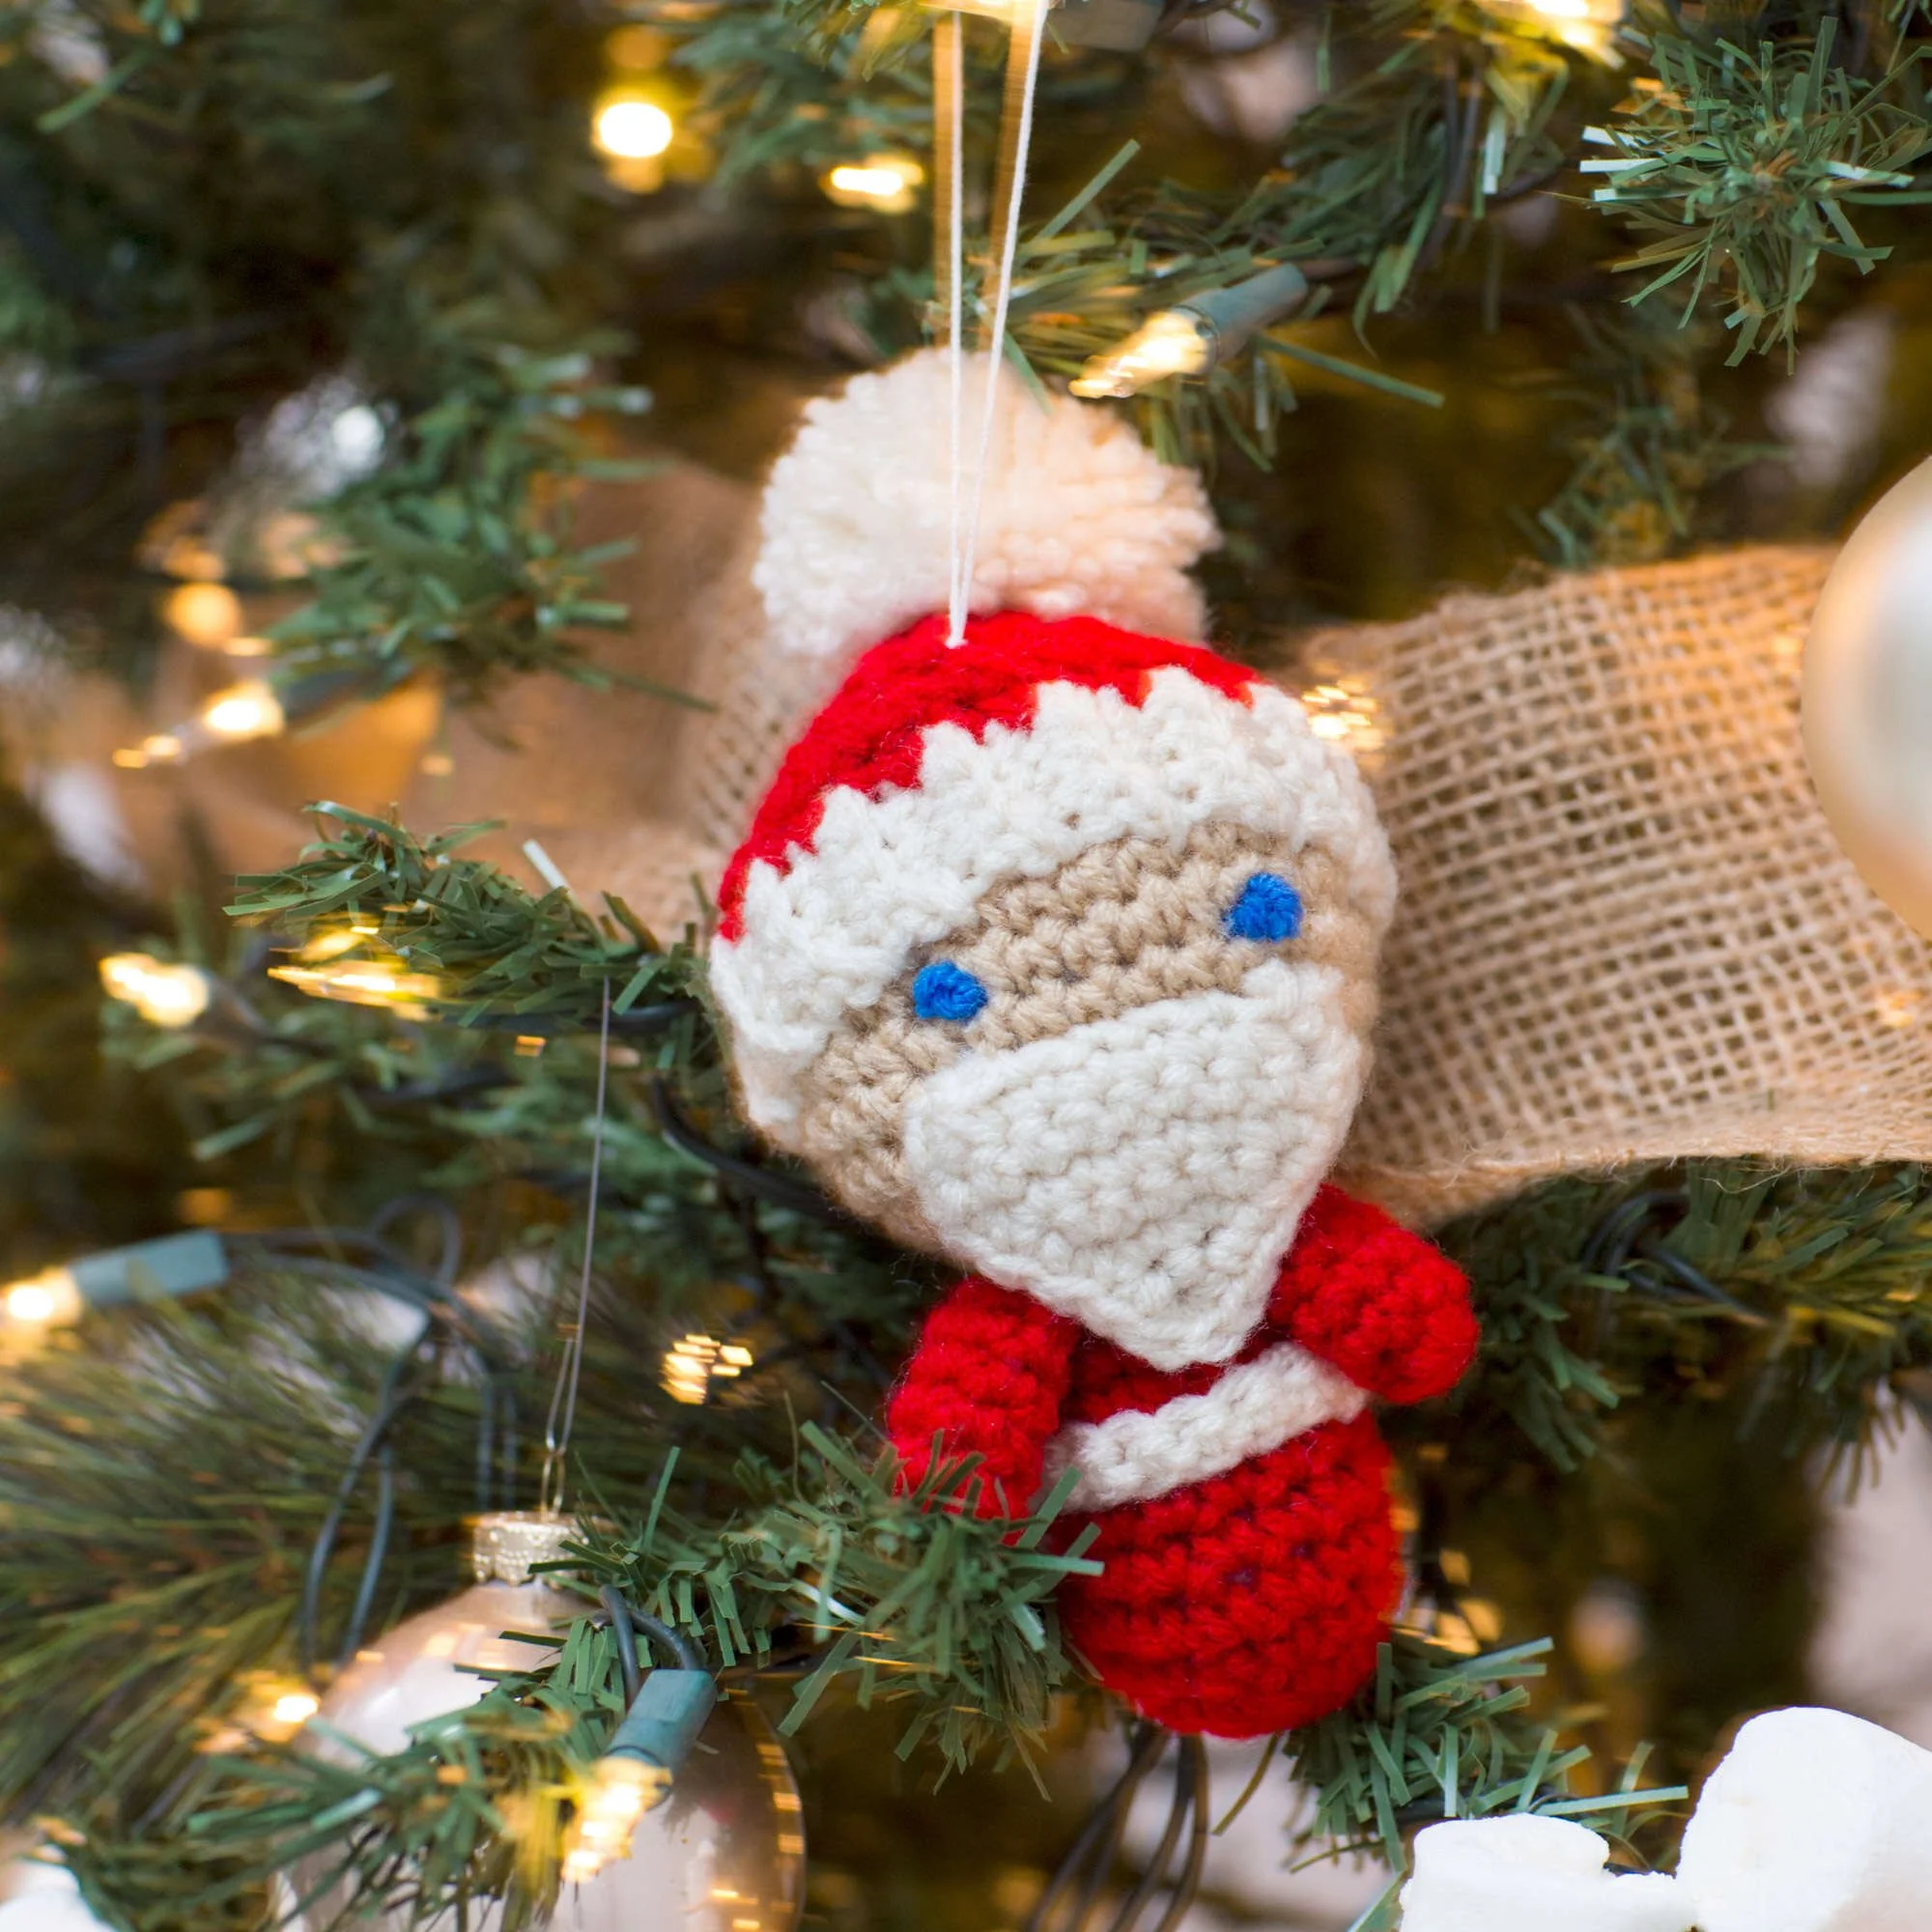
The finished ornament measures 6½” (16.5 cm) tall, excluding the pompom.
Crochet Abbreviations
- sc = single crochet
- ch = chain
- st = stitch
- … = repeat instructions between asterisks as directed
- sc2tog = single crochet two together (decrease)
Pattern Notes
The Amigurumi Santa ornaments consist of multiple components, including the head, body, arms, beard, waistband, and hat. The assembly is straightforward, allowing for a fun crafting experience.
Ornament (make 2)
Let’s dive into making these jolly ornaments!
Head
Begin at the top with Color A.
- Round 1: Work 6 sc in 2nd ch from hook—6 sc.
- Place a marker for the beginning of the round and move the marker up as each round is completed.
- Round 2: Work 2 sc in each sc around—12 sc.
- Round 3: *Sc in next sc, 2 sc in next sc; repeat from * around—18 sc.
- Round 4: *Sc in next 2 sc, 2 sc in next sc; repeat from * around—24 sc.
- Round 5: Sc in each sc around.
- Round 6: *Sc in next 3 sc, 2 sc in next sc; repeat from * around—30 sc.
- Rounds 7–11: Repeat Round 5.
- Round 12: *Sc2tog; repeat from * around—15 sc.
- Round 13: Repeat Round 5; join with slip st in first sc.
- Fasten off, leaving a long tail.
With Color D, embroider French knot eyes on Round 10.
Body
Beginning at the bottom with Color B.
- Rounds 1 and 2: Work the same as Rounds 1 and 2 of head—12 sc.
- Round 3: *Sc in next 3 sc, 2 sc in next sc; repeat from * around—15 sc.
- Rounds 4–8: Work the same as Round 5 of head.
- Round 9: *Sc in next 3 sc, sc2tog; repeat from * around—12 sc.
- Round 10: Work the same as Round 5 of head.
- Stuff the body with fiberfill.
- Round 11: Work the same as Round 12 of head; join with slip st in first sc—6 sc.
- Fasten off, leaving a long tail.
- Weave tail through the last round and pull closed.
Arm (make 2)
With Color B, ch 2.
- Round 1: Work the same as Round 1 of head—6 sc.
- Round 2: Repeat Round 3 of head—9 sc.
- Rounds 3–6: Repeat Round 5 of head; join with slip st in first sc.
- Fasten off, leaving a long tail.
- Do not stuff.
Beard
With Color C, ch 2.
- Row 1: Work 2 sc in 2nd ch from hook, turn—2 sc.
- Row 2 (right side): Ch 1, 2 sc in each sc, turn—4 sc.
- Rows 3 and 4: Ch 1, 2 sc in first sc, sc in each sc across to last 2 sc, 2 sc in last sc, turn—8 sc.
- Row 5: Ch 1, sc in each sc across, turn.
- Round 6: Ch 1, sc2tog, sc in next 4 sc, sc2tog; *working in ends of rows, work 6 sc evenly spaced down first side; working in opposite side of foundation ch, 3 sc in ch; repeat from * to * up other side; join with slip st in first sc.
- Fasten off, leaving a long tail for sewing.
Waistband
With Color C, ch 18.
- Row 1: Sc in 2nd ch from hook and in each ch across. Fasten off, leaving a long tail for sewing.
Hat
Ribbing
With Color C, ch 5.
- Row 1 (right side): Sc in 2nd ch from hook and in each ch across, turn—4 sc.
- Rows 2–29: Ch 1, sc in back loop of each sc across, turn.
- Row 30: Repeat last row; change to Color B, turn.
Crown
- Row 1 (right side): Ch 1, working in ends of rows, sc in each row across, turn—30 sc.
- Row 2: Ch 1, *sc in next 3 sc, sc2tog; repeat from * across, turn—24 sc.
- Row 3: Ch 1, sc in each sc across, turn.
- Row 4: Ch 1, *sc in next 2 sc, sc2tog; repeat from * across, turn—18 sc.
- Row 5: Repeat Row 3.
- Row 6: Ch 1, *sc in next sc, sc2tog; repeat from * across, turn—12 sc.
- Row 7: Repeat Row 3.
- Row 8: Ch 1, *sc2tog; repeat from * across, turn—6 sc.
- Fasten off, leaving a long tail.
Assembly
- Arms: Weave tail through the last round and pull stitches closed, then sew in place at the top of the body.
- Head & Body: Stuff the head with fiberfill. Push Round 13 of the head onto the top of the body. With the end tail, sew securely around to join the head to the body. Sew the waistband around the body.
- Hat: Weave the tail through the last row and pull closed. Working through ends of rows, sew back seam. Working in ends of ribbing, sew the hat on the head.
Finishing
Pompom (make 2)
- Cut a 15″ (38 cm) strand of Color C and set aside.
- Wrap Color C around 4 fingers 50 times.
- Carefully slide loops off fingers and tie a single strand very tightly around the center of the loops.
- Do not cut or trim the center tie.
- Cut loops open at both ends. Shake and trim evenly to the desired length.
- Thread ends of the center tie through the top of the hat and secure the pompom.
Hanging Loop
- Cut a strand of white embroidery floss to the desired length for the hanging loop, thread through the top of the ornament, and tie the ends in a knot.
Weave in Ends
Make sure to weave in all ends neatly to finish off your Amigurumi Santa ornaments.
Frequently Asked Questions
What crochet hook is used for this pattern?
You will need a Susan Bates® Crochet Hook: 3.75 mm [US F-5].
Is this project worked in rows or rounds?
The Santa ornaments are primarily worked in rounds.
Does this crochet project require assembly?
Yes, the project involves assembly, particularly when attaching the head, arms, and hat.
What are the finished dimensions of the ornament?
The finished ornament measures 6½” (16.5 cm) tall, excluding the pompom.
How many components does the ornament consist of?
The ornament consists of a head, body, two arms, a beard, a waistband, and a hat.
Conclusion
Crafting your own Crochet Amigurumi Santa Ornaments is a wonderful way to embrace the holiday spirit and create cherished decorations. These ornaments are not just fun to make but also provide an opportunity to express your creativity. As you hang them on your tree or gift them to loved ones, you’ll appreciate the joy and warmth that handmade creations bring during the festive season. Happy crocheting!