Crochet Amigurumi Heart Pattern
Crochet has always brought warmth and joy to crafting enthusiasts. In this article, we will explore the delightful Crochet Amigurumi Heart Pattern, a perfect project for gifting or enhancing your home décor. This cuddly heart can be made in vibrant colors to express love, friendship, or just to add a splash of charm to your space.
About This Amigurumi Design
The Amigurumi Heart design combines a tender shape with the art of crochet, creating a visually appealing piece. Whether you choose to create this for yourself or someone special, the heart is a wonderful representation of affection and creativity. This pattern provides step-by-step instructions along with essential materials needed.
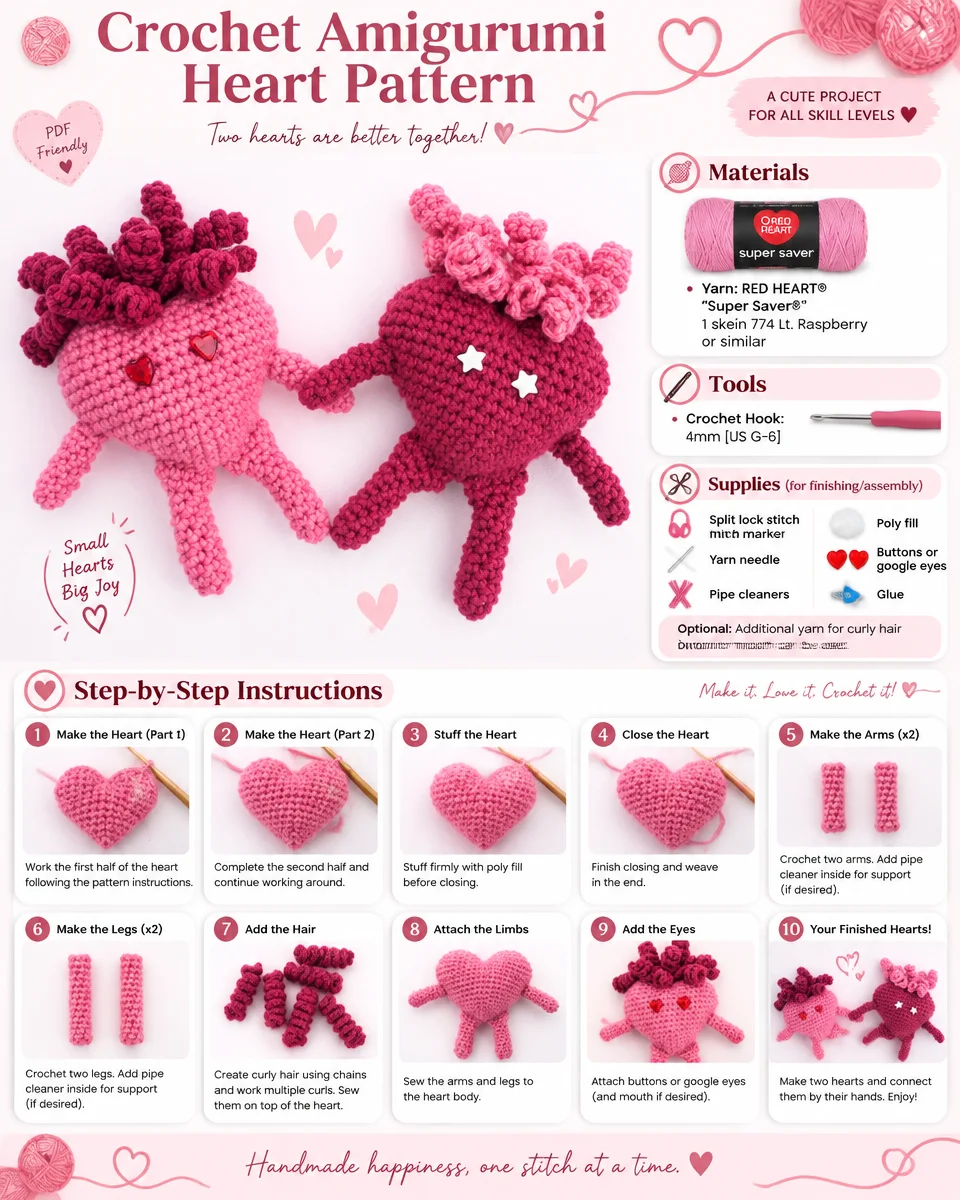
Materials
To get started on your Amigurumi Heart, you will need the following supplies:
Yarn
- RED HEART® “Super Saver®” — 1 skein in either 774 Lt. Raspberry or 905 Magenta
Crochet Hook
- 4mm [US G-6]
Supplies (for finishing/assembly)
- Split lock stitch marker
- Yarn needle
- Pipe cleaners
- Poly fill
- Buttons or google eyes
- Glue
- (Optional) Additional yarn for curly hair and/or mouth (implied by “different color yarn”)
Crochet Abbreviations
Understanding the abbreviations used in this pattern will help you navigate the instructions with ease.
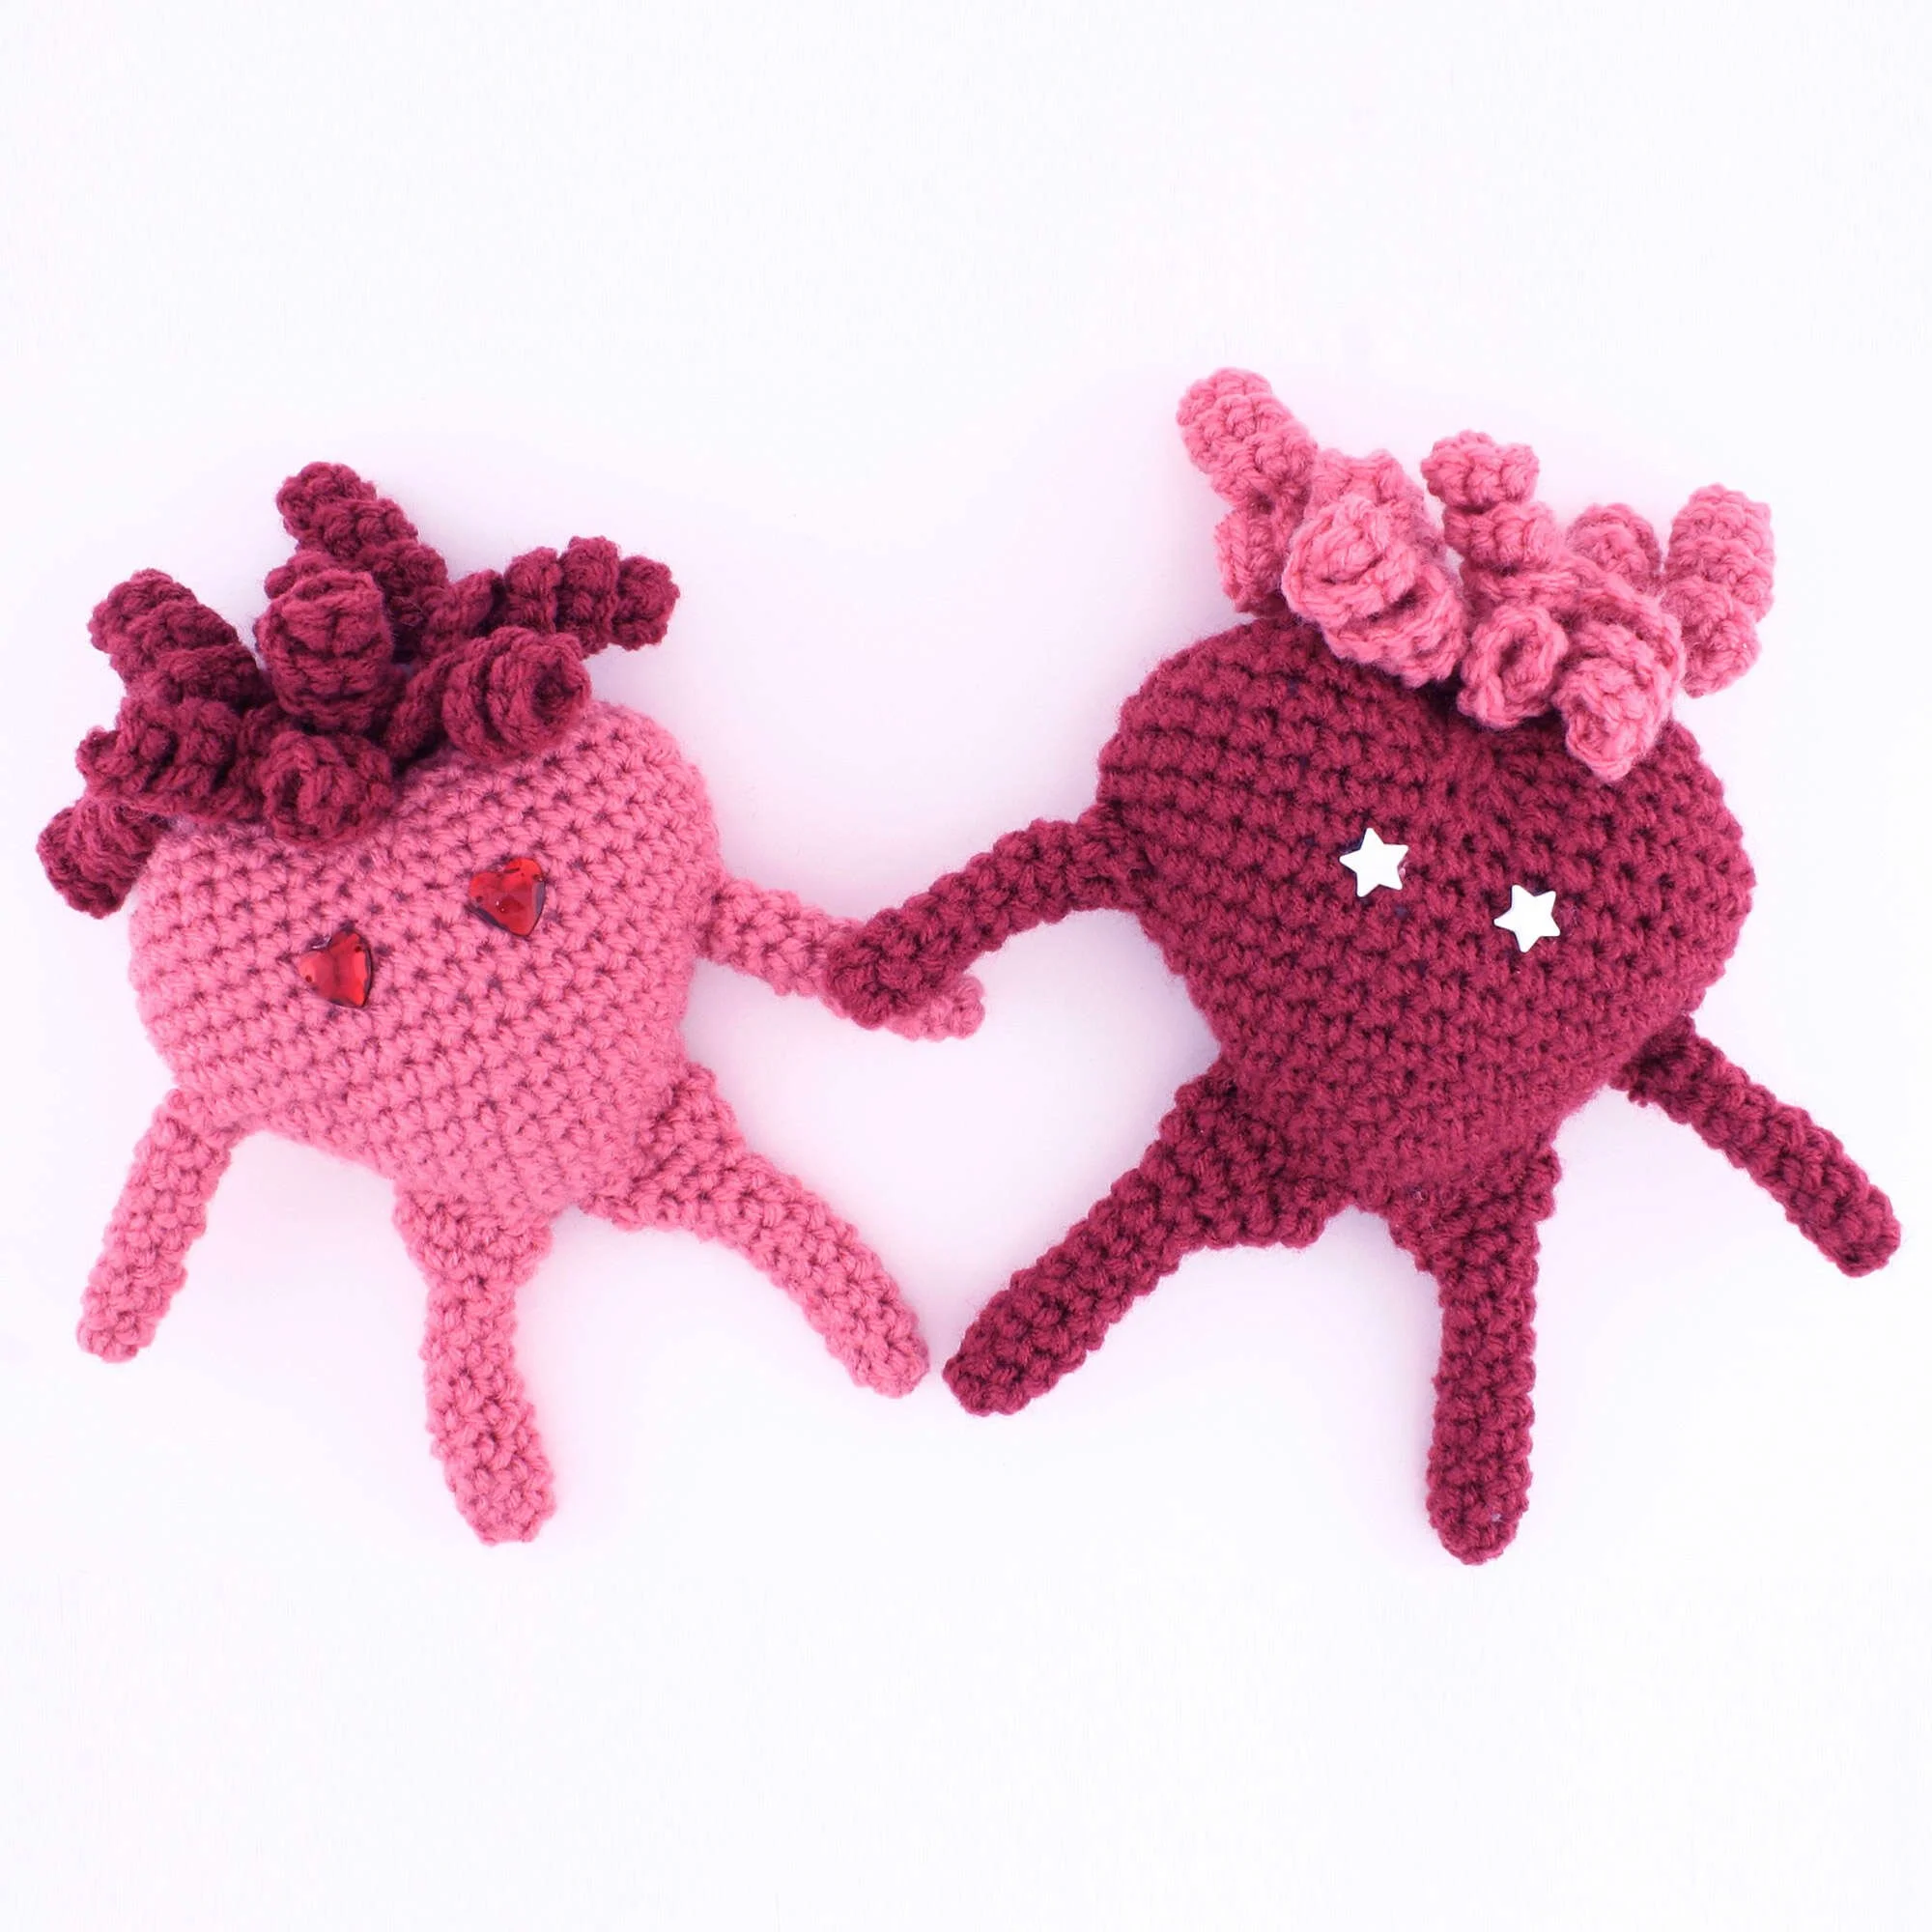
- Sc – Single crochet
- Ch – Chain
- Sc3tog – [Draw up a loop in the next sc] 3 times, yarn over, and draw through all 4 loops on the hook — creates 2 sc decreased
- Rnd – Round
- Slip st – Slip stitch
Pattern Notes
This pattern is constructed in continuous rounds, which means you will not turn at the end of each round. Follow the instructions closely, as maintaining the stitch count is crucial for shaping the heart properly. Place a marker to keep track of your rounds if needed.
Heart
Let’s begin with the heart. Follow these round-by-round instructions for the base formation of your heart:
Round Instructions
- Rnd 1: 6 Sc in 2nd ch from the hook.
- Rnd 2: [3 Sc in the next sc, sc in the next 2 sc] twice — 10 sc
(Place a marker in the center stitch of each 3-sc group to indicate each side.) - Rnd 3: Sc in next sc, 3 sc in next sc, sc in next 4 sc, 3 sc in next sc, sc in next 3 sc — 14 sc
- Rnd 4: Sc in next 2 sc, 3 sc in next sc, sc in next 6 sc, 3 sc in next sc, sc in next 4 sc — 18 sc
- Rnd 5: Sc in next 3 sc, 3 sc in next sc, sc in next 8 sc, 3 sc in next sc, sc in next 5 sc — 22 sc
- Rnd 6: Sc in next 4 sc, 3 sc in next sc, sc in next 10 sc, 3 sc in next sc, sc in next 6 sc — 26 sc
- Rnd 7: Sc in next 5 sc, 3 sc in next sc, sc in next 12 sc, 3 sc in next sc, sc in next 7 sc — 30 sc
- Rnd 8: Sc in next 6 sc, 3 sc in next sc, sc in next 14 sc, 3 sc in next sc, sc in next 8 sc — 34 sc
- Rnd 9: Sc in next 7 sc, 3 sc in next sc, sc in next 16 sc, 3 sc in next sc, sc in next 9 sc — 38 sc
- Rnd 10: Sc in next 8 sc, 3 sc in next sc, sc in next 18 sc, 3 sc in next sc, sc in next 10 sc — 42 sc
- Rnds 11-14: Sc in each sc around.
- Rnd 15: [Ch 1, skip next 2 sc, sc in next 8 sc, sc3tog, sc in next 8 sc] twice — 38 sc
- Rnd 16: [Working over the ch-1 of rnd below, slip st in first skipped stitch on rnd below, sc in next 7 sc, sc3tog, sc in next 7 sc] twice — 34 sc
- Rnd 17: [Slip st in same sc as before, sc in next 6 sc, sc3tog, sc in next 6 sc] twice — 26 sc
- Rnd 18: [Slip st in 2nd skipped sc on Rnd 15, sc in next 5 sc, sc3tog, sc in next 5 sc] twice — 22 sc
- Rnd 19: [Slip st in same sc as before, sc in next 4 sc, sc3tog, sc in next 4 sc] twice; slip st in next slip st — 18 sc
- Fasten off.
Arms (Make 2)
Each arm adds charm to your heart.
Round Instructions
- Ch 2.
- Rnd 1: 5 Sc in 2nd ch from hook.
- Rnds 2-8: Sc in each sc around. Fasten off leaving a long tail for sewing.
Legs (Make 2)
Having legs helps stabilize your heart.
Round Instructions
- Ch 2.
- Rnd 1: 6 sc in 2nd ch from hook.
- Rnds 2-10: Sc in each sc around — 6 sc.
- Rnd 11: 2 Sc in each sc around — 12 sc.
- Rnd 12: Sc in each sc around — 12 sc.
- Fasten off leaving a long tail for sewing.
Curly Hair (Optional)
The curly hair can add an adorable touch.
Instructions
- Join yarn in the first stitch at the top of the heart in the “seam.”
- *Ch 15, 3 sc in 2nd ch from hook, 3 sc in each ch to end, slip st in the next st on Heart; repeat from * across.
- Fasten off.
- Different lengths of curls can be made by adjusting the chain length.
Assembly
Now, let’s bring all the pieces together to complete your Amigurumi Heart.
- Stuff the Heart with poly fill to give it shape and comfort.
- Weave the top opening closed, matching the stitches carefully.
- Insert Pipe Cleaners into the arms and legs for added stability. Trim any excess pipe cleaner if necessary.
- Sew on Arms and Legs according to your preference (we attached the arms on Rnd 10).
Eyes and Mouth
The facial features will personalize your heart:
- Eyes: Glue on buttons or googly eyes, or stitch using different colored yarn.
- Mouth: A mouth can also be stitched if desired.
Finishing
Finally, ensure your heart is securely fastened off as specified for the heart, arms, and legs. Verify the top opening is well-closed by weaving and matching stitches.
Frequently Asked Questions
What materials are needed for the Crochet Amigurumi Heart?
You will need RED HEART® “Super Saver®” yarn, a 4mm crochet hook, split lock stitch markers, poly fill, pipe cleaners, buttons or googly eyes, glue, and optional yarn for curly hair.
What is the size of the finished heart?
The pattern does not specify the finished dimensions, but it will depend on your crochet tension and the materials used.
Is this project worked in rounds or rows?
This project is worked in continuous rounds, which is typical for amigurumi patterns.
Does this crochet project require assembly?
Yes, the pieces need to be assembled after crocheting, including stuffing and sewing the arms and legs to the heart.
Can I use different colors of yarn for this pattern?
Absolutely! Feel free to express your creativity by using different colors for your heart and its features.
Conclusion
In conclusion, the Crochet Amigurumi Heart Pattern is a delightful project that is not only engaging but also perfect for expressing love and creativity. With simple steps and vibrant yarns, you can create a piece that adds warmth to any setting or makes for a thoughtful gift. Happy crocheting!