Fiona and Fred Crochet Flamingo Pattern
Creating a whimsical flamingo with the Fiona and Fred Crochet Flamingo Pattern is a delightful project that combines fun and artistry. This amigurumi pattern is perfect for enthusiasts looking to make a lovely decorative piece or a thoughtful gift.
About the Crochet Project
The Fiona and Fred Crochet Flamingo is a charming stuffed animal that stands out with its vibrant color and unique design. This project utilizes the amigurumi technique, which involves crocheting in continuous rounds to create a three-dimensional toy. The end result is a delightful flamingo with detailed features, including a beak, legs, and wings, making it not only a great toy but also a beautiful collectible.
Materials
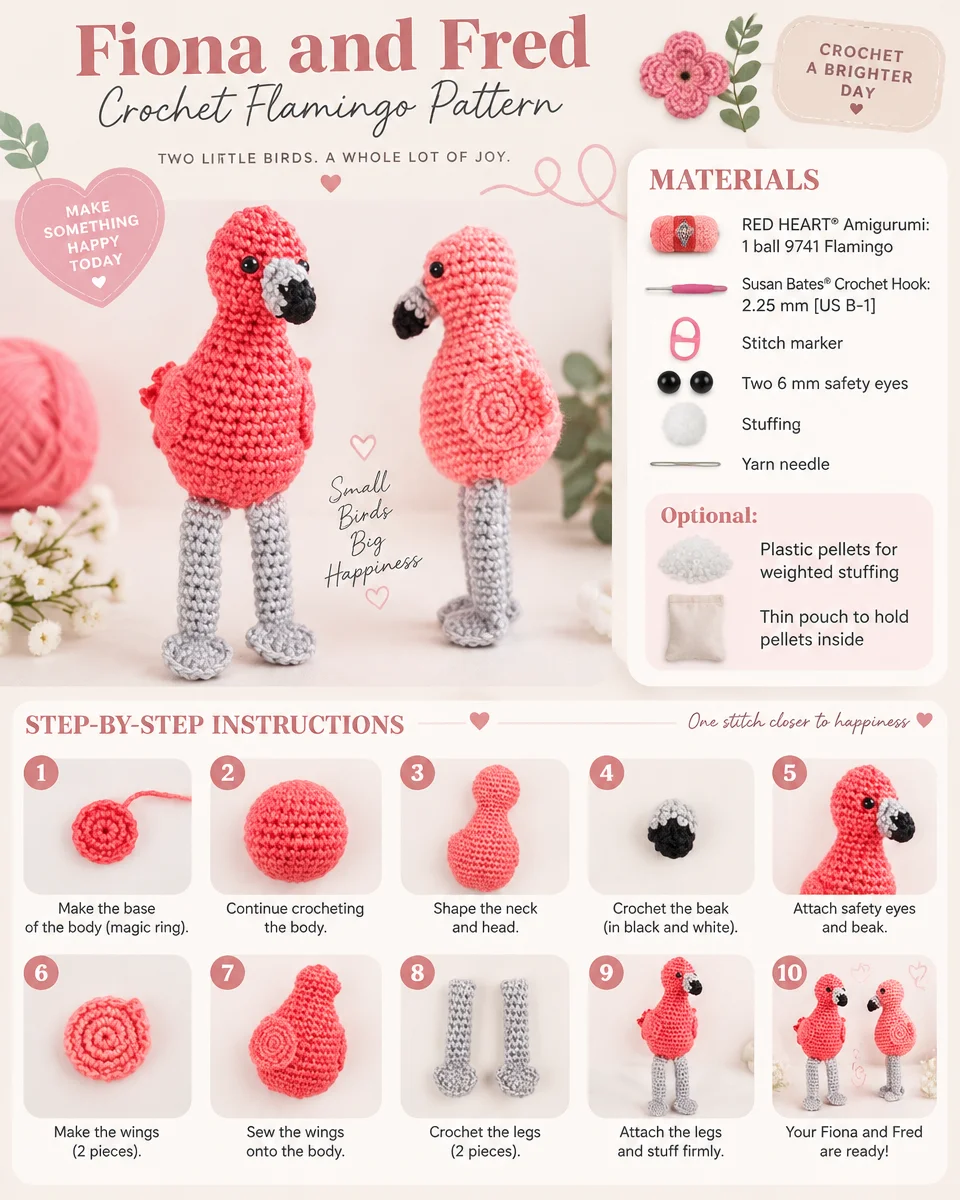
Yarn
- RED HEART® Amigurumi: 1 ball 9741 Flamingo
Crochet Hook
- Susan Bates® Crochet Hook: 2.25 mm [US B-1]
Stuffing
- Polyester stuffing
Safety Eyes
- Two 6 mm safety eyes
Notions
- Stitch marker
- Yarn needle
Optional
- Plastic pellets for weighted stuffing
- Thin pouch to hold pellets
Crochet Abbreviations
- ch: chain
- sc: single crochet
- sc2tog: single crochet two together
- st: stitch
- dc: double crochet
- hdc: half double crochet
- sl st: slip stitch
Special Stitches
sc2tog (single crochet 2 stitches together)
Insert hook in next stitch, yarn over and pull up a loop; repeat for the second stitch, yarn over and draw through all 3 loops on hook.
Adjustable Ring
Wrap yarn into a ring, ensuring that the tail falls behind the working yarn. Grip ring and tail between middle finger and thumb. Insert hook through center of ring, yarn over (with working yarn) and draw up a loop. Work stitches of first round in the ring. After the first round of stitches is worked, pull gently on tail to tighten ring.
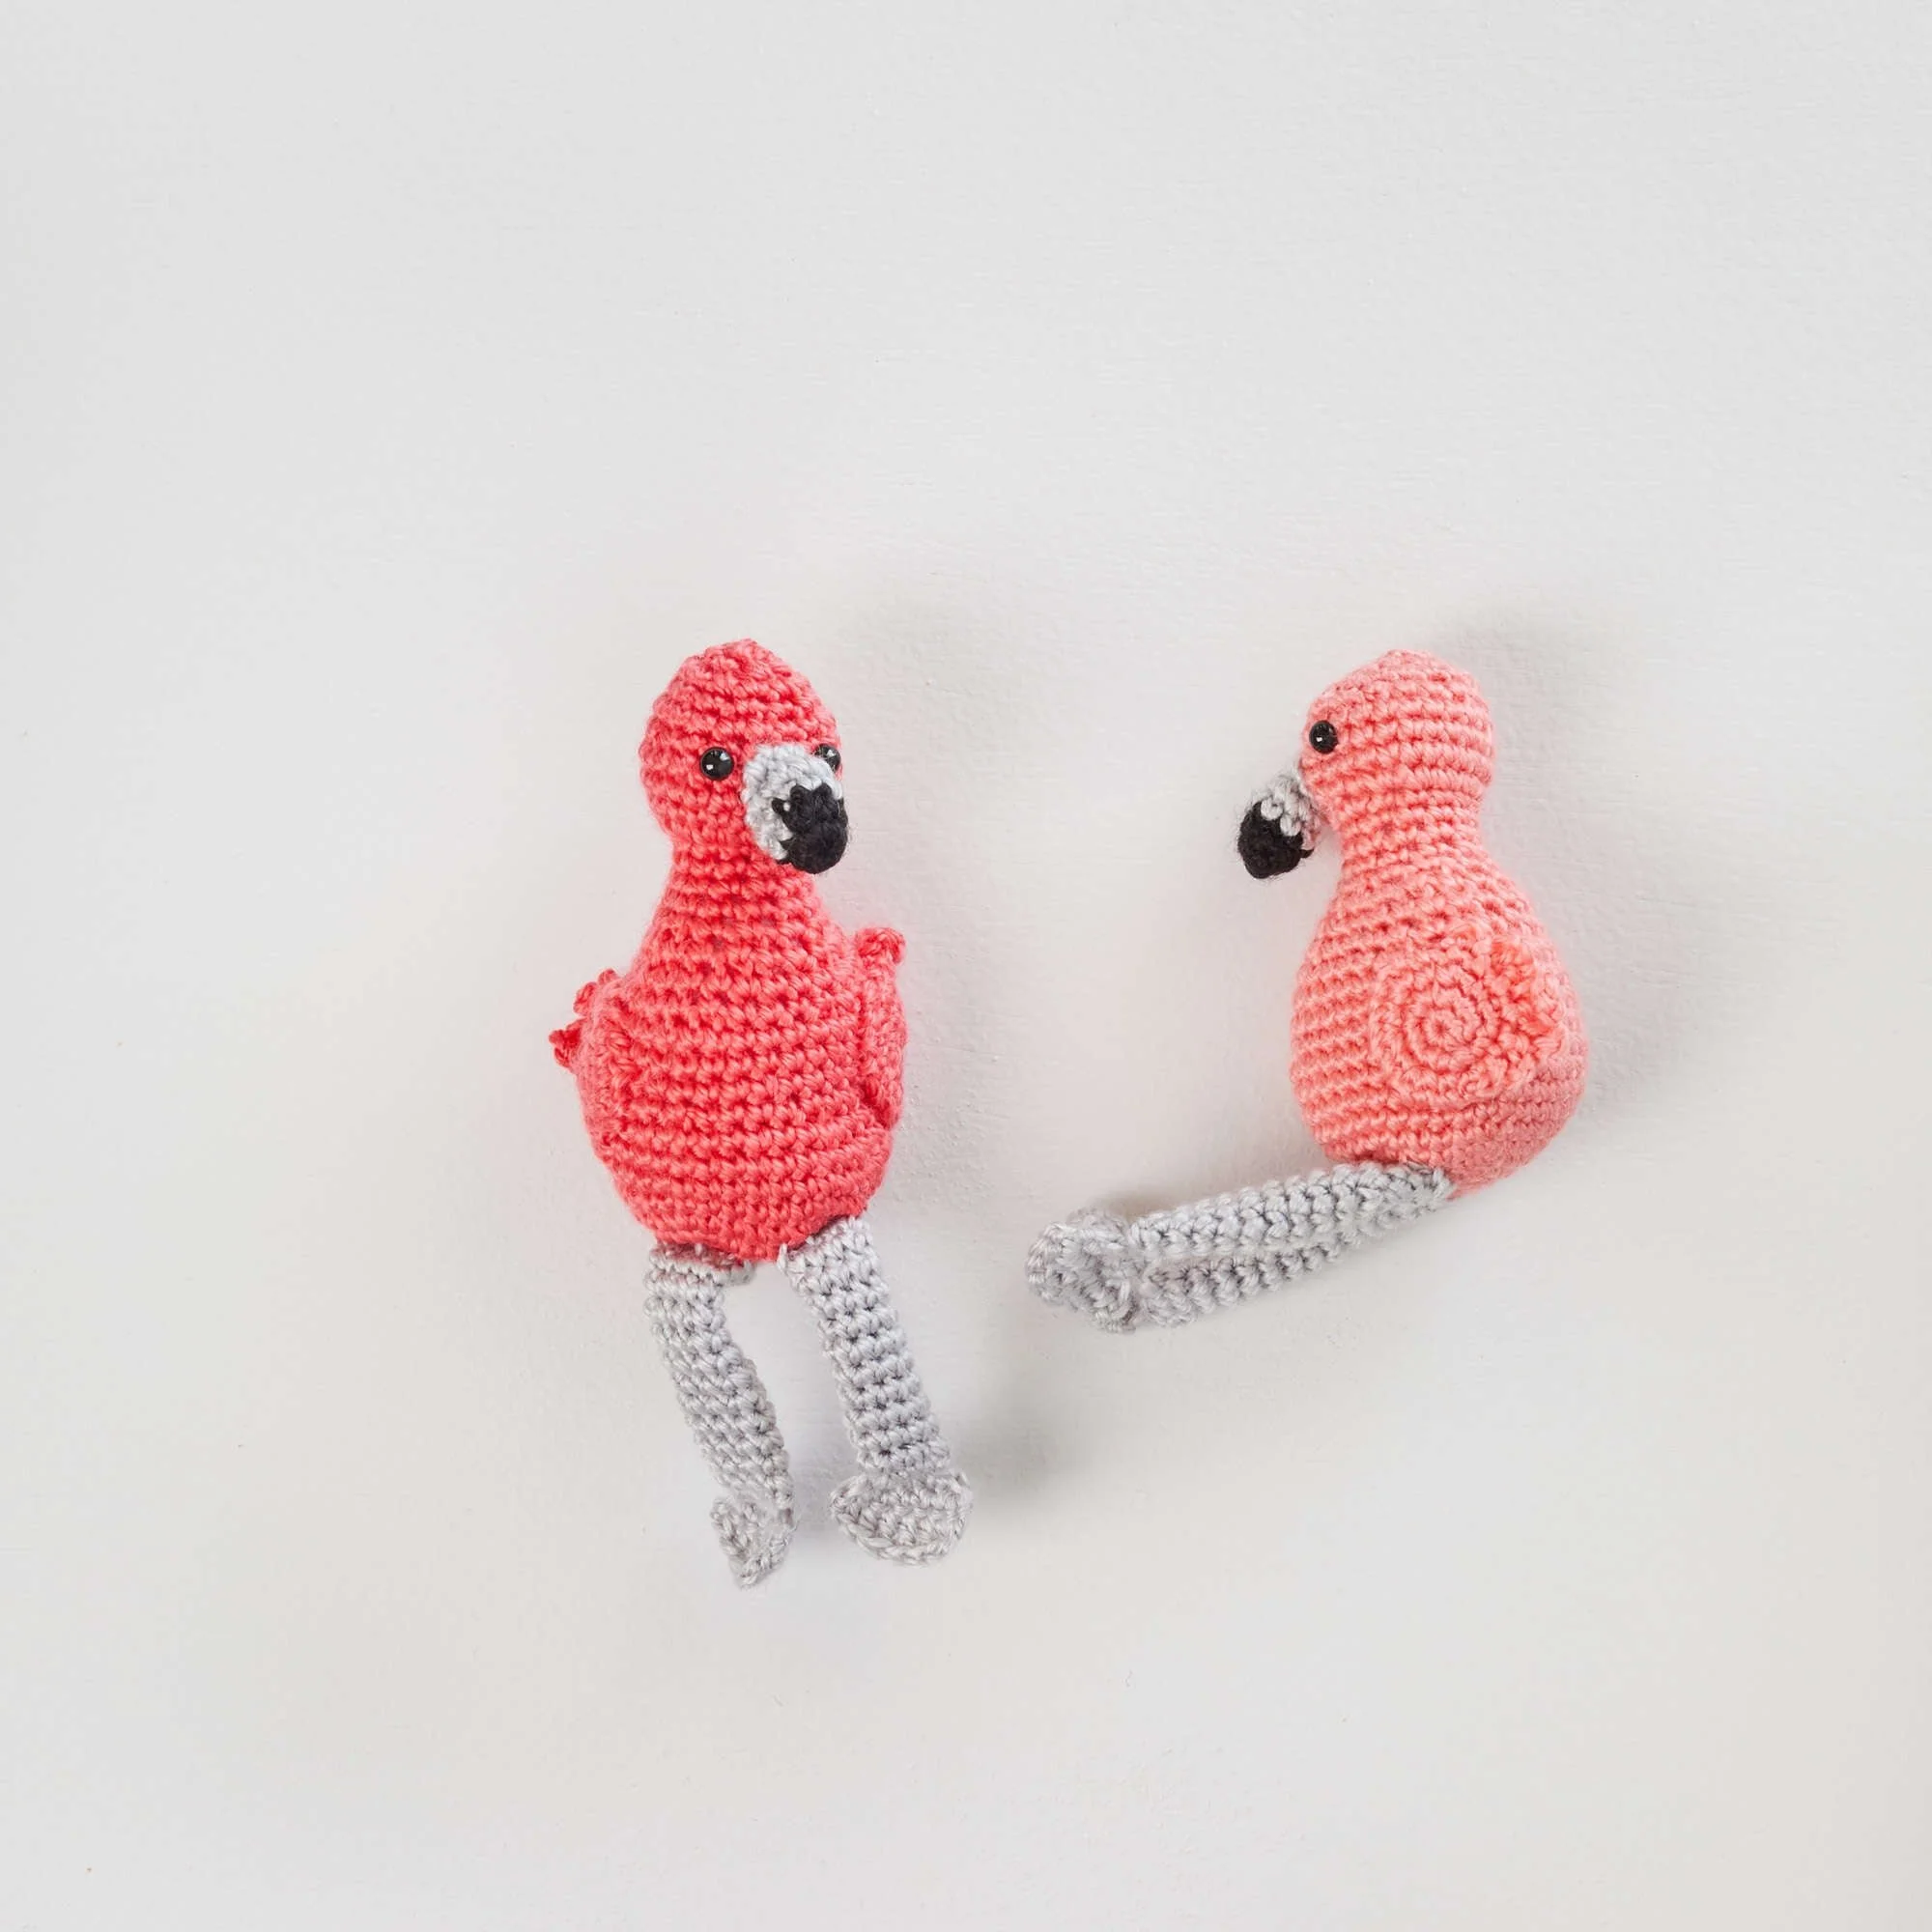
Body/Head
Starting at the bottom of the body, with the yarn color of your choice (A or B), create an adjustable ring.
Round 1 (right side):
Ch 1, work 6 sc in ring; do not join, work in continuous rounds (spiral)—6 sc. Place a marker in the last sc worked to indicate the end of the round. Move the marker up as each round is completed.
Round 2:
Work 2 sc in each of the next 6 sts—12 sc.
Round 3:
[2 sc in next st, sc in next st] 6 times—18 sc.
Round 4:
[2 sc in next st, sc in next 2 sts] 6 times—24 sc.
Round 5:
[2 sc in next st, sc in next 3 sts] 6 times—30 sc.
Round 6:
[2 sc in next st, sc in next 4 sts] 6 times—36 sc.
Rounds 7–10:
Sc in each st around.
Round 11:
[Sc2tog, sc in next 4 sts] 6 times—30 sc.
Rounds 12–14:
Sc in each st around.
Round 15:
[Sc2tog, sc in next 3 sts] 6 times—24 sc.
Round 16:
Sc in each st around.
Round 17:
[Sc2tog, sc in next 2 sts] 6 times—18 sc.
Before stuffing the piece, if using weighted pellets, fill a thin cloth pouch with the pellets and place it in the bottom of the piece. Then stuff the piece, packing the stuffing on top of the pouch.
Round 18:
[Sc2tog, sc in next st] 6 times—12 sc.
Rounds 19–22:
Sc in each st around.
Begin Head
Round 23:
Work 2 sc in each st around—24 sc.
Rounds 24–26:
Sc in each st around.
Round 27:
[Sc2tog, sc in next 2 sts] 6 times—18 sc.
Round 28:
Sc in each st around. Attach safety eyes between Rounds 25 and 26, about 4 stitches apart.
Round 29:
[Sc2tog, sc in next st] 6 times—12 sc. If needed, add a little more stuffing to the piece.
Round 30:
[Sc2tog] 6 times—6 sc.
Fasten off, leaving a long tail. Thread the tail through the stitches of the last round and pull to close the opening. Weave in and trim ends.
Beak
With the D color, make an adjustable ring.
Round 1 (right side):
Ch 1, work 6 sc in ring; do not join, work in continuous rounds (spiral)—6 sc. Place a marker in the last sc worked to indicate the end of the round. Move the marker up as each round is completed.
Round 2:
Work 2 sc in each of next 2 sts, sc in next 4 sts and change to color C in last st—8 sc.
Rounds 3 and 4:
With color C, sc in each st around.
Fasten off, leaving a long tail for sewing the beak to the head.
Legs (make 2 for each flamingo)
With color C, leaving a long beginning tail for sewing the leg to the body, make an adjustable ring.
Round 1 (right side):
Ch 1, work 6 sc in ring; do not join, work in continuous rounds (spiral)—6 sc. Place a marker in the last sc worked to indicate the end of the round. Move the marker up as each round is completed.
Round 2:
[2 sc in next st, sc in next 2 sts] twice—8 sc.
Rounds 3–14:
Sc in each st around.
Foot
Flatten the top of the tube, matching stitches in the back and front of the last round to create a double layer with 4 stitches in each layer. Work now proceeds back and forth in rows.
Row 15:
Working through both thicknesses, skip the first st, sc in next 3 sts.
Row 16:
Ch 1, turn, working in front loops only, 2 sc in the first st, sc in next st, 2 sc in the last st—5 sc.
Row 17:
Ch 1, turn, 2 sc in the first st, sc in next 3 sts, 2 sc in the last st—7 sc.
Row 18:
Ch 1, turn, sc in the first st, hdc in next st, dc in next 3 sts, hdc in next st, sc in last st.
Fasten off. Weave in and trim the ending tail. Do not cut the beginning tail, as it can be used later to sew the leg to the body.
Wings (make 2 for each flamingo)
Using the same yarn color as the body, make an adjustable ring.
Round 1 (right side):
Ch 1, work 6 sc in ring; do not join, work in continuous rounds (spiral)—6 sc. Place a marker in the last sc worked to indicate the end of the round. Move the marker up as each round is completed.
Round 2:
Work 2 sc in each of the next 6 sts—12 sc.
Round 3:
[2 sc in next st, sc in next st] 6 times—18 sc.
Round 4 (wing tips):
Slip st in next st, ch 4, slip st in next st, ch 6, slip st in next st, ch 8, slip st in next st, ch 6, slip st in next st, ch 4, slip st in next st; leave the remaining sts unworked.
Fasten off, leaving a long tail for sewing the wing to the body.
Finishing / Assembly
Referring to a photograph as a guide for placement, use yarn tails or scraps to sew the following pieces together:
- Sew the beak to the head between the eyes, positioning it so that the beak curves downward.
- Sew the legs to the bottom of the body, positioning the feet to face forwards, with the small ridge at the ankle on the front side.
- Sew the wings to the sides of the body, leaving about 10 stitches on the front belly between the wings. Point the wing tips toward the back and sew around the outside of Round 3, leaving the wing tips unsewn.
Weave in and trim any remaining ends.
Frequently Asked Questions
What yarn is used for the Fiona and Fred Crochet Flamingo Pattern?
The pattern calls for RED HEART® Amigurumi: 1 ball 9741 Flamingo.
What size crochet hook is recommended for this project?
You will need a Susan Bates® Crochet Hook: 2.25 mm [US B-1].
Are there safety eyes included in the materials?
Yes, the pattern requires two 6 mm safety eyes to give your flamingo its charming expression.
Is assembly required for this crochet project?
Yes, there is some assembly involved after crocheting the separate pieces, such as the beak, legs, and wings.
How is the body of the flamingo constructed?
The body is worked in continuous rounds starting from the bottom and moving upwards, which gives it a seamless look.
Conclusion
The Fiona and Fred Crochet Flamingo Pattern is a captivating project that encourages creativity while providing a satisfying crochet experience. This vibrant flamingo not only serves as a fun toy but also as an eye-catching décor piece. Happy crocheting!