Crochet Chicken Rooster Pattern
Crochet enthusiasts, get ready for a delightful project! This Crochet Chicken Rooster Pattern combines charm and creativity, making it a fantastic addition to your amigurumi collection. With detailed instructions and a lovely design, you will enjoy creating this adorable rooster that is sure to brighten your space. Let’s dive into the materials and the step-by-step process.
About the Crochet Project
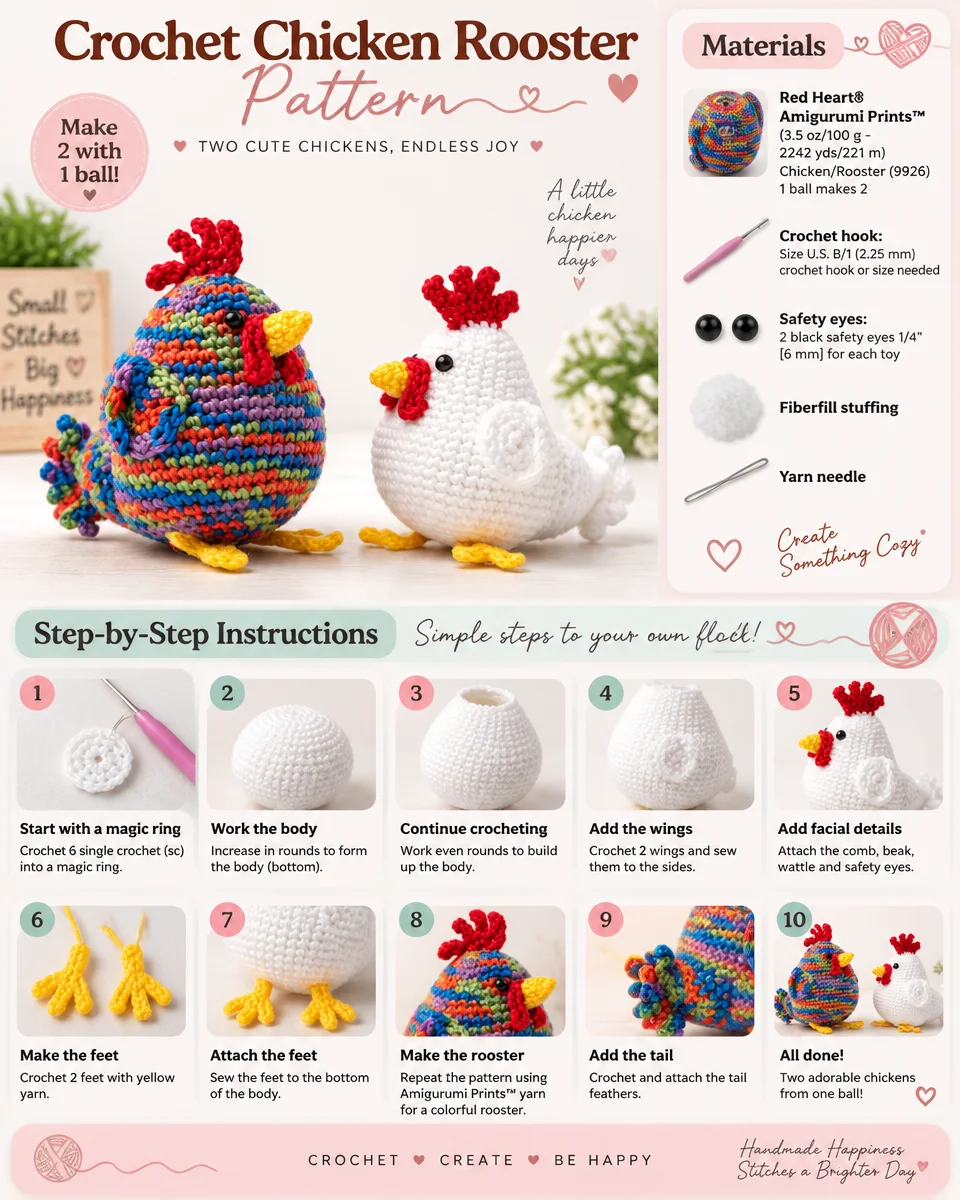
This crochet chicken rooster pattern is designed to create a cute, cuddly amigurumi toy. Ideal for decorating your home, making a unique gift, or simply enjoying a relaxing crochet session, this project is perfect for crocheters looking to add a touch of handmade warmth to their environment. The rooster can be made using vibrant colors, giving you the freedom to express your creativity.
Materials
Here’s what you’ll need to complete your Chicken Rooster:
Yarn
- Red Heart® Amigurumi Prints™ (3.5 oz/100 g; 2242 yds/221 m)
- Color: Chicken/Rooster (9926) – 1 ball of yarn makes 2 roosters.
Crochet Hook
- Size U.S. B/1 (2.25 mm) crochet hook or size needed to obtain gauge.
Safety Eyes
- 2 black safety eyes (1/4″ [6 mm]) for each toy.
Stuffing
- Fiberfill stuffing to give your rooster its cuddly form.
Notions
- Yarn needle for sewing pieces together.
Color Instructions
You can create your rooster using two different color versions:
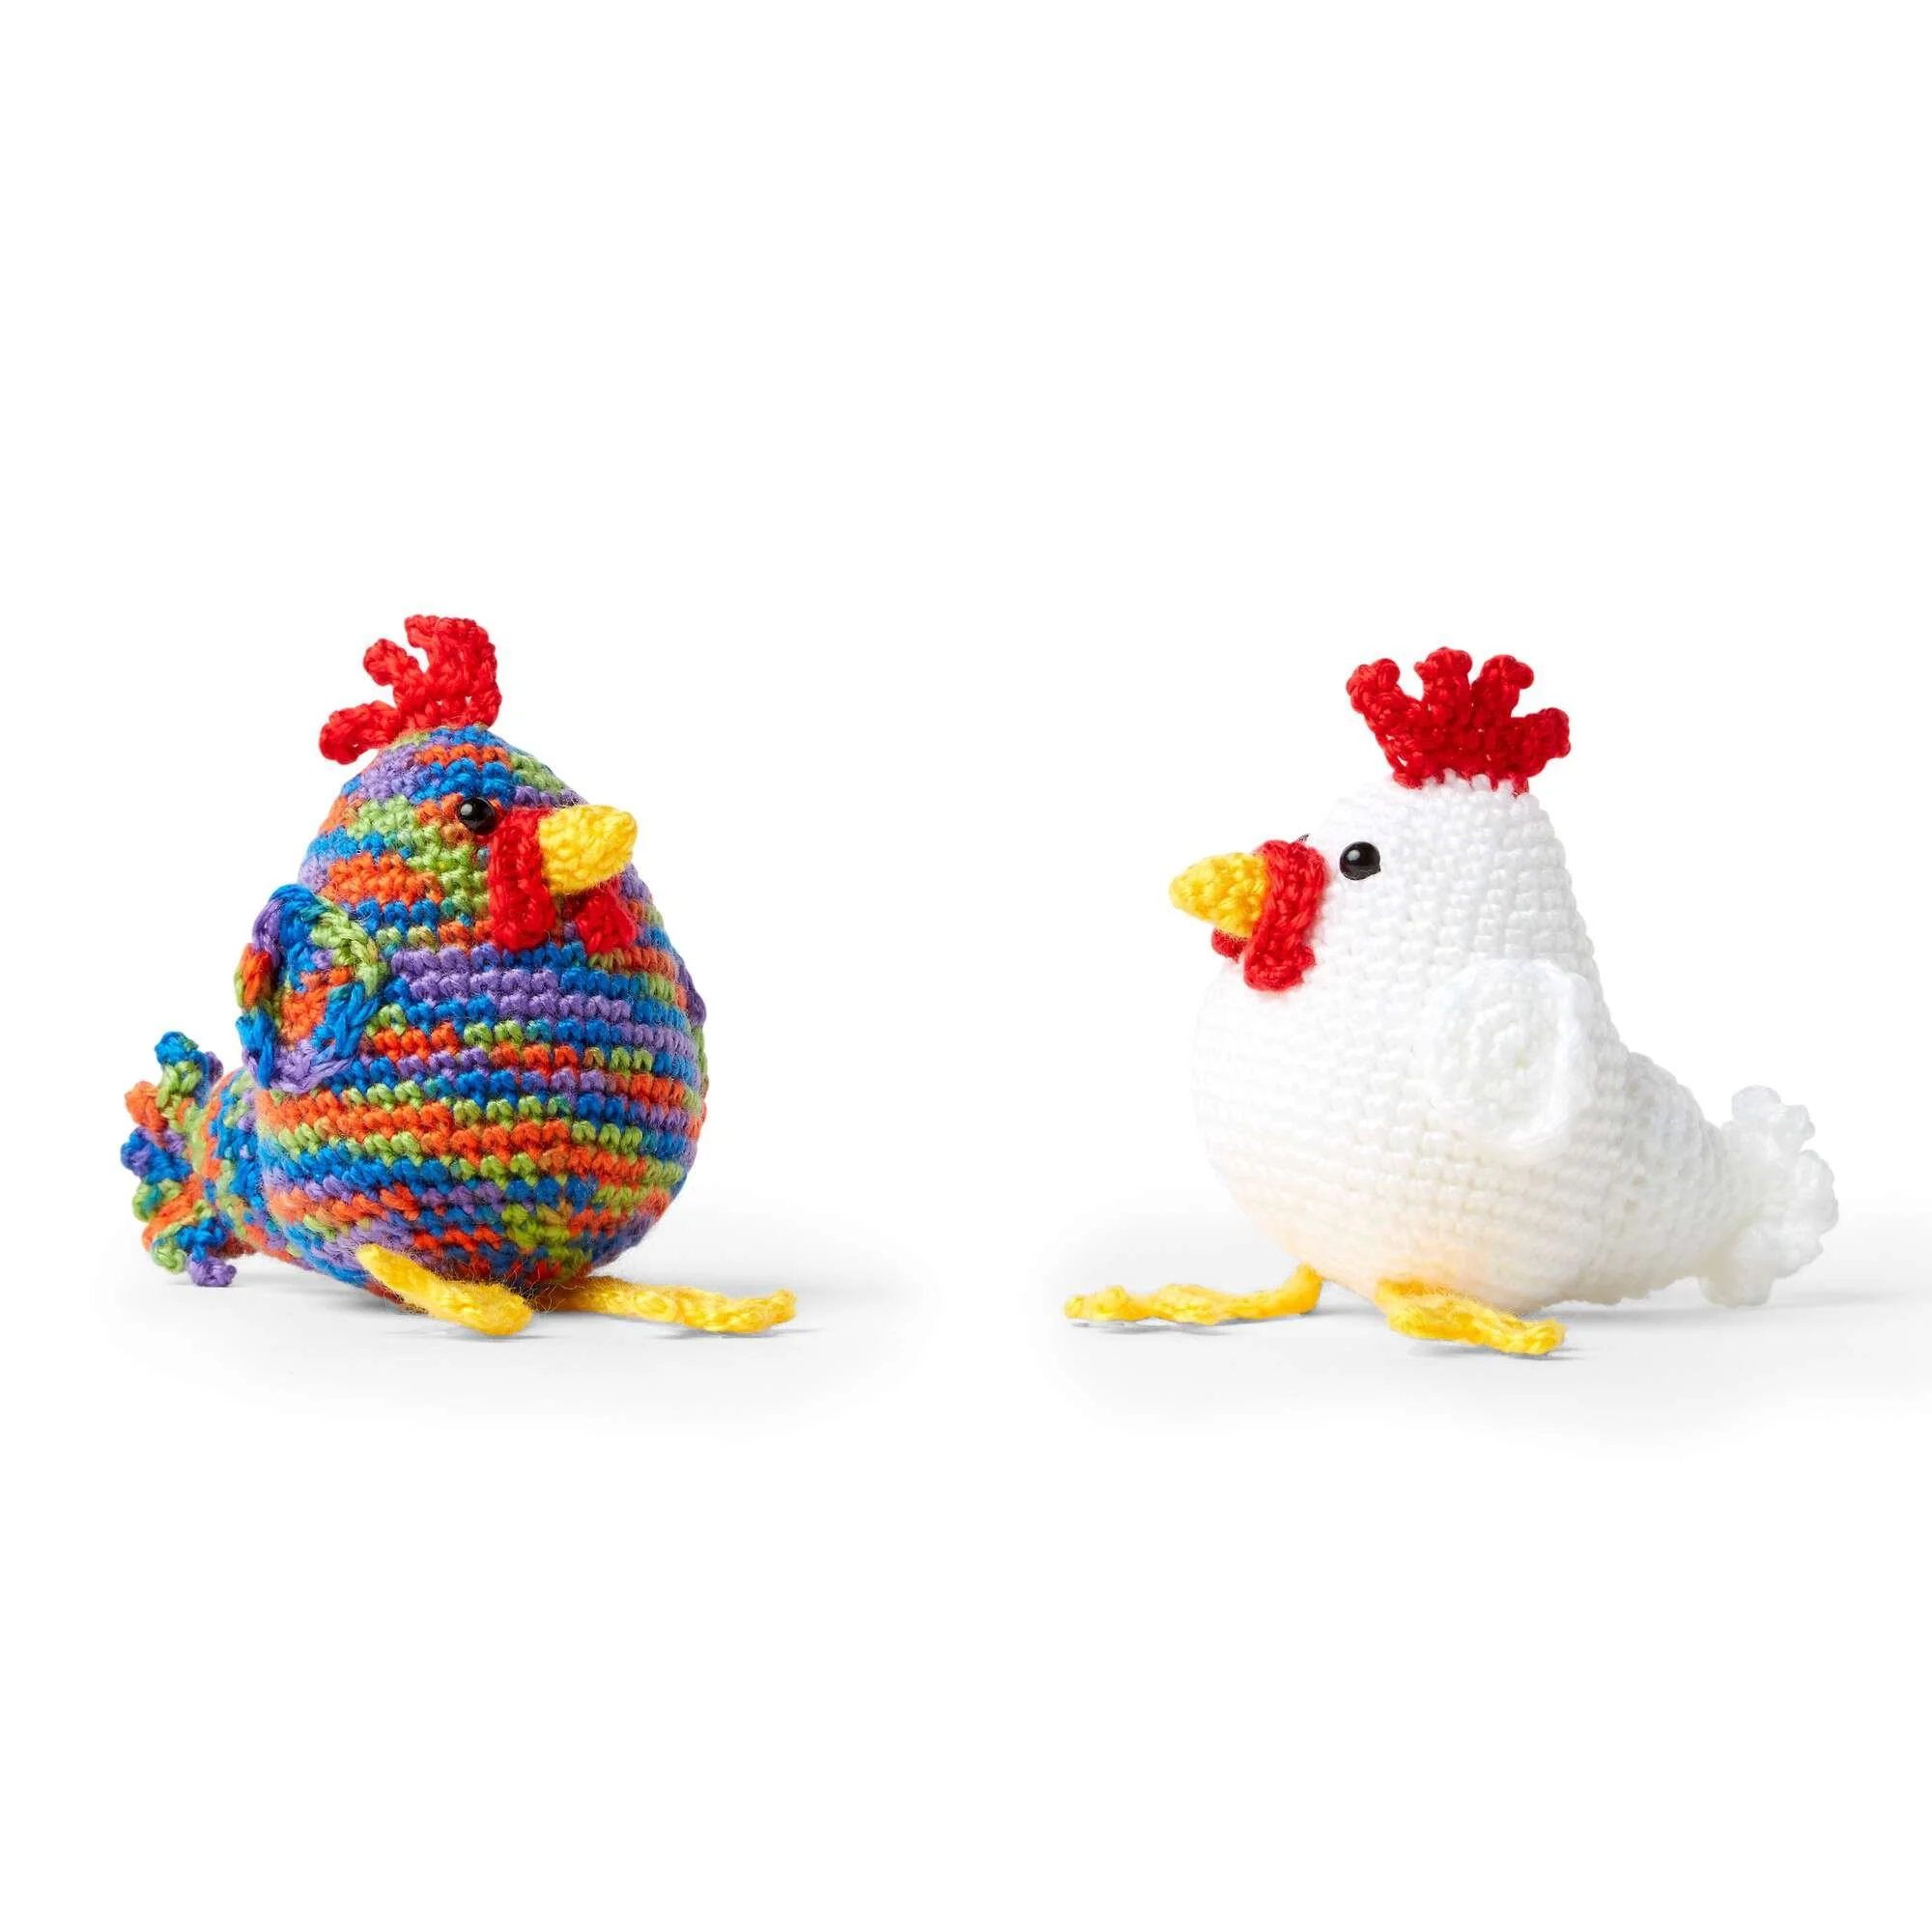
- Version 1: White as Color 1, Yellow as Color 2, Red as Color 3.
- Version 2: Prints as Color 1, Yellow as Color 2, Red as Color 3.
Crochet Abbreviations
Here’s a quick reference for the abbreviations used in this pattern:
- ch = chain
- sc = single crochet
- sc2tog = single crochet two together (decrease)
- sl st = slip stitch
- dc = double crochet
- rnd = round
- sts = stitches
Pattern Notes
- The body of the rooster is worked in continuous rounds. Do not join at the end of each round unless instructed to do so.
- Ensure that you stuff the body firmly for a stable shape that can stand upright.
Body
(Worked in rounds using Color 1 for the Body)
-
With Color 1, ch 2.
-
1st rnd: 6 sc in 2nd ch from hook. Join. (6 sc)
-
2nd rnd: Ch 1. 2 sc in each sc around. Join. (12 sc)
-
3rd rnd: Ch 1. *1 sc in next sc. 2 sc in next sc. Rep from * around. Join. (18 sc)
-
4th rnd: Ch 1. 1 sc in each sc around. Join.
-
5th rnd: Ch 1. *1 sc in each of next 2 sc. 2 sc in next sc. Rep from * around. Join. (24 sc)
-
6th and 7th rnds: Ch 1. 1 sc in each sc around. Join.
-
8th rnd: Ch 1. *1 sc in each of next 3 sc. 2 sc in next sc. Rep from * around. Join. (30 sc)
-
9th and 10th rnds: Ch 1. 1 sc in each sc around. Join.
-
11th rnd: Ch 1. *1 sc in each of next 4 sc. 2 sc in next sc. Rep from * around. Join. (36 sc)
-
12th and 13th rnds: Ch 1. 1 sc in each sc around. Join.
-
14th rnd: Ch 1. *1 sc in each of next 5 sc. 2 sc in next sc. Rep from * around. Join. (42 sc)
-
15th to 21st rnds: Ch 1. 1 sc in each sc around. Join.
-
22nd rnd: Ch 1. *1 sc in each of next 5 sc. Sc2tog. Rep from * around. Join. (36 sts)
-
23rd rnd: Ch 1. *1 sc in each of next 4 sc. Sc2tog. Rep from * around. Join. (30 sts)
-
24th rnd: Ch 1. *1 sc in each of next 3 sc. Sc2tog. Rep from * around. Join. (24 sts)
-
25th rnd: Ch 1. *1 sc in each of next 2 sc. Sc2tog. Rep from * around. Join. (18 sts)
-
Secure safety eyes to Body as shown in photo. Stuff Body firmly.
-
26th rnd: Ch 1. *1 sc in next sc. Sc2tog. Rep from * around. Join. (12 sts)
-
27th rnd: Ch 1. (Sc2tog) 6 times. Join. (6 sts)
-
Fasten off, leaving a long end. Draw end through remaining sts. Pull tightly. Fasten securely.
Beak
-
With Color 2, ch 6, leaving a long end for sewing. Join with sl st to first ch.
-
1st rnd: Ch 1. 1 sc in each ch around. Join. (6 sc)
-
2nd rnd: Ch 1. 1 sc in each sc around. Join.
-
3rd rnd: Ch 1. (Sc2tog) 3 times. Join. (3 sts)
-
Fasten off. Draw end through remaining sts. Pull tightly. Fasten securely.
-
Sew Beak to Body as shown in photo.
Comb (Top of Head)
-
With Color 3, ch 6.
-
1st row: 1 sc in 2nd ch from hook.
- *Ch 4. 1 sc in 2nd ch from the hook. 1 sc in each of next 2 ch. 1 sc in next ch of foundation ch. Rep from * 3 times more.
-
Fasten off, leaving long end for sewing.
-
Sew Comb to top of Body as shown in photo.
Wattle
-
With Color 3, ch 11.
-
1st row: 3 sc in 2nd ch from hook. 1 sc in each ch to last ch. 3 sc in last ch.
-
Fasten off, leaving a long end for sewing.
-
Sew Wattle around Beak as shown in photo.
Wings (Make 2)
-
With Color 1, ch 2.
-
1st rnd: 6 sc in 2nd ch from hook. Join. (6 sc)
-
2nd rnd: Ch 1. 2 sc in each sc around. Join. (12 sc)
-
3rd rnd: Ch 1. 1 sc in first sc. 2 sc in next sc. (1 sc in next sc. 2 dc in next sc) 3 times. (1 sc in next sc. 2 sc in next sc) twice. Join. (18 sts)
-
Fasten off, leaving long end for sewing.
-
Sew Wings to sides of Body as shown in photo.
Tail
-
With Color 1, ch 24, leaving a long end for sewing. Join.
-
1st rnd: Ch 1. 1 sc in each ch around. Join. (24 sc)
-
2nd rnd: Ch 1. *1 sc in each of next 2 sc. Sc2tog. Rep from * around. Join. (18 sts)
-
3rd rnd: Ch 1. 1 sc in each st around. Join.
-
4th rnd: Ch 1. *1 sc in next sc. Sc2tog. Rep from * around. Join. (12 sts)
-
5th to 7th rnds: Ch 1. 1 sc in each st around. Join.
-
8th rnd: Ch 1. *1 sc in next sc. Ch 3. 1 sc in 2nd ch from hook. 1 sc in next ch. Rep from * around. Join.
-
Fasten off, leaving long end for sewing.
-
Sew end of Tail closed at 7th rnd. Stuff Tail firmly. Sew tail to Body as shown in photo.
Legs (Make 2)
-
With Color 2, ch 14.
-
1st row: 1 sl st in 2nd ch from hook and each of next 2 ch. *Ch 4. 1 sl st in 2nd ch from hook. 1 sl st in each of next 2 ch. Rep from * once more. 1 sc in next ch of foundation chain and each ch to end of chain.
-
Fasten off, leaving a long end for sewing.
-
Sew Legs to bottom of Body as shown in photo.
Assembly
Ensure that you follow the instructions carefully to assemble all the individual parts of your rooster. Each section attaches to the main body as indicated, allowing for a cohesive and adorable finished product.
Frequently Asked Questions
What crochet hook is used for this pattern?
You will need a Size U.S. B/1 (2.25 mm) crochet hook or a size needed to obtain gauge.
Is this project worked in rows or rounds?
This project is primarily worked in continuous rounds.
Does this crochet project require assembly?
Yes, there is some assembly required to attach the various body parts like the beak, comb, and wings to the body.
Conclusion
The Crochet Chicken Rooster Pattern is not only a fun challenge but also a wonderful way to express creativity through crochet. By following the detailed instructions and using your creativity with colors, you will create a delightful rooster that could make for a charming gift or whimsical home decor. Happy crocheting!