Crochet Dragon Pattern
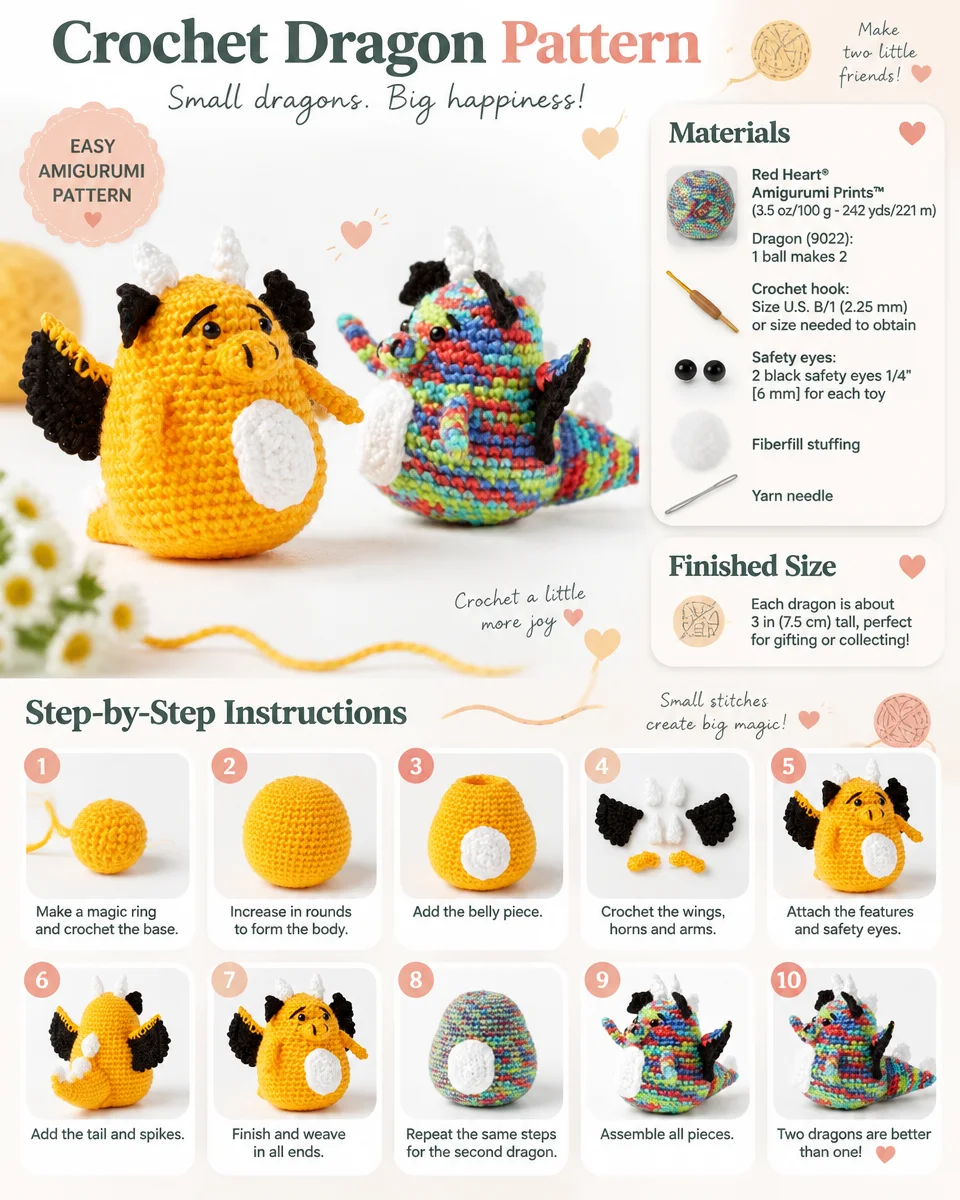
Create your very own adorable crochet dragon with this fun and engaging crochet pattern! This charming dragon is perfect for gifting to children or adding a whimsical touch to your home. This guide will walk you through everything you need to know to successfully make your crochet dragon, including materials, instructions, and useful tips.
About This Crochet Dragon Design
This crochet dragon is an amigurumi-style toy that features a round body, small arms, a long tail, and cute facial features. The pattern allows you to choose between two color versions, giving you the flexibility to customize your dragon according to your artistic vision or the preferences of the recipient.
Materials
Before you start crocheting, gather the following materials:
- Yarn:
- Red Heart® Amigurumi Prints™ (3.5 oz/100 g; 242 yds/221 m)
- Dragon (9022): 1 ball makes 2
- Crochet Hook: Size U.S. B/1 (2.25 mm) or size needed to obtain gauge.
- Safety Eyes: 2 black safety eyes 1/4″ [6 mm] for each toy.
- Fiberfill Stuffing: For making the dragon soft and plushy.
- Yarn Needle: For sewing pieces together.
Version / Color Key
You can choose your color palette for your dragon:
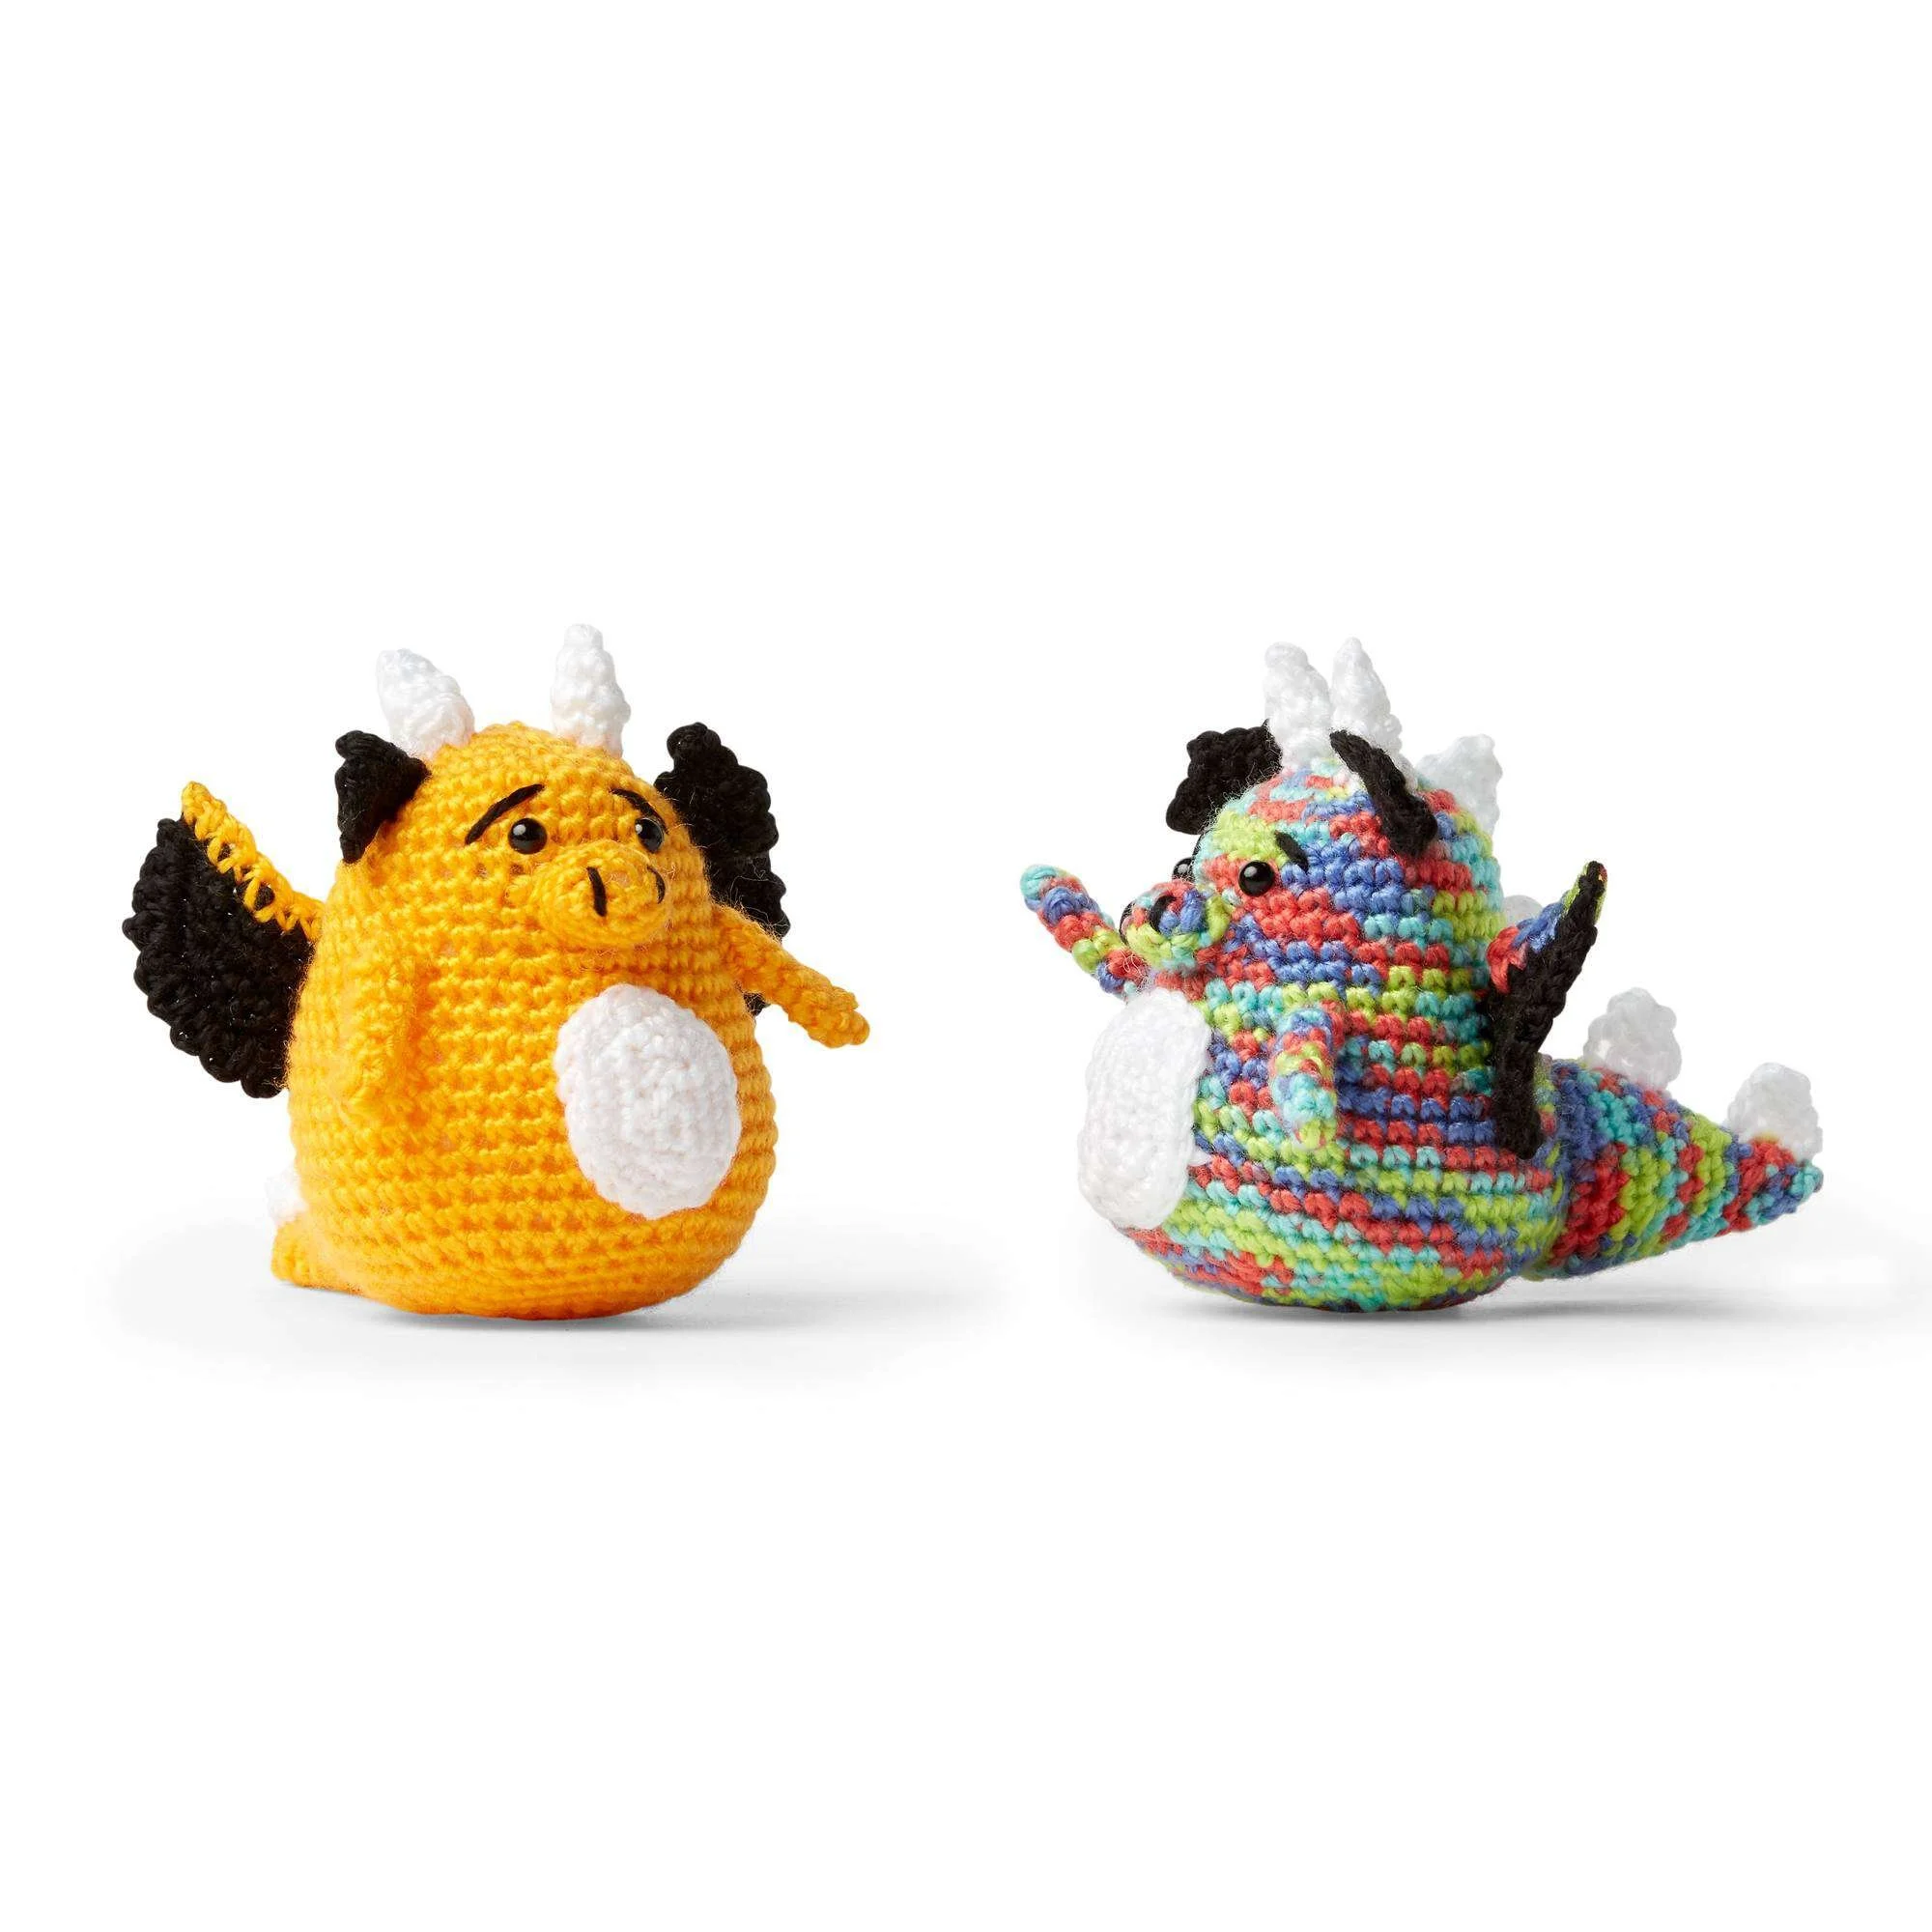
- Version 1: Prints = Color 1, Black = Color 2, White = Color 3
- Version 2: Yellow = Color 1, Black = Color 2, White = Color 3
Crochet Abbreviations
Familiarize yourself with the following crochet abbreviations used in the pattern:
- sc: Single crochet
- sc2tog: Single crochet two together (decrease)
- ch: Chain
- rnd: Round
- sl st: Slip stitch
- turn: Turn your work
Important Notes
- Sc2tog is used for decreases as written in rounds.
- Stem stitch and straight stitch are used for embroidery (eyebrows and nostrils as shown in the diagrams).
- “Join” in rounds is always done with a slip stitch (sl st) to the first stitch.
Body (make 1)
With Color 1, ch 2.
- 1st rnd: 6 sc in 2nd ch from hook. Join. (6 sc)
- 2nd rnd: Ch 1. 2 sc in each sc around. Join. (12 sc)
- 3rd rnd: Ch 1. *1 sc in next sc. 2 sc in next sc. Rep from * around. Join. (18 sc)
- 4th rnd: Ch 1. *1 sc in each of next 2 sc. 2 sc in next sc. Rep from * around. Join. (24 sc)
- 5th rnd: Ch 1. *1 sc in each of next 3 sc. 2 sc in next sc. Rep from * around. Join. (30 sc)
- 6th to 11th rnds: Ch 1. 1 sc in each sc around. Join.
- 12th rnd: Ch 1. *1 sc in each of next 4 sc. 2 sc in next sc. Rep from * around. Join. (36 sc)
- 13th and 14th rnds: Ch 1. 1 sc in each sc around. Join.
- 15th rnd: Ch 1. *1 sc in each of next 5 sc. 2 sc in next sc. Rep from * around. Join. (42 sc)
- 16th to 22nd rnds: Ch 1. 1 sc in each sc around. Join.
- 23rd rnd: Ch 1. *1 sc in each of next 5 sc. sc2tog. Rep from * around. Join. (36 sts)
- 24th rnd: Ch 1. *1 sc in each of next 4 sc. sc2tog. Rep from * around. Join. (30 sts)
- 25th rnd: Ch 1. *1 sc in each of next 3 sc. sc2tog. Rep from * around. Join. (24 sts)
- 26th rnd: Ch 1. *1 sc in each of next 2 sc. sc2tog. Rep from * around. Join. (18 sts)
- 27th rnd: Ch 1. *1 sc in next sc. sc2tog. Rep from * around. Join. (12 sts)
- 28th rnd: Ch 1. (sc2tog) 6 times. Join. (6 sts)
Fasten off, leaving a long end. Draw end through the remaining stitches. Pull tightly and fasten securely.
Secure safety eyes to Body as shown in the photo. Stuff Body firmly.
Nose (make 1)
With Color 1, ch 4.
- 1st rnd: 1 sc in 2nd ch from hook. 1 sc in next ch. 3 sc in last ch. Working into opposite side of foundation ch, 1 sc in next ch. 2 sc in last ch. Join. (8 sc)
- 2nd and 3rd rnds: Ch 1. 1 sc in each sc around. Join.
Fasten off at the end of the 3rd row. Stuff Nose and sew it to the Body as shown in the picture.
With Color 2, using Stem stitch, embroider eyebrows and using Straight stitch, embroider nostrils as shown in the picture.
Ears (make 2)
With Color 2, ch 3, leaving a long end for sewing.
- 1st row: 1 sc in 2nd ch from hook. 1 sc in next ch. Turn. (2 sc)
- 2nd row: Ch 1. 2 sc in each of next 2 sc. Turn. (4 sc)
- 3rd row: Ch 2. Sl st in each of the first 2 sc. Ch 2. Sl st in each of the next 2 sc. Ch 2. Sl st in the same space as the last sl st.
Fasten off and sew Ears to Body as shown in the photo.
Horns (make 2)
With Color 3, ch 4, leaving a long end for sewing. Join with a sl st to the first ch.
- 1st rnd: Ch 1. 1 sc in each ch around. Join. (4 sc)
- 2nd rnd: Ch 1. 1 sc in each sc around. Join.
- 3rd rnd: Ch 1. (sc2tog) twice. Join. (2 sts)
Fasten off, draw the end through the remaining sts, pull tightly, and fasten securely.
Stuff Horns firmly. Sew Horns to Body as shown in the photo.
Arms (make 2)
With Color 1, ch 2.
- 1st rnd: 4 sc in 2nd ch from hook. Join. (4 sc)
- 2nd to 6th rnds: Ch 1. 1 sc in each sc around. Join.
Fasten off at the end of the last rnd, leaving a long end for sewing. Sew Arms to Body as shown in the photo.
Belly (make 1)
With Color 3, ch 4.
- 1st rnd: 1 sc in 2nd ch from hook. 1 sc in the next ch. 3 sc in next ch. Working into the opposite side of the foundation chain, 1 sc in next ch. 2 sc in last ch. Join. (8 sc)
- 2nd rnd: Ch 1. 2 sc in the first sc. 1 sc in the next sc. 2 sc in each of the next 3 sc. 1 sc in the next sc. 2 sc in each of the last 2 sc. Join. (14 sc)
- 3rd rnd: Ch 1. 1 sc in the first sc. 2 sc in the next sc. 1 sc in the next sc. (1 sc in the next sc. 2 sc in the next sc) 3 times. 1 sc in the next sc. (1 sc in the next sc. 2 sc in the next sc) twice. Join. (20 sc)
Fasten off, leaving a long end for sewing. Sew Belly to Body as shown in the photo.
Tail (make 1)
With Color 1, ch 18, leaving a long end for sewing. Join with a sl st to the first ch.
- 1st rnd: Ch 1. 1 sc in each ch around. Join. (18 sc)
- 2nd and 3rd rnds: Ch 1. 1 sc in each sc around. Join.
- 4th rnd: Ch 1. *1 sc in each of the next 4 sc. Sc2tog. Rep from * around. Join. (15 sts)
- 5th rnd: Ch 1. 1 sc in each st around. Join.
- 6th rnd: Ch 1. *1 sc in each of the next 3 sc. Sc2tog. Rep from * around. Join. (12 sts)
- 7th rnd: Ch 1. 1 sc in each st around. Join.
- 8th rnd: Ch 1. *1 sc in each of the next 2 sc. Sc2tog. Rep from * around. Join. (9 sts)
- 9th rnd: Ch 1. 1 sc in each st around. Join.
- 10th rnd: Ch 1. *1 sc in next sc. Sc2tog. Rep from * around. Join. (6 sts)
- 11th rnd: Ch 1. 1 sc in each st around. Join.
- 12th rnd: Ch 1. (sc2tog) 3 times. Join. (3 sts)
Fasten off, leaving a long end. Draw end through remaining stitches, pull tightly, and fasten securely.
Stuff Tail firmly. Sew Tail to Body as shown in the photo.
Spikes (make 4)
With Color 3, ch 4, leaving a long end for sewing.
- 1st row: 1 sc in 2nd ch from hook. 1 sc in each ch to end of chain. Turn. (3 sc)
- 2nd row: Ch 1. Sc3tog. Fasten off.
Sew Spikes to Body and Tail as shown in the photo.
Wings (make 2)
With Color 2, ch 2.
- 1st row: 2 sc in 2nd ch from hook. Turn. (2 sc)
- 2nd row: Ch 1. 2 sc in each of the next 2 sc. Turn. (4 sc)
- 3rd row: Ch 1. *1 sc in next sc. 2 sc in next sc. Rep from * once more. Turn. (6 sc)
- 4th row: Ch 1. *1 sc in each of the next 2 sc. 2 sc in next sc. Rep from * once more. Turn. (8 sc)
- 5th row: Ch 1. *1 sc in each of the next 3 sc. 2 sc in next sc. Rep from * once more. Turn. (10 sc)
- 6th row: *Ch 2. Sl st in next sc. Rep from * to the end of the row. Join Color 1. Do not turn. Break Color 2.
Wing Edging:
1st row: With Color 1, ch 1. Working down the straight edge of the Wing, work 6 sc evenly across. Fasten off, leaving a long end for sewing.
Sew Wings to Body as shown in the photo.
Assembly / Finishing
Once all pieces are completed, secure safety eyes to the Body as shown in the photo. Stuff the Body firmly. Sew components as indicated:
- Nose: sew to Body as shown in the picture.
- Ears (2): sew to Body as shown in the photo.
- Horns (2): sew to Body as shown in the photo.
- Arms (2): sew to Body as shown in the photo.
- Belly: sew to Body as shown in the photo.
- Tail: sew to Body as shown in the photo.
- Spikes (4): sew to Body and Tail as shown in the photo.
- Wings (2): sew to Body as shown in the photo.
Embroidery on face: With Color 2, using Stem stitch, embroider eyebrows; using Straight stitch, embroider nostrils as shown in the picture.
Frequently Asked Questions
What crochet hook is used for this pattern?
You’ll need a size U.S. B/1 (2.25 mm) crochet hook or a size needed to obtain gauge.
Does this crochet project require assembly?
Yes, the dragon components (like the body, arms, tail, and wings) are worked separately and then sewn together.
What yarn is used for this crochet dragon?
The crochet dragon is made using Red Heart® Amigurumi Prints™ yarn, and 1 ball can typically make 2 toys.
Is this project worked in rows or rounds?
The dragon is constructed entirely in rounds.
How many safety eyes are needed for each toy?
You will need 2 black safety eyes (1/4″ [6 mm]) for each dragon toy.
Conclusion
The Crochet Dragon Pattern offers a fantastic opportunity to create a delightful amigurumi toy that is sure to enchant both children and adults alike. Whether you decide on vibrant colors from the yarn selection or personalize it with your unique touches, each dragon will be a special addition to any collection. Happy crocheting!