Crochet Dia & Mia Mermaid Pattern
Dive into the magical world of crochet with the charming Crochet Dia & Mia Mermaid Pattern! This amigurumi project is perfect for those looking to create a whimsical and colorful addition to their handmade collection. Follow along for detailed instructions on how to craft this adorable mermaid, complete with a bikini top, tail, and tutu!
About the Crochet Project
This project will guide you through making a delightful mermaid doll named Dia & Mia, showcasing intricate detailing from her hair down to her regal fin. With step-by-step instructions, this amigurumi pattern emphasizes continuous rounds of single crochet, allowing you to hone your skills while enjoying the process.
Materials
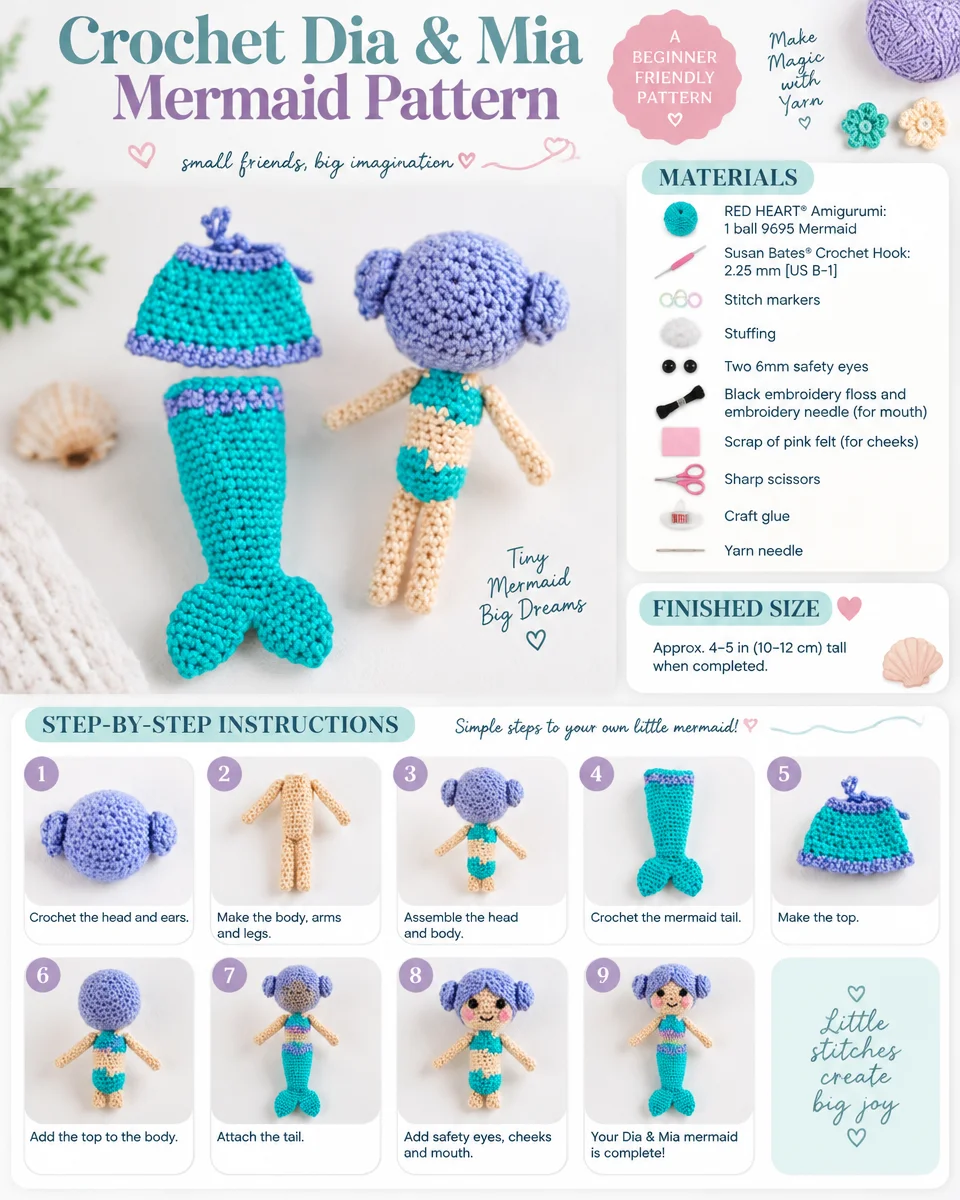
To get started with your crochet mermaid pattern, you will need the following materials:
Yarn
- RED HEART® Amigurumi: 1 ball 9695 Mermaid
Crochet Hook
- Susan Bates® Crochet Hook: 2.25 mm [US B-1]
Stuffing
- Stuffing material (fiberfill or optional knee high stocking filled with plastic pellets for weighted stuffing)
Safety Eyes
- Two 6mm safety eyes
Notions
- Stitch markers
- Black embroidery floss and embroidery needle (for mouth)
- Scrap of pink felt (for cheeks)
- Sharp scissors
- Craft glue
- Yarn needle
- Regular size drinking straw (for leg armature)
Optional
- Knee high stocking and plastic pellets (for weighted stuffing)
Crochet Abbreviations
In this pattern, you’ll encounter the following crochet abbreviations:
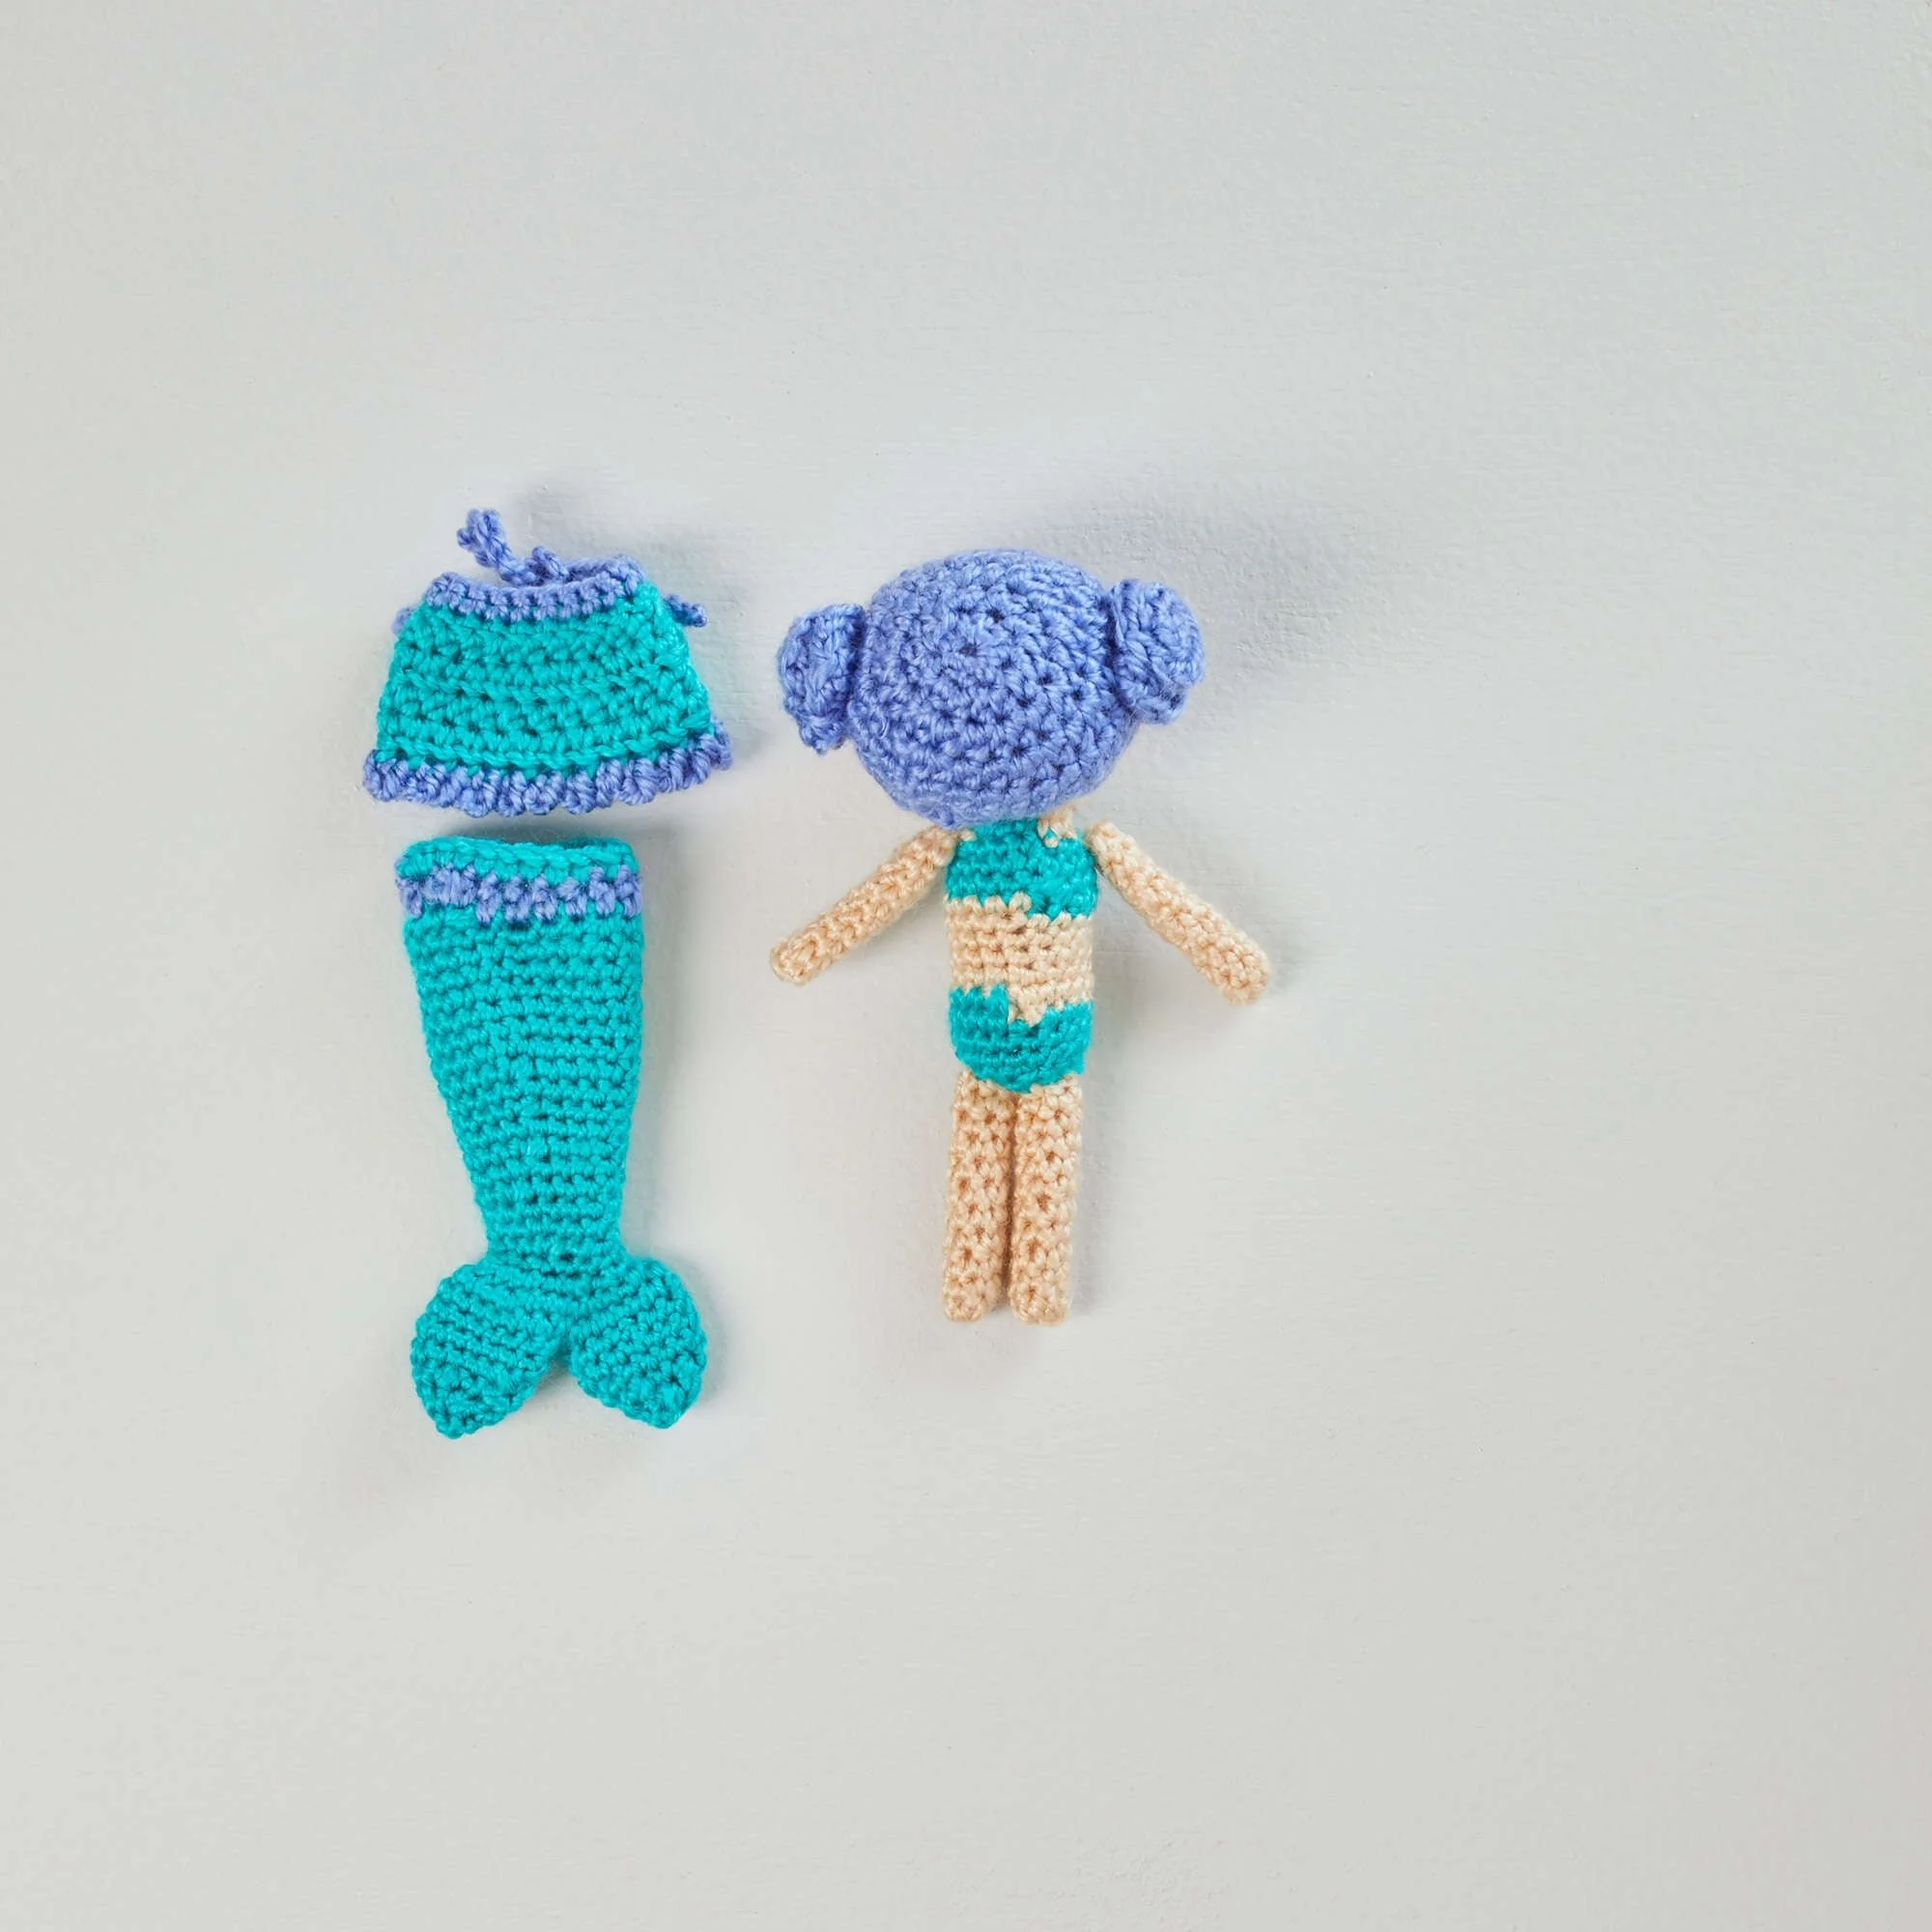
- sc: single crochet
- sc2tog: single crochet 2 stitches together
- hdc: half double crochet
- ch: chain
- sl st: slip stitch
Special Stitch
sc2tog
(single crochet 2 stitches together)
To work this stitch, insert your hook into the next stitch, yarn over, and pull up a loop. Repeat this process in the next stitch, giving you three loops on your hook. Yarn over once more and pull through all three loops on your hook.
Special Technique
- Adjustable ring: Wrap yarn into a ring, ensuring the tail falls behind the working yarn. Grip the ring and tail between your middle finger and thumb. Insert your hook through the center of the ring, yarn over, and draw up a loop. Work the needed stitches in the ring. After completing the first round of stitches, pull gently on the tail to tighten the ring.
Pattern Instructions
Body
To start, create the body of the mermaid by making an adjustable ring.
Round 1 (right side):
- Work 6 sc in ring; do not join, work in continuous rounds (spiral)—6 sc.
- Place a stitch marker in the last sc worked to indicate the end of the round and move the marker up as each round is completed.
Round 2:
- Work 2 sc in each of the next 6 sts and change to your choice of yarn color B or C for the bikini in the last st —12 sc.
- Fasten off A.
Bikini
Round 3:
- With the bikini color, [sc in next st, 2 sc in next st] 6 times—18 sc.
Rounds 4–6:
- With the bikini color, sc in each st around and change to A in the last st.
- Fasten off bikini color.
Rounds 7–11:
- With A, sc in each st around and change to bikini color in last st.
- Fasten off A.
Rounds 12–14:
- With bikini color, sc in each st around.
- Stuff the body with stuffing or with an optional knee-high filled with plastic pellets. Complete the piece with bikini color only.
Round 15:
- [Sc in next st, sc2tog] 6 times—12 sc.
Round 16:
- [Sc2tog] 6 times—6 sc.
- Fasten off, leaving a long tail. Thread the tail through the stitches of the last round and pull to close the opening. Secure the tail and weave it inside the body.
Arms and Legs (make 4)
Note:
- Arms and legs are “stuffed” with drinking straw cut to size. Do not stuff with fiber.
With A, make an adjustable ring.
Round 1 (right side):
- Work 6 sc in ring; do not join, work in continuous rounds (spiral)—6 sc.
- Place a stitch marker in the last sc worked.
Rounds 2–11:
- Sc in each st around.
- Fasten off, leaving a long tail for sewing the limb to the body. Insert straw into the limb and cut straw even with the top opening of the limb.
Head
Beginning at the top of the head with A, make an adjustable ring.
Round 1 (right side):
- Work 6 sc in ring; do not join, work in continuous rounds (spiral)—6 sc.
- Place a marker in the last sc worked.
Round 2:
- Work 2 sc in each of the next 6 sts—12 sc.
Round 3:
- [Sc in next st, 2 sc in next st] 6 times—18 sc.
Round 4:
- [Sc in next 2 sts, 2 sc in next st] 6 times—24 sc.
Round 5:
- [Sc in next 3 sts, 2 sc in next st] 6 times—30 sc.
Round 6:
- [Sc in next 4 sts, 2 sc in next st] 6 times—36 sc.
Rounds 7–12:
- Sc in each st around.
Round 13:
- [Sc in next 4 sts, sc2tog] 6 times—30 sc.
Round 14:
- [Sc in next 3 sts, sc2tog] 6 times—24 sc.
Attach safety eyes between Rounds 8 and 9, about 8 sts apart.
Round 15:
- [Sc in next 2 sts, sc2tog] 6 times—18 sc.
Begin stuffing the head and continue to stuff until the piece is complete.
Round 16:
- [Sc in next st, sc2tog] 6 times—12 sc.
- Fasten off, leaving a long tail for sewing the head to the body.
Wig Base
With your choice of yarn color B or D, make an adjustable ring.
Round 1 (right side):
- Work 8 hdc in ring; join with a slip stitch in the first hdc—8 hdc.
Round 2:
- Ch 1 (does not count as a stitch), 2 hdc in each st around; join with a slip stitch in the first hdc—16 hdc.
Round 3:
- Ch 1, [hdc in next st, 2 hdc in next st] 8 times; join with a slip stitch in the first hdc—24 hdc.
Round 4:
- Ch 1, [hdc in next 2 sts, 2 hdc in next st] 8 times; join with a slip stitch in the first hdc—32 hdc.
Round 5:
- Ch 1, hdc in each st around; join with a slip stitch in the first hdc.
Rounds 6 and 7:
- Ch 1, sc in each st around; join with a slip stitch in the first sc.
- Fasten off, leaving a long tail for sewing the wig base to the head. Note: Hair instructions are found at the end of the pattern. Hair is added last.
Tail
Beginning at the waist with C, ch 20; taking care not to twist the ch, join with a slip stitch in the first ch to form a ring.
Round 1:
- Work 2 sc in the same ch as the joining slip stitch, sc in next 9 ch, 2 sc in next ch, sc in next 9 ch; do not join, work in continuous rounds (spiral)—22 sc.
- Place a marker in the last sc worked to indicate the end of the round.
Rounds 2–8:
- Sc in each st around.
Round 9:
- [Sc2tog, sc in next 9 sts] twice—20 sc.
Round 10:
- Sc in each st around.
Round 11:
- [Sc2tog, sc in next 8 sts] twice—18 sc.
Round 12:
- Sc in each st around.
Round 13:
- [Sc2tog, sc in next 7 sts] twice—16 sc.
Round 14:
- Sc in each st around.
Round 15:
- [Sc2tog, sc in next 6 sts] twice—14 sc.
Rounds 16 and 17:
- Sc in each st around.
Round 18:
- [Sc2tog, sc in next 5 sts] twice—12 sc.
Round 19:
- Sc in each st around.
Round 20:
- Work 2 sc in each st around—24 sc.
Round 21:
- [Sc in next 3 sts, 2 sc in next st] 6 times—30 sc.
- Fasten off C.
Fins
Flatten the piece with decrease lines at the sides. Inserting through both layers, place a marker in the middle stitch on the top and bottom layers so that there are 14 stitches on each side of the marked middle stitches.
First Fin
Working through both layers, join C with a slip stitch in the marked middle sts.
Round 1:
- Sc in next 14 sts; leave the sts on the other side of the marker unworked for the second fin; do not join, work in continuous rounds (spiral)—14 sc.
- Place a marker in the last sc worked to indicate the end of the round.
Rounds 2 and 3:
- Sc in each st around.
Round 4:
- [Sc2tog, sc in next 5 sts] twice—12 sc.
Round 5:
- [Sc in next st, sc2tog] 4 times—8 sc.
Round 6:
- [Sc2tog] 4 times—4 sc.
Fasten off, leaving a long tail. Thread the tail through the stitches of the last round and pull to close the opening. Weave in and trim ends.
Second Fin
Working through both layers, join C with a slip stitch in the marked middle sts so that you are ready to work over the 14 unworked sts.
Repeat Rounds 1–6 of the first fin.
Fasten off, leaving a long tail. Thread the tail through the stitches of the last round and pull to close the opening. Weave in and trim ends.
Waistband
Round 1:
With the right side facing and working along the opposite side of the foundation chain at the waist, draw up a loop of B in any ch, ch 1, hdc in the same ch and in each ch around; join with a slip stitch in the first hdc—20 hdc.
If a two-color waistband is desired, fasten off B and draw up a loop of C in any hdc.
Round 2:
- Ch 1, sc in each st around; join with a slip stitch in the first sc.
- Fasten off. Weave in and trim ends.
Tutu
Beginning at the waist edge with B, ch 19.
Row 1:
- Sc in 2nd ch from hook and in each remaining ch across—18 sc.
Row 2:
- Ch 1, turn, working in back loops only, 2 sc in each st across—36 sc.
Row 3:
- Ch 1, turn, *sc in next st, 2 sc in next st; repeat from * across—54 sc.
Rows 4 and 5:
- Ch 1, turn, sc in each st across.
Fasten off, leaving a long tail. With a long yarn tail, sew edges together for the back seam, leaving about ⅛” [3mm] unsewn at the top waist edge. Weave in and trim ends.
Sash (tutu)
With the right side facing, join B with a slip stitch in one top corner of the waist edge, ch 22.
Fasten off and weave in and trim ends.
Join B with a slip stitch in the second top corner of the waist edge, ch 22.
Fasten off and weave in and trim ends.
Skirt (sundress)
Beginning at the waist edge with C, ch 19.
Row 1:
- Sc in 2nd ch from hook and in each remaining ch across—18 sc.
Row 2:
- Ch 1, turn, [hdc in next 2 sts, 2 hdc in next st] 6 times—24 hdc.
Rows 3–5:
- Ch 1, turn, hdc in each st across and change to B in last st of last row.
- Fasten off C, leaving a long tail for sewing edges together.
Row 6:
With B, turn, *ch 3, slip st in next st; repeat from * across.
Fasten off, leaving a long tail. Using the long tail, sew the first and last ch-3 loops together. Weave in and trim end.
With a long C-colored tail from Row 5, whip stitch side edges together for the back seam. Weave in and trim ends.
Sash (skirt)
With B, ch 25, hold the skirt with the foundation chain at the top, sc in each ch along the opposite side of the foundation ch, ch 25.
Fasten off and weave in and trim ends.
Finishing / Assembly
Referring to the photograph as a guide to placement, sew the following pieces together using yarn tails or yarn scraps:
- Sew the head to the body, ensuring to position the face forward.
- Sew the arms to the upper sides of the body at Rounds 3 and 4.
- Sew the legs to the lower portion of the body.
Bangs
Before sewing the wig base to the head, embroider the bangs as follows: With yarn the same color as the wig base, begin embroidering bangs about 2 rows above the eyes and make long stitches that will be partially hidden under the wig base. Vary the length of the bang stitches for a tousled look.
Place the wig base on the head, overlapping bangs by a fraction of an inch. Pin in place for best results, and sew the base to the head. Weave and trim ends.
Smile
With an embroidery needle and 2 strands of black embroidery floss, embroider a smile at Round 13 of the head, in the middle of the face, about 3 stitches wide.
Cheeks
Cut small circles from pink felt. Refer to the photo for placement and glue the cheeks to the face directly under and to the sides of the eyes.
Hair (added last)
Hair Version 1 (side buns)
With B, leaving a long beginning tail, ch 21.
Row 1:
- Hdc in 2nd ch from the hook, 2 hdc in the next ch, *hdc in the next ch, 2 hdc in the next ch; repeat from * across—30 hdc.
- Fasten off, leaving a long tail. Roll the piece in a spiral (jelly roll) fashion. With one yarn tail, sew layers together to retain the shape. With the other yarn tail, sew the bun to the side of the head, about level with the eyes. Repeat to make and attach the second bun.
Hair Version 2 (long curls)
First Round of Curls:
Join D with a slip stitch in any st of last round of wig base; ch 21, slip st in each ch of ch-21 just made, slip st in the same st as the joining slip stitch (first curl made), *skip the next st, slip stitch in the next st, ch 21, slip st in each ch of ch-21 just made, slip st in the same st as the very first slip stitch of this curl (next curl made); repeat from * around the last round of the wig base.
Fasten off, weave in and trim ends.
Next Round of Curls:
Working around Round 4 of the wig base (or any round desired), repeat the first round of curls.
Note: There is no need to fill the entire wig base with curls as it will become too heavy and may cause the head to sag. To hide the base and style the hair, pull a few lengths of the Round 4 curls to the back of the head and tie loosely in the back. Slip stitch lengths will curl naturally.
Weave in and trim any remaining ends. Dress the mermaid in an outfit of your choice.
Frequently Asked Questions
What yarn is used for this pattern?
The pattern calls for RED HEART® Amigurumi, specifically 1 ball of color 9695 Mermaid.
Does this project involve assembly?
Yes, assembly is required to attach the head, arms, and legs to the body. Detailed instructions are provided in the Finishing section.
What crochet hook size is recommended?
The pattern recommends using a Susan Bates® Crochet Hook size 2.25 mm [US B-1].
Is gauge information provided for this project?
Gauge information is not provided in the pattern.
Can I use other yarn types?
While RED HEART® Amigurumi is specified, you may experiment with other yarn types, but keep in mind that this may affect the size and look of the finished mermaid.
Conclusion
The Crochet Dia & Mia Mermaid Pattern is a fun and colorful project that results in a charming doll perfect for gifting or keeping as a collectible. With clear instructions and a delightful design, this is a great project for crochet enthusiasts looking to add a unique piece to their collection. Happy crocheting!