Benedict and Bertie Crochet Bird Pattern
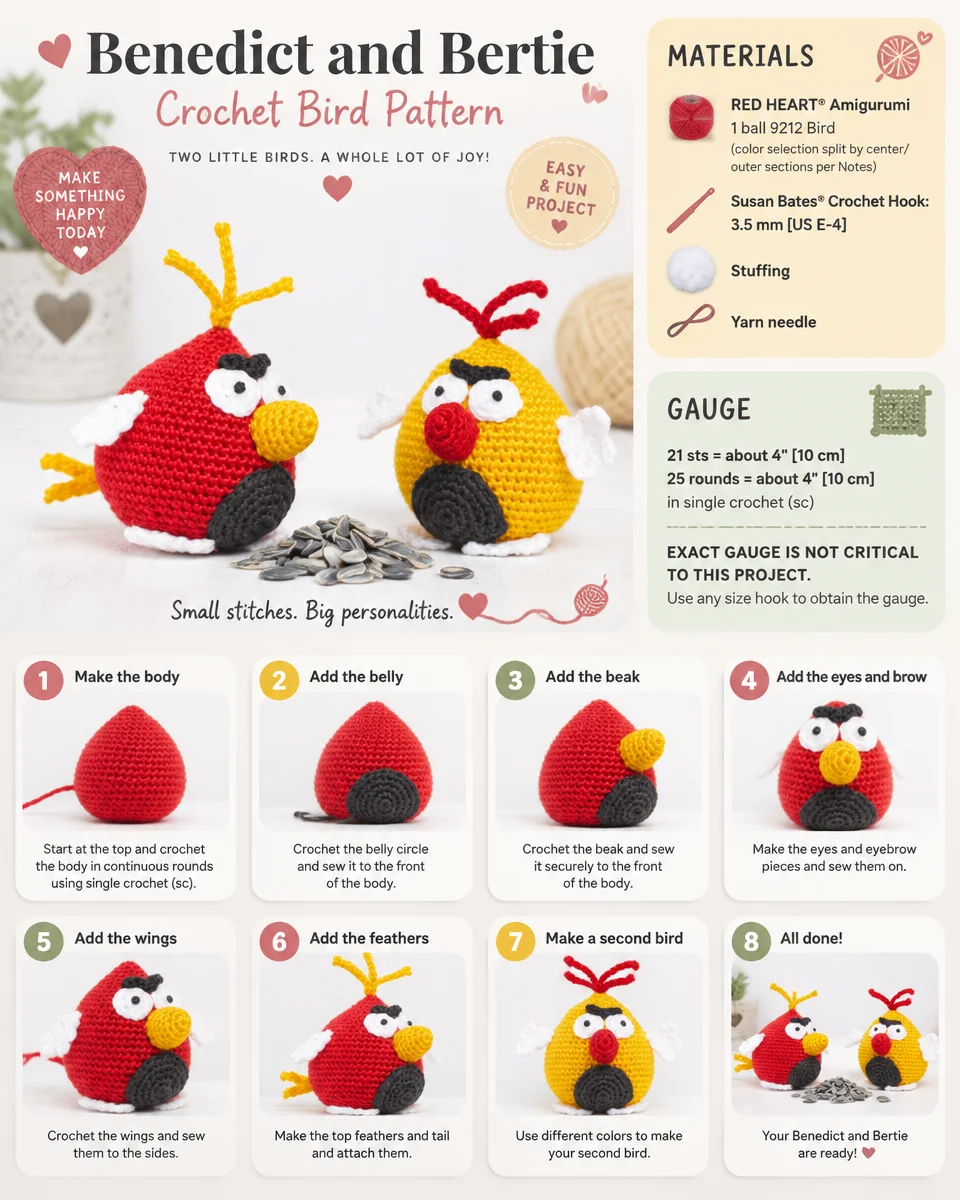
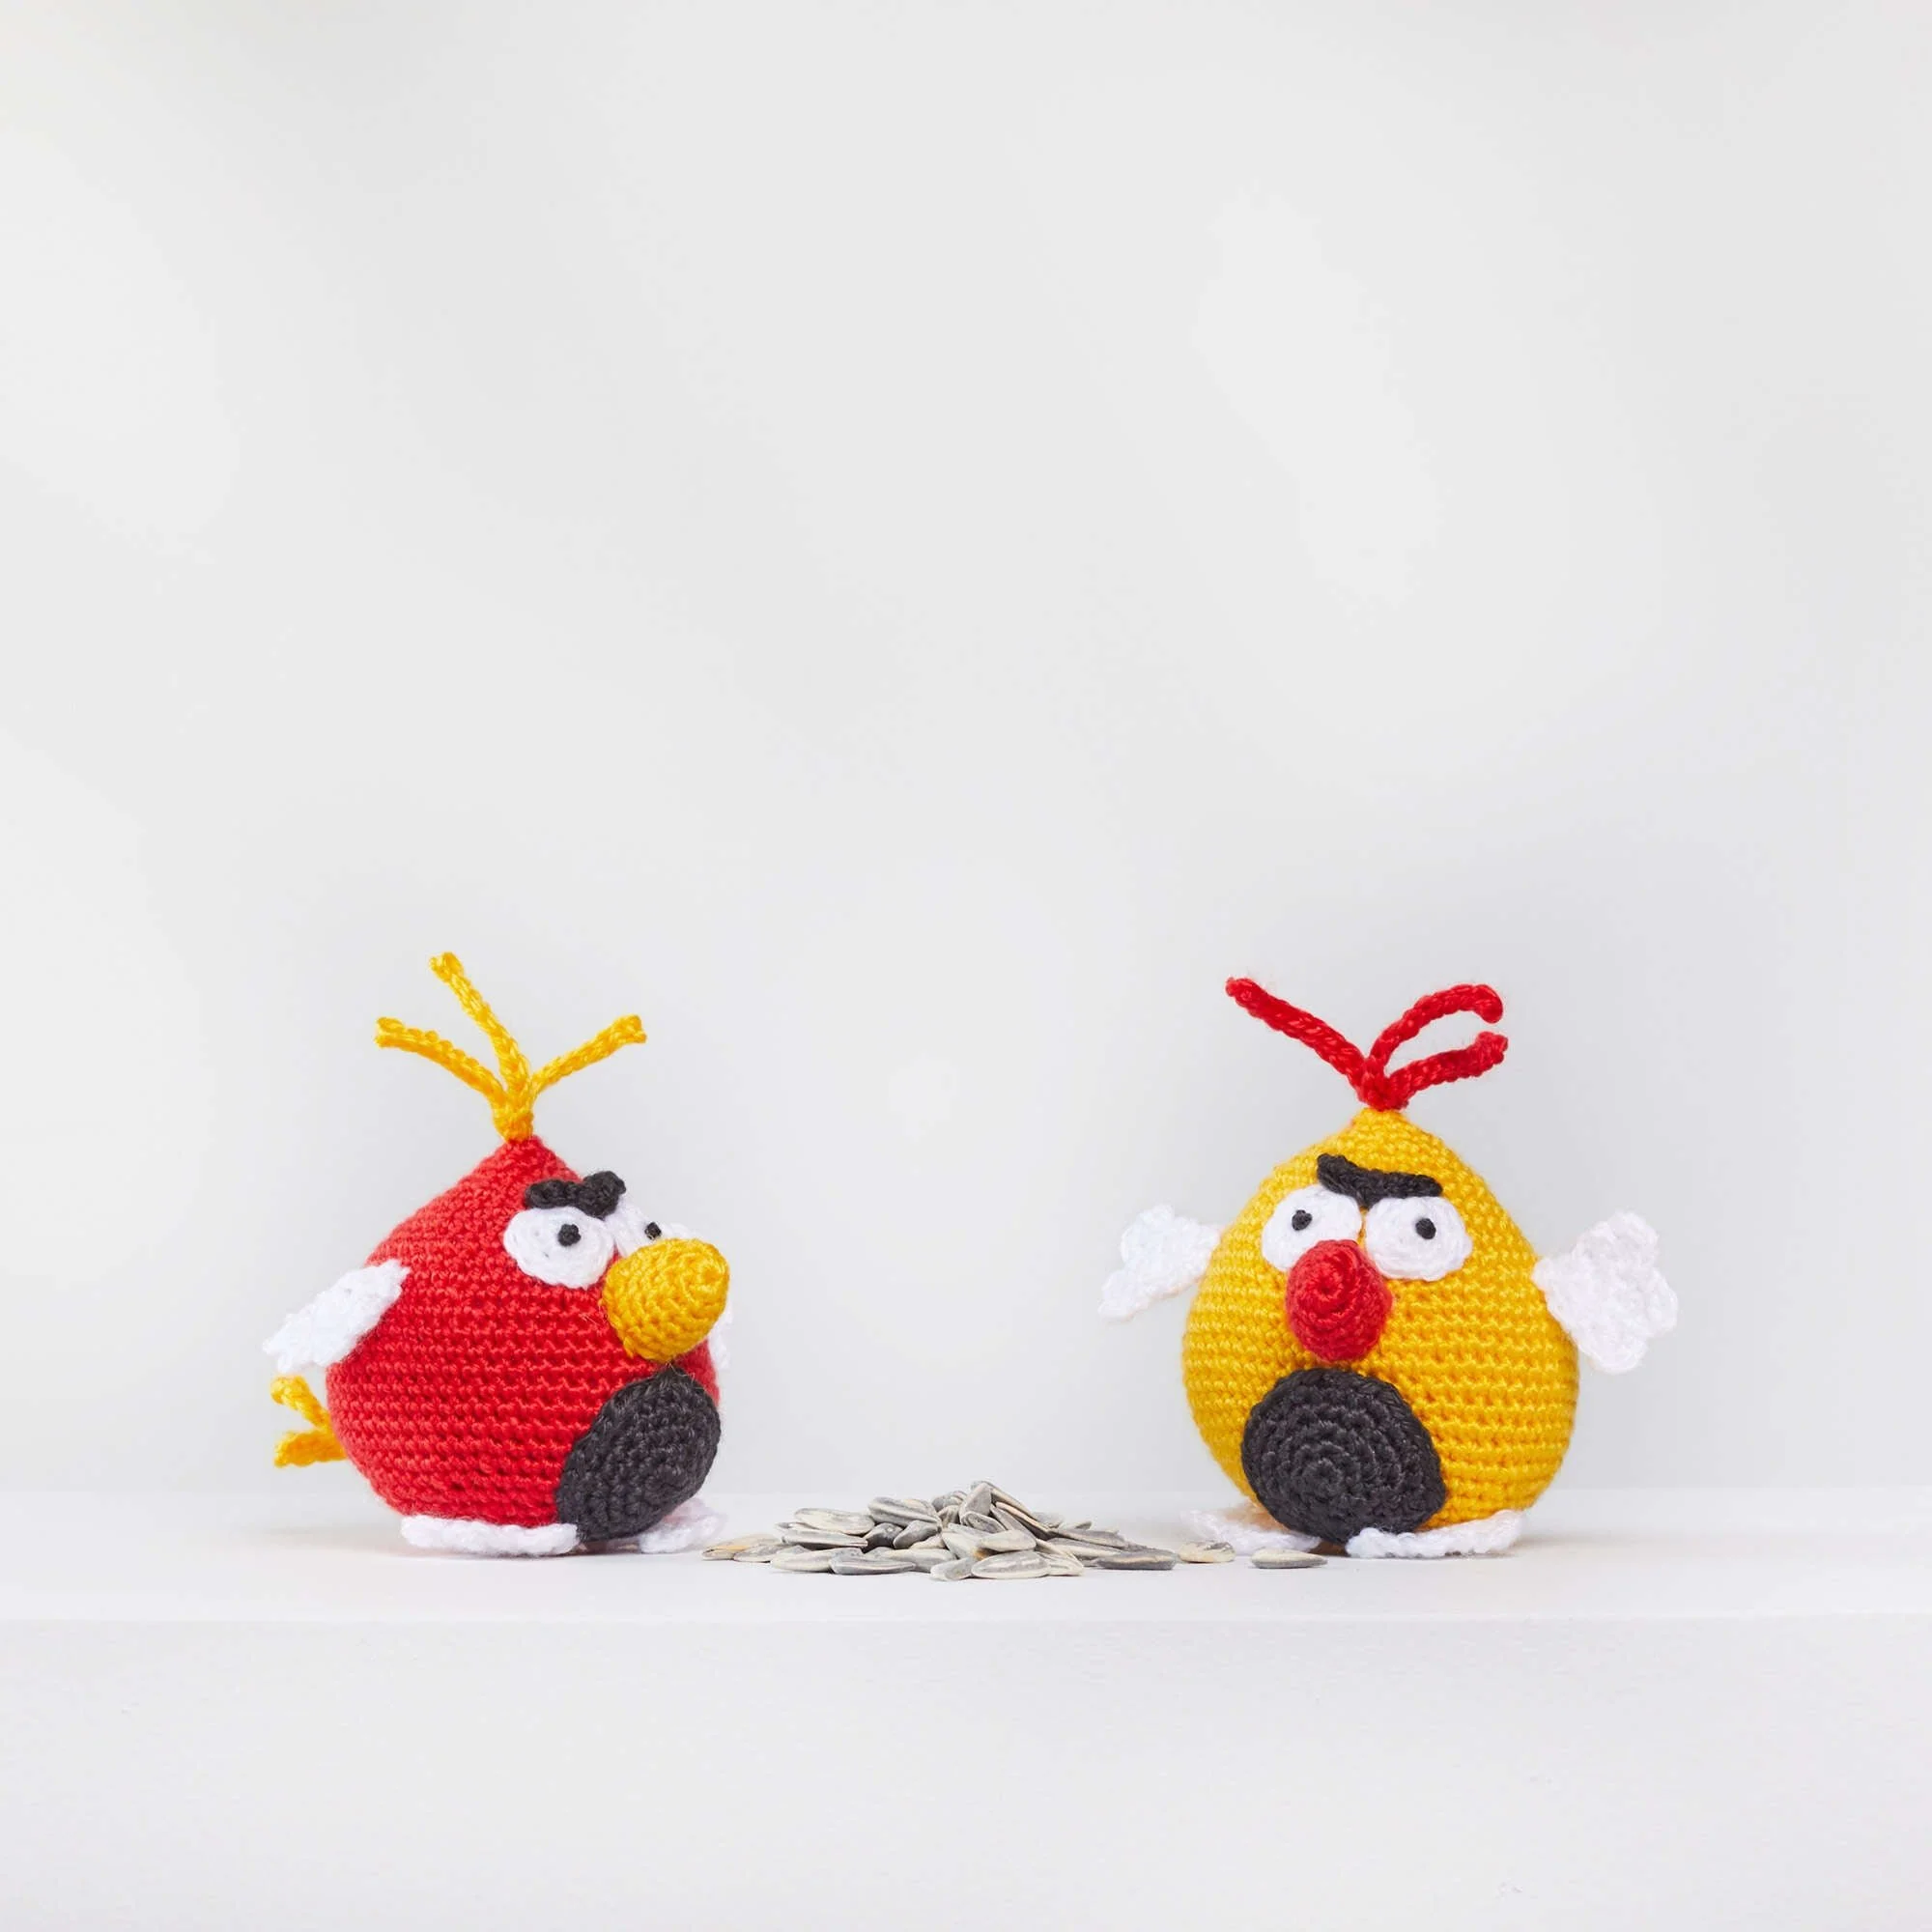
Crochet your very own charming birds with the Benedict and Bertie Crochet Bird Pattern, perfect for collectors, gifts, or simply brightening up your home décor. This delightful amigurumi project features two adorable birds that can be customized in various colors, making them a unique addition to any crochet collection. Follow this guide to create your very own feathered friends using straightforward instructions and a few basic materials.
About the Crochet Project
The Benedict and Bertie birds are perfect examples of amigurumi crochet, a popular craft style that focuses on creating small stuffed figures. This pattern is suitable for crochet enthusiasts who are comfortable with basic crochet stitches like single crochet (sc) and can follow instructions for continuous rounds. Whether you are a seasoned crocheter or just starting out, this colorful bird pattern will provide a satisfying project while enhancing your skills.
Materials
To get started, gather the following materials:
Yarn
- RED HEART® Amigurumi: 1 ball in color 9212 Bird (for best results, select colors as specified in pattern notes).
Crochet Hook
- Susan Bates® Crochet Hook: 3.5 mm [US E-4].
Stuffing
- Polyester fiberfill or your preferred stuffing material.
Notions
- Yarn needle for weaving in ends and sewing pieces together.
Gauge
- 21 sts = about 4″ [10 cm].
- 25 rounds = about 4″ [10 cm] in single crochet (sc).
- Note: Exact gauge is not critical to this project. Feel free to use any size hook to achieve the desired gauge.
Crochet Abbreviations
Familiarize yourself with the following crochet abbreviations used throughout the pattern:
- ch: Chain
- sc: Single crochet
- sc2tog: Single crochet two stitches together (this special stitch is explained below).
- dc: Double crochet
- sts: Stitches
Special Stitch
- sc2tog (single crochet 2 stitches together): Insert hook in next stitch, yarn over and pull up a loop; yarn over and pull through all 3 loops on hook.
Instructions
Body/Head
To begin your bird, start with the head and body.
- With your first color, ch 3; slip stitch in the first chain to form a ring.
- Round 1 (right side): Ch 1, work 8 sc in ring; do not join, work in continuous rounds—8 sc. Place a marker in the last sc worked to indicate the end of the round and move marker up each round as completed.
- Round 2: [2 sc in next st, sc in next st] 4 times—12 sc.
- Round 3: Sc in next st, [2 sc in next st, sc in next 2 sts] 3 times, 2 sc in next st, sc in next st—16 sc.
- Round 4: [2 sc in next st, sc in next 3 sts] 4 times—20 sc.
- Round 5: Sc in next 2 sts, [2 sc in next st, sc in next 4 sts] 3 times, 2 sc in next st, sc in next 2 sts—24 sc.
- Round 6: [2 sc in next st, sc in next 5 sts] 4 times—28 sc.
- Round 7: Sc in next 3 sts, [2 sc in next st, sc in next 6 sts] 3 times, 2 sc in next st, sc in next 3 sts—32 sc.
- Round 8: [2 sc in next st, sc in next 7 sts] 4 times—36 sc.
- Round 9: Sc in next 4 sts, [2 sc in next st, sc in next 8 sts] 3 times, 2 sc in next st, sc in next 4 sts—40 sc.
- Round 10: [2 sc in next st, sc in next 9 sts] 4 times—44 sc.
- Round 11: Sc in next 5 sts, [2 sc in next st, sc in next 10 sts] 3 times, 2 sc in next st, sc in next 5 sts—48 sc.
- Round 12: [2 sc in next st, sc in next 11 sts] 4 times—52 sc.
- Round 13: Sc in next 6 sts, [2 sc in next st, sc in next 12 sts] 3 times, 2 sc in next st, sc in next 6 sts—56 sc.
- Round 14: [2 sc in next st, sc in next 13 sts] 4 times—60 sc.
Continue with straight rounds until the base of the bird is formed:
- Rounds 15–21: Sc in each st around.
- Round 22: Sc in next 4 sts, [sc2tog, sc in next 8 sts] 5 times, sc2tog, sc in next 4 sts—54 sc.
- Round 23: [Sc2tog, sc in next 7 sts] 6 times—48 sc.
- Round 24: Sc in next 3 sts, [sc2tog, sc in next 6 sts] 5 times, sc2tog, sc in next 3 sts—42 sc.
- Round 25: [Sc2tog, sc in next 5 sts] 6 times—36 sc.
- Round 26: Sc in next 2 sts, [sc2tog, sc in next 4 sts] 5 times, sc2tog, sc in next 2 sts—30 sc.
- Round 27: [Sc2tog, sc in next 3 sts] 6 times—24 sc.
- Round 28: Sc in next st, [sc2tog, sc in next 2 sts] 5 times, sc2tog, sc in next st—18 sc.
Now it’s time to stuff the bird:
- Stuff body: Make sure to fill it generously to give your bird a rounded shape.
- Round 29: [Sc2tog] 9 times—9 sc.
Fasten off, leaving a long tail. Thread the tail through stitches of the last round and pull to close the opening. Secure the tail and weave it to the inside of the body.
Beak
Using the second color:
- Ch 3; slip st in first ch to form a ring.
- Round 1: Ch 1, work 6 sc in ring; join with slip st in first sc—6 sc.
- Round 2: Ch 1, [2 sc in next st, sc in next st] 3 times; join with slip st in first sc—9 sc.
- Round 3: Ch 1, sc in next st, [2 sc in next st, sc in next 2 sts] twice, 2 sc in next st, sc in next st; join with slip st in first sc—12 sc.
- Rounds 4–6: Ch 1, sc in each st around; join with slip st in first sc.
Fasten off, leaving a long tail for sewing. Stuff the beak lightly.
Tail
With the second color:
- Ch 3.
- Row 1: Work 3 dc in 3rd ch from hook.
- Row 2: Ch 1, turn, sc in first st, [ch 7, sc in 2nd ch from hook and in next 5 ch, sc in next st] twice, ch 7, sc in 2nd ch from hook and in next 5 ch.
Fasten off, leaving a long tail for sewing.
Head Feathers
Work with the second color:
- Row 1: [Ch 11, sc in 2nd ch from hook and in next 9 ch] 3 times.
Fasten off, leaving a long tail for sewing.
Eyes (make 2 for each bird)
With color A:
- Ch 3; slip st in first ch to form a ring.
- Round 1 (right side): Ch 1, work 6 sc in ring; join with slip st in first sc—6 sc.
- Round 2: Ch 1, 2 sc in each st around; join with sl st in first sc—12 sc.
Fasten off, leaving a long tail for sewing. Use color D to embroider a pupil in the center of each eye.
Eyebrow
With color D:
- Ch 5.
- Row 1: Slip st in 2nd ch from hook and in next 3 ch, ch 5, slip st in 2nd ch from hook and in next 3 ch.
Fasten off, leaving a long tail for sewing.
Belly
With color D:
- Ch 3; slip st in first ch to form a ring.
- Round 1 (right side): Ch 1, work 6 sc in ring; join with slip st in first sc—6 sc.
- Round 2: Ch 1, 2 sc in each st around; join with slip st in first sc—12 sc.
- Round 3: Ch 1, [2 sc in next st, sc in next st] 6 times; join with slip st in first sc—18 sc.
- Round 4: Ch 1, sc in next st, [2 sc in next st, sc in next 2 sts] 5 times, 2 sc in next st, sc in next st; join with slip st in first sc—24 sc.
- Round 5: Ch 1, [2 sc in next st, sc in next 3 sts] 6 times; join with slip st in first sc—30 sc.
Fasten off, leaving a long tail for sewing.
Wings/Feet (make 4 for each bird – 2 for wings and 2 for feet)
With color A:
- Ch 2.
- Row 1: Work 3 sc in 2nd ch from hook—3 sc.
- Row 2: Ch 1, turn, sc in each st across.
- Row 3: Ch 1, turn, 2 sc in each st across—6 sc.
- Row 4: Ch 1, turn, sc in each st across.
- Row 5: Ch 2, turn, dc in first st, [ch 2, slip st in next st, ch 2, dc in next st] twice, ch 2, slip st in last st.
Fasten off, leaving a long tail for sewing.
Finishing (Assembly and Placement)
Referring to the photograph of the finished product as a guide, sew the following pieces together:
- Sew head feathers to top of the head.
- Sew eyes to the front of the head.
- Sew eyebrows above the eyes.
- Sew the beak below the eyes.
- Sew the belly below the beak.
- Sew the tail to the lower back of the body.
- Sew the wings to the sides of the body.
- Sew the feet to the bottom of the body.
Remember to weave in and trim any remaining ends neatly.
Frequently Asked Questions
What crochet hook is used for this pattern?
The pattern calls for a Susan Bates® Crochet Hook sized 3.5 mm [US E-4].
Is this project worked in rows or rounds?
The Benedict and Bertie bird project is primarily worked in continuous rounds, especially when crocheting the body and head.
How many pieces do I need to make for each bird?
Each bird requires several components: one body/head, one beak, one tail, two eyes, one belly, two wings, and two feet, totaling eight pieces for one bird.
Does this crochet project require assembly?
Yes, this project requires assembly where you will need to sew together various components to complete the final bird figure.
How long will it take to finish this project?
The time to complete this project will vary depending on your experience level and crocheting speed; however, expect several enjoyable hours as you transform yarn into your delightful new creations!
Conclusion
The Benedict and Bertie Crochet Bird Pattern brings joy and creativity to your craft projects. With its colorful design and the potential to customize with various colors, these birds can be made for personal use, gifts, or decoration. Enjoy the process of crocheting your unique set of birds and marvel at your hand-crafted creations! Happy crocheting!