Crochet Cutie Cupcake Amigurumi Pattern
Creating delightful crochet projects not only brings joy but also allows you to express your creativity. In this article, we’ll explore the whimsical Crochet Cutie Cupcake Amigurumi pattern. This fun and adorable cupcake is perfect for decorations, gifts, or playful toys. Let’s get started with everything you need to know to make your own scrumptious creation.
About This Amigurumi Design
The Crochet Cutie Cupcake Amigurumi pattern is an enchanting project that features vibrant colors and charming designs. It consists of multiple components including a cupcake bottom, cupcake top, icing, whip cream, and a cherry on top. This pattern incorporates various crochet techniques, making it a delightful project for crocheters looking to enhance their skills.
Materials
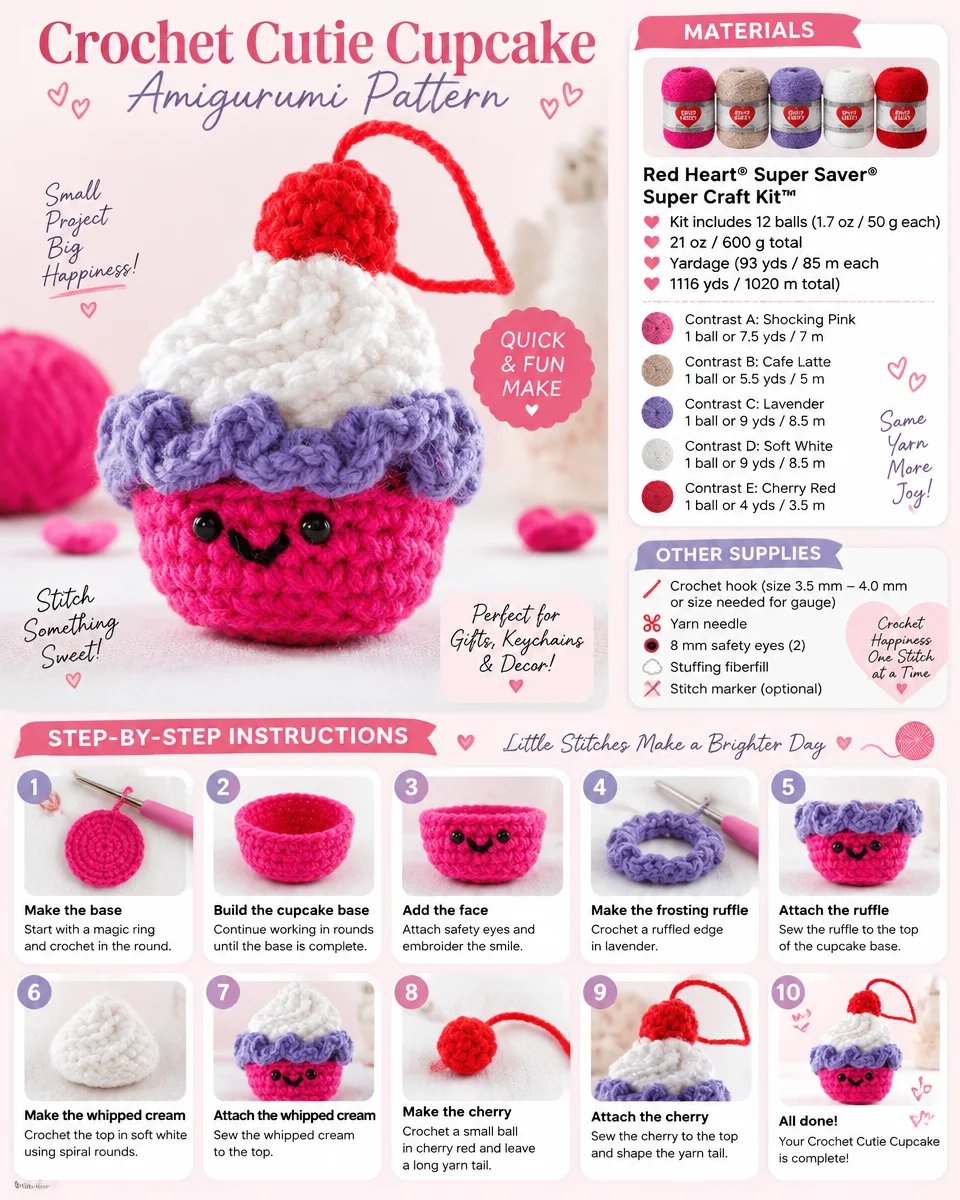
To create your Crochet Cutie Cupcake, you’ll need the following materials:
Yarn
- Red Heart® Super Saver® Super Craft Kit™
- Total Weight: 21 oz (600 g)
- Total Yardage: 1116 yds (1020 m)
- Contrast A: Shocking Pink — 1 ball or 7.5 yds (7 m)
- Contrast B: Cafe Latte — 1 ball or 5.5 yds (5 m)
- Contrast C: Lavender — 1 ball or 9 yds (8.5 m)
- Contrast D: Soft White — 1 ball or 9 yds (8.5 m)
- Contrast E: Cherry Red — 1 ball or 4 yds (3.5 m)
- Contrast F: Black — 1 ball or ½ yds (0.5 m)
Crochet Hook
- Hook size: U.S. G/6 (4.5 mm) Susan Bates® Silvalume® crochet hook or size needed to obtain gauge
Notions
- Susan Bates® stitch marker
- Susan Bates® yarn needle
- Pair of 6 mm safety eyes
- Polyester fiberfill
Crochet Abbreviations
Understanding crochet abbreviations is essential to follow the pattern instructions effectively. Here are the relevant abbreviations used in this project:
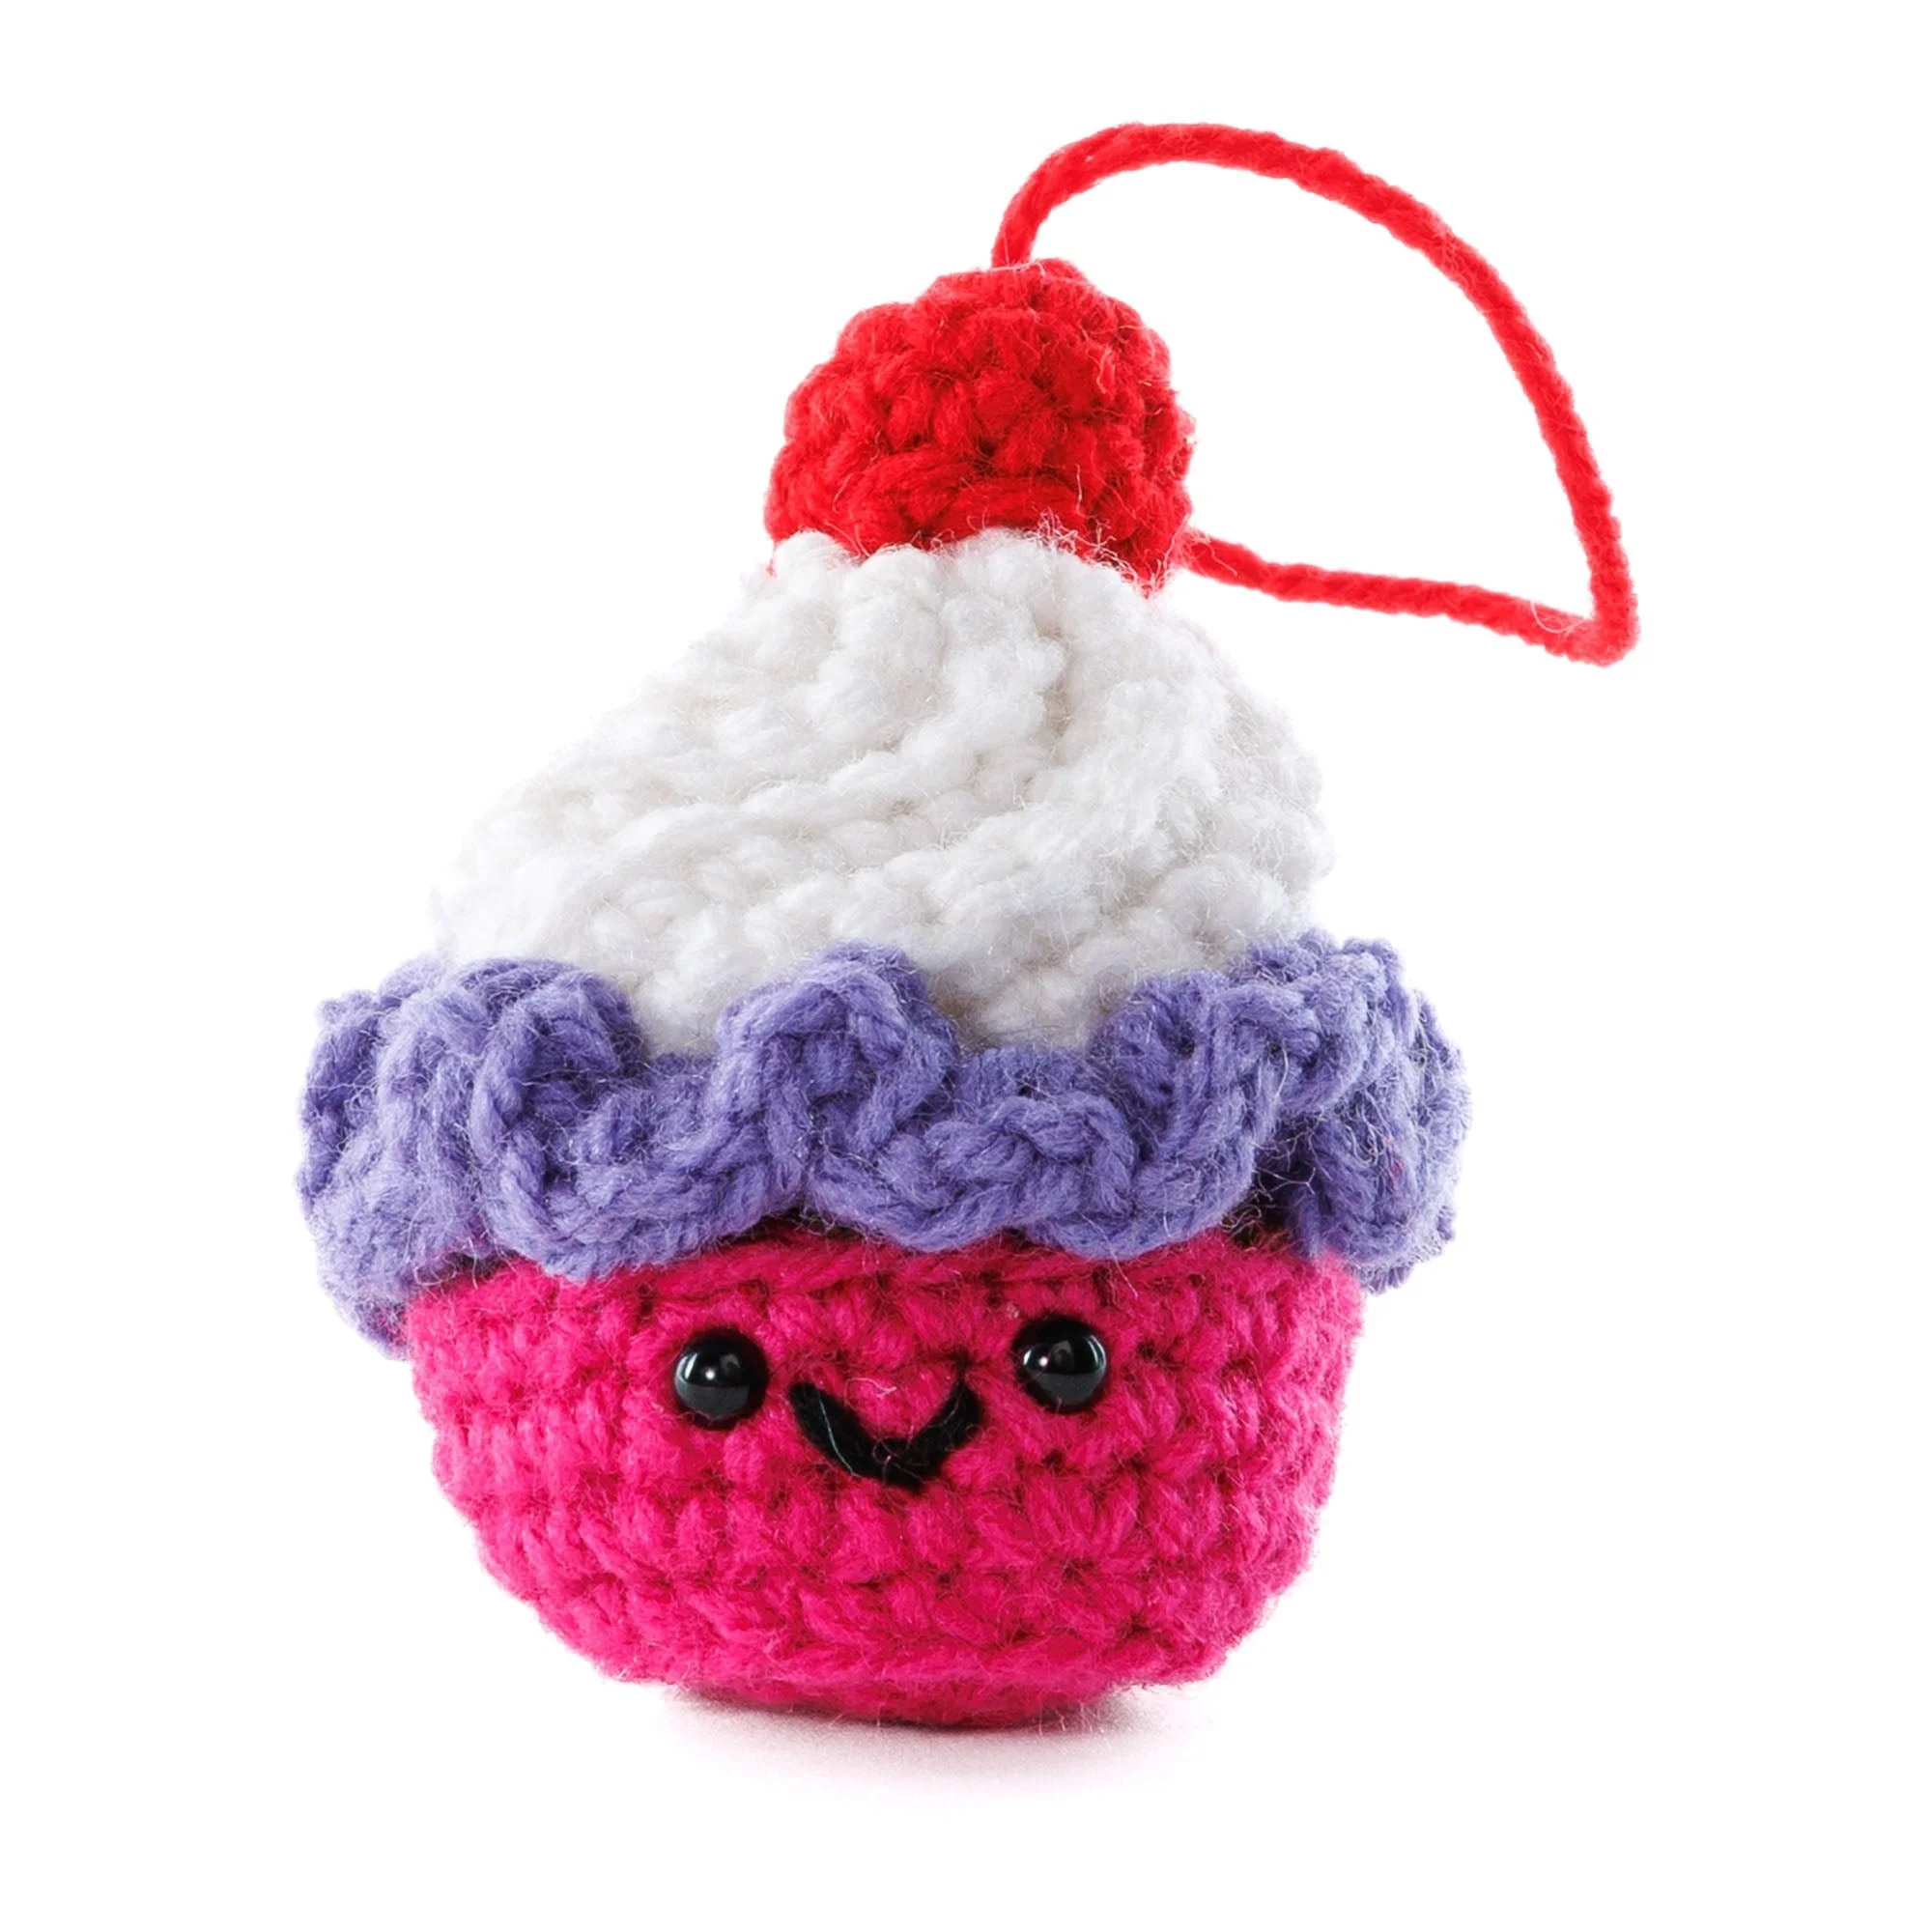
- ch = chain
- sc = single crochet
- mr = magic ring
- sc2tog = single crochet 2 together
- sl st = slip stitch
- hdc = half double crochet
Pattern Notes
Before diving into the instructions, keep in mind that:
- Make sure to stuff your cupcake lightly, as this will help it retain its charming shape.
- Safety eyes should be placed securely and carefully to ensure safety and aesthetics.
- The cupcake is worked in rounds, and some components use back loop only or front loop only techniques for added texture.
Pattern Instructions
Bottom (make 1)
- With Contrast A, make a magic ring.
- 1st rnd: Ch 1. 6 sc in ring. PM on the first sc.
- Pull the tail of magic ring up tightly to close the opening and secure.
- 2nd rnd: 2 sc in each sc around. (12 sc)
- 3rd rnd: *2 sc in next sc. 1 sc in next sc. Rep from * around. (18 sc)
- 4th rnd: Working in back loops only, 1 sc in each sc around. (18 sc)
- 5th rnd: Working in both loops, 1 sc in each sc around. (18 sc)
- 6th rnd: *2 sc in next sc. 1 sc in each of next 2 sc. Rep from * around. (24 sc)
- 7th rnd: 1 sc in each sc around. Join Contrast B. Break Contrast A.
- Insert safety eyes at the top of the 6th rnd, with 2 sts between them.
Cupcake Top (make 1)
- 1st rnd: Working in back loops only, 1 sc in each sc around. (24 sc)
- 2nd rnd: Working in both loops, *sc2tog, 1 sc in each of next 2 sc. Rep from * around. (18 sts)
- Lightly stuff cupcake top.
- 3rd rnd: Working in back loops only, *sc2tog, 1 sc in next st. Rep from * around. (12 sts)
- 4th rnd: Working in both loops, (sc2tog) 6 times. Join with sl st to first st.
- Fasten off.
Icing (make 1)
- Join Contrast C with a sl st to the remaining loop of any st on 3rd rnd of Cupcake.
- 1st rnd: Working in remaining loops of sts, ch 2 (does not count as st). 4 hdc in same sp as sl st.
- *4 hdc in next st. Rep from * around.
- Join with sl st to the top of the first hdc.
- Fasten off.
Whip Cream (make 1)
- With Contrast D, ch 11, leaving a tail approx 8″ (20.5 cm) long.
Row Instructions:
- 1st row (RS): 2 sc in 2nd ch from hook. 1 sc in each of next 7 ch. Sc2tog. Turn. (10 sts)
- 2nd row: Ch 1. Sc2tog. 1 sc in each of next 7 sc. 2 sc in last sc. Turn.
- 3rd row: Ch 1. 2 sc in first sc. 1 sc in each of next 7 sc. Sc2tog. Turn.
- Rep 2nd and 3rd rows 6 times more. (15 rows total).
- Fasten off at the end of the last row, leaving a tail approx 8″ (20.5 cm) long.
Whip Cream Assembly / Finishing
- With RS facing, use the tail from the foundation ch to sew the last row to remaining loops of foundation ch to form a tube.
- Still working with this same tail, run the yarn in and out of the top of the tube, into the very edges of the rows.
- Pull tightly to cinch shut and fasten securely.
- Fold the bottom edge of the tube inward to create a little dome of whip cream.
- Using the tail, sew the edge of the whip cream to the cupcake along the ruffle row.
Cherry (make 1)
- With Contrast E, make a magic ring.
- 1st rnd: Ch 1. 5 sc in ring. PM on first sc.
- Pull the tail of the magic ring up tightly to close.
- 2nd rnd: 2 sc in each sc around. (10 sc)
- 3rd and 4th rnds: 1 sc in each sc around.
- Fasten off leaving a long tail for sewing to the top of the whip cream.
- Lightly stuff the cherry (or use yarn ends).
- Using the tail, sew to the top of the whip cream.
Mouth Embroidery (use Contrast F)
- Split Contrast F into plies. Using 2 plies, embroider the mouth between the eyes with a straight stitch. Bring needle up just below this straight stitch and ‘catch’ it to create a little smile.
Hanging Loop (use Contrast E)
- Cut a length of Contrast E 8″ (20.5 cm) long.
- Thread through the top of the cherry and tie a knot to secure.
Frequently Asked Questions
What crochet hook is used for this pattern?
The pattern recommends a size U.S. G/6 (4.5 mm) Susan Bates® Silvalume® crochet hook or a size needed to obtain gauge.
Is this project worked in rows or rounds?
The Crochet Cutie Cupcake is primarily worked in rounds, with specific components constructed separately.
Does this crochet project require assembly?
Yes, the project includes assembly for the whip cream, cherry, and securing the pieces together,
Conclusion
The Crochet Cutie Cupcake Amigurumi pattern is a delightful project that brings together the fun of amigurumi creation and the joy of crafting something whimsical and tasty-looking. With vibrant colors and easy-to-follow instructions, it’s a perfect addition to your crochet projects, guaranteed to bring a smile to anyone’s face. Enjoy crafting your cupcake and let it inspire fun moments in your home or as a delightful gift! Happy Crocheting!