Crochet a Snail Couple Pattern
Creating adorable crochet snails is a fun and rewarding experience, making this Crochet a Snail Couple Pattern an ideal choice for those who love playful amigurumi projects. This pattern is perfect for whipping up a pair of cute companions, whether you’re looking to create a charming gift or simply want to expand your crochet collection. With easy-to-follow instructions and delightful design features, these snails will surely bring joy to anyone who receives them.
About the Crochet Project
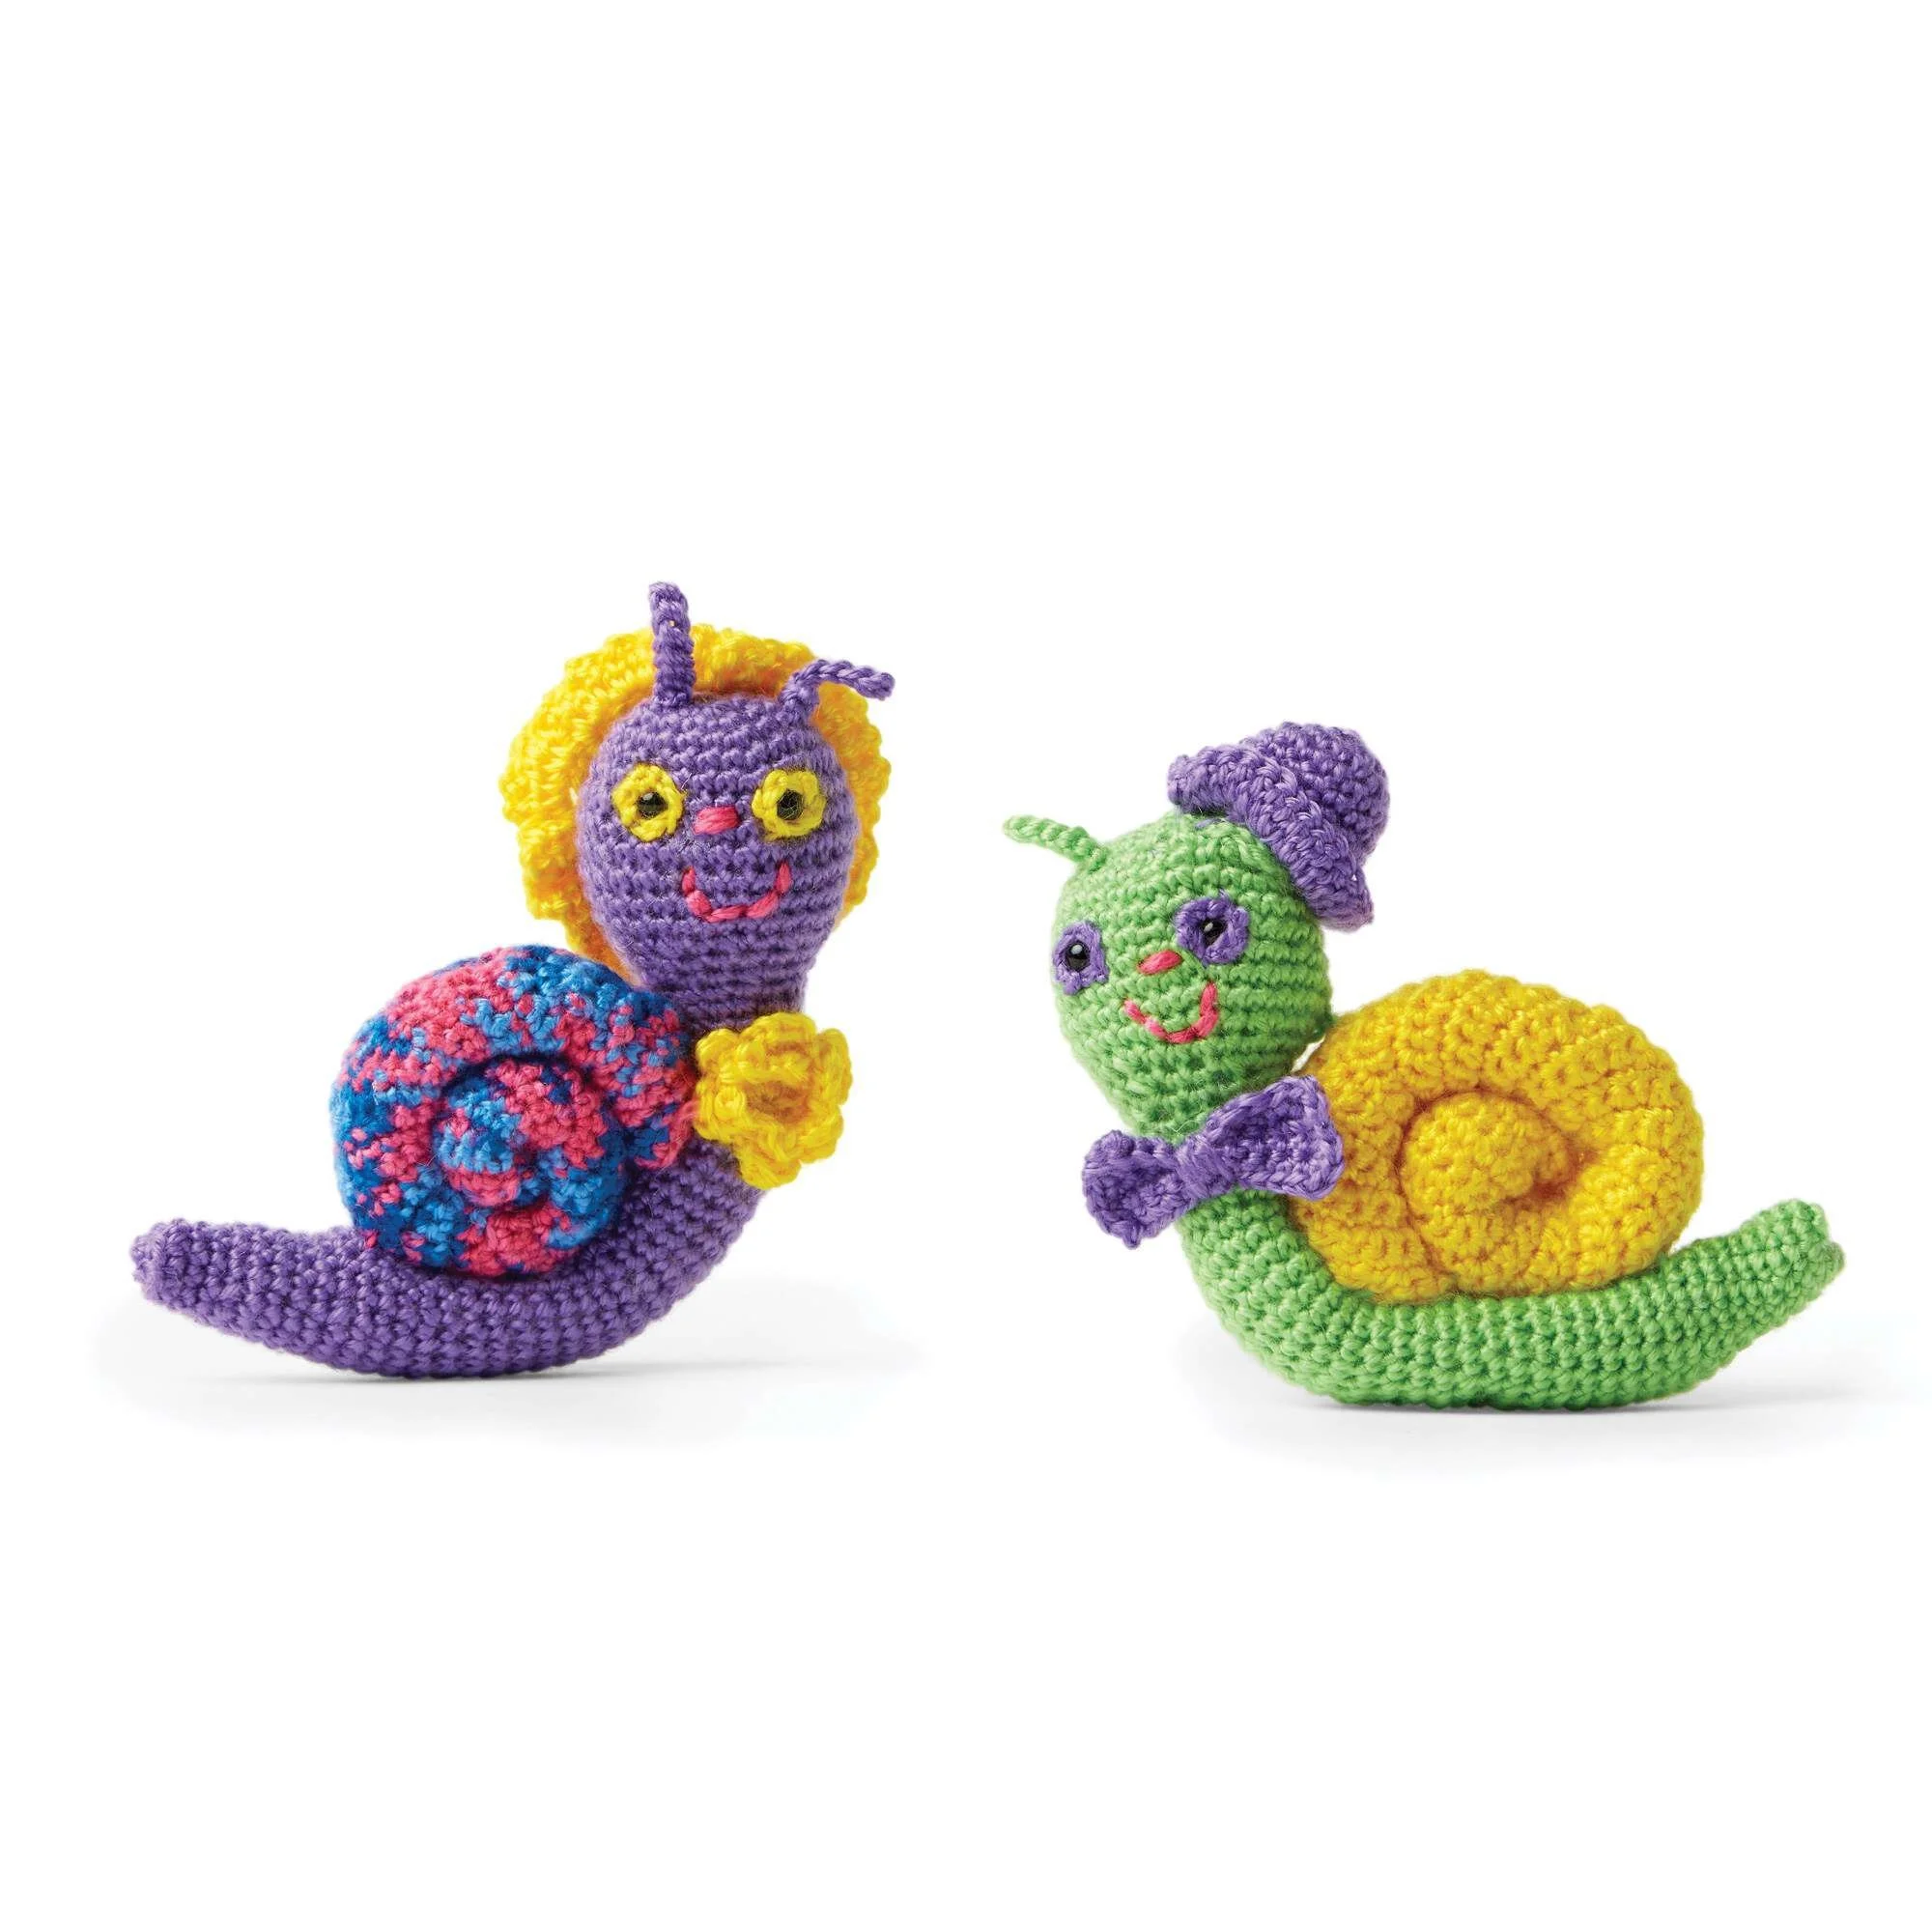
In this project, you’ll create a boy and a girl snail. The boy will feature a green head and body with a colorful shell topped off with a cute hat and bow tie. The girl, on the other hand, will have a purple head and body, adorned with flowers and a fancy hat. These delightful creatures are not only great for decoration but can also serve as toys for children, making them a versatile addition to any crochet enthusiast’s repertoire.
Materials
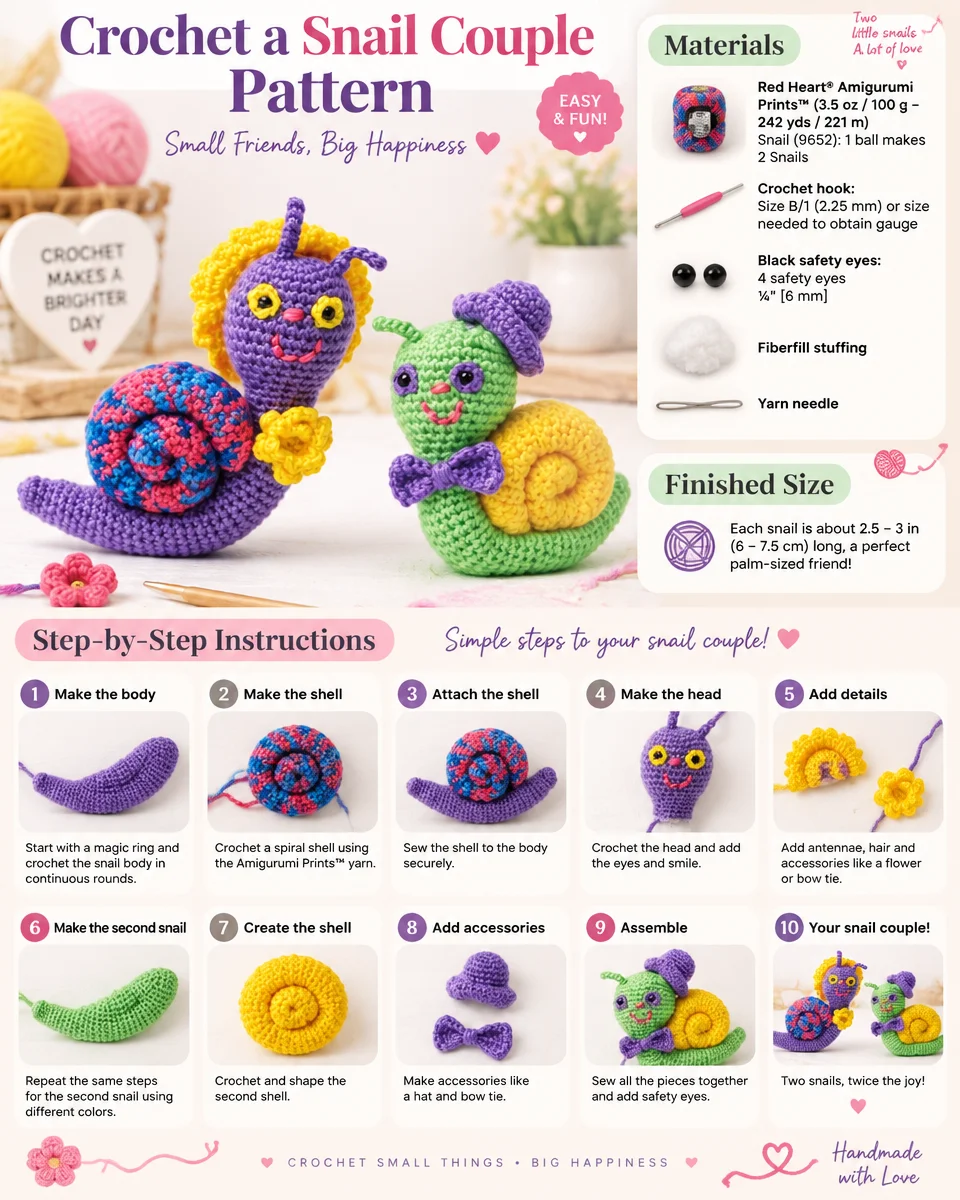
To get started on your snail couple, gather the following materials:
Yarn
- Red Heart® Amigurumi Prints™: (3.5 oz / 100 g; 242 yds / 221 m)
- Snail (9652): 1 ball makes 2 Snails
- Color Options:
- Boy Version: Green (Color 1), Yellow (Color 2), Purple (Color 3)
- Girl Version: Purple (Color 1), Yellow (Color 2), Multi (Color 3)
Crochet Hook
- Size B/1 (2.25 mm) or size needed to obtain gauge
Notions
- Black safety eyes: 4 safety eyes, ¼” [6 mm]
- Fiberfill stuffing
- Yarn needle
Crochet Abbreviations
Familiarize yourself with these common crochet abbreviations that will appear in the pattern:
- ch = chain
- sc = single crochet
- sl st = slip stitch
- pm = place marker
- dc = double crochet
- hdc = half double crochet
- st = stitch
- rem = remaining
- sts = stitches
- rep = repeat
- tog = together
- **… = repeat instructions in between the asterisks as indicated
Pattern Notes
- To change color: Work to the last 2 loops on the hook and draw the new color through the last 2 loops, proceeding with the new color while keeping the color change on the wrong side (WS) of the work.
- Do not join at the end of rounds. Work in continuous rounds (spiral). Move the marker up as each round is completed.
Boy Version 1
Outer Eye (Make 2)
- With Color 3, ch 2.
- 1st rnd: 6 sc in 2nd ch from hook. Join with sl st to first sc. Fasten off, leaving a long end for sewing.
Head and Body
- With Color 1, ch 2 (top of head).
- 1st rnd: 6 sc in 2nd ch from hook. Do not join at end of rnd. PM for the beginning of rnd.
- 2nd rnd: 2 sc in each sc around. (12 sc)
- 3rd rnd: *1 sc in next sc. 2 sc in next sc. Rep from * around. (18 sc)
- 4th rnd: *1 sc in each of the next 2 sc. 2 sc in next sc. Rep from * around. (24 sc)
- 5th rnd: 1 sc in each sc around.
- 6th rnd: *1 sc in each of the next 3 sc. 2 sc in next sc. Rep from * around. (30 sc)
- 7th to 12th rnds: 1 sc in each sc around. Place Outer Eye against head between the 6th and 8th rnds, 3 sc apart. Following manufacturer’s instructions, attach safety eye through the center of the outer eye and through the head. Snap in place inside the head.
- 13th rnd: *1 sc in next sc. sc2tog. Rep from * around. (20 sts)
- 14th rnd: 1 sc in each st around. Stuff head.
- 15th rnd: *1 sc in each of the next 2 sc. sc2tog. Rep from * around. (15 sts)
- 16th to 44th rnds: 1 sc in each st around. Stuff head lightly as you go.
- 45th rnd: *1 sc in each of the next 3 sc. sc2tog. Rep from * around. (12 sts)
- 46th to 49th rnds: 1 sc in each st around.
- 50th rnd: (1 sc in each of the next 4 sc. Sc2tog) twice. (10 sts)
- 51st to 57th rnds: 1 sc in each st around. Finish stuffing. Fasten off, leaving a long end for sewing. Draw end through rem sts. Pull tightly. Fasten securely.
Nose and Mouth
- Cut a long piece of pink from the multi yarn.
- Using satin stitch, embroider the nose.
- Using back stitch, embroider the smile.
Antenna (Make 2)
- With Color 1, ch 6.
- 1st row: sl st in 2nd ch from hook and each ch to end of chain. Fasten off, leaving a long end. Sew in place.
Shell
- With Color 2, ch 2.
- 1st row: 6 sc in 2nd ch from hook. Turn.
- 2nd row: Ch 1. 1 sc in each sc to the end of the row. Turn.
- 3rd row: Ch 1. *1 sc in next sc. 2 sc in next sc. Rep from * to end of the row. Turn. (9 sc)
- 4th row: Ch 1. 1 sc in each sc to the end of the row. Turn.
- 5th row: Ch 1. *1 sc in each of the next 2 sc. 2 sc in next sc. Rep from * to end of the row. Turn. (12 sc)
- 6th row: Ch 1. 1 sc in each sc to the end of the row.
- 7th row: Ch 1. *1 sc in each of the next 2 sc. 2 sc in next sc. Rep from * to end of the row. Turn. (16 sc)
- 8th to 10th rows: Ch 1. 1 sc in each sc to the end of the row. Turn.
- 11th row: Ch 1. (1 sc in next sc. 2 sc in next sc) twice. (Sc2tog) 4 times. (2 sc in next sc. 1 sc in next sc) twice. Turn. (16 sc)
- 12th row: Ch 1. 1 sc in each sc to the end of the row. Turn.
- 13th to 48th rows: As the 11th and 12th rows 18 times more, stuffing lightly as you go. Fasten off.
- Begin with the 1st row, roll up the shell tightly and sew together as you roll.
- Sew the shell to the body with the open end of the shell covering the 26th to 29th rnds of the body.
Hat
- With Color 3, ch 2 (top of hat).
- 1st rnd: 6 sc in 2nd ch from hook. Do not join at end of rnd. PM for beginning of rnd.
- 2nd rnd: 2 sc in each sc around. (12 sc)
- 3rd rnd: *1 sc in next sc. 2 sc in next sc. Rep from * around. (18 sc)
- 4th to 8th rnds: 1 sc in each sc around. Join with sl st to the front loop of the first sc.
- 9th rnd: Ch 2 (does not count as st). Working in front loops only, 1 hdc in the same space as sl st. 2 hdc in each st around. Join with sl st to the first sc. Fasten off, leaving a long end. Sew hat in place.
Bow Tie
- With Color 3, ch 5.
- 1st row: 1 sc in 2nd ch from hook and each ch to the end of the chain. Turn. (4 sc)
- 2nd to 10th rows: Ch 1. 1 sc in each sc to the end of the row. Turn.
- Do not fasten off at the end of the last row.
- Edging: 1st rnd: Ch 1. Work in sc around the tie, having 3 sc in each corner. Join with sl st to the first sc.
- Wrap the length of Color 3 tightly around the center of the tie 8 times to shape into a bow and sew in place.
Girl Version 2
Head and Body
- With Color 1, follow the same instructions as provided for Boy Version 1.
Antenna
- With Color 1, follow the same instructions as provided for Boy Version 1.
Shell
- With Color 3, follow the same instructions as provided for Boy Version 1.
Eyes
- With Color 2, follow the same instructions as provided for Boy Version 1.
Nose and Mouth
- Follow the same instructions as provided for Boy Version 1.
Hat
- With Color 2, ch 4.
- 1st rnd: 11 dc in 4th ch from hook. Join with sl st to the top of ch 3. (12 dc)
- 2nd rnd: Ch 3. 1 dc in the same space as sl st. 2 dc in each dc around. Join with sl st to the top of ch 3. (24 dc)
- 3rd rnd: Ch 1. 1 sc same space as sl st. 1 sc in each of the next 2 dc. 2 sc in next dc. *1 sc in each of the next 3 dc. 2 sc in next dc. Rep from * around. Join with sl st to the first sc. (30 sc)
- 4th rnd: Ch 4 (counts as dc and ch 1). 1 dc in the same space as sl st. (1 dc. Ch 1. 1 dc) in each sc around. Join with sl st to the 3rd ch of ch 4. Fasten off, leaving a long end. Sew hat in place.
Flower
- With Color 2, ch 2.
- 1st rnd: 6 sc in the 2nd ch from the hook. Do not join at the end of rnd. PM for the beginning of rnd.
- 2nd rnd: 2 sc in each sc around. (12 sc)
- 3rd rnd: *Working in front loops only, (sl st. ch 1. 1 sc) in the next sc. sl st in the next sc. Rep from * around. (6 petals)
- 4th rnd: Working in back loops of the 2nd rnd, sl st in the first sc. *(Ch 1. 2 dc. Ch 1) in the next sc. sl st in the next sc. Rep from * around. Fasten off, leaving a long end. Sew the flower in place.
Frequently Asked Questions
What crochet hook is used for this pattern?
The pattern specifies using a size B/1 (2.25 mm) crochet hook, or the size needed to obtain gauge.
How many snails does one ball of yarn make?
One ball of Red Heart® Amigurumi Prints™ (3.5 oz / 100 g; 242 yds / 221 m) is enough to make 2 snails.
Is this project worked in rows or rounds?
The snails are worked in continuous rounds, as specified in the pattern.
Do I need to assemble the snails?
There is minimal assembly required; most parts are crocheted separately and sewn to the body during the finishing stages.
Are there safety eyes included in the pattern?
Yes, the pattern requires 4 safety eyes, each measuring ¼” [6 mm].
Conclusion
The Crochet a Snail Couple Pattern offers a perfect blend of creativity and crochet techniques, resulting in charming, playful snails that can bring warmth and joy to any space. With easy-to-follow instructions for both the boy and girl versions, this pattern is an excellent choice for any crochet enthusiast wishing to add a bit of whimsy to their projects. Happy crocheting!