
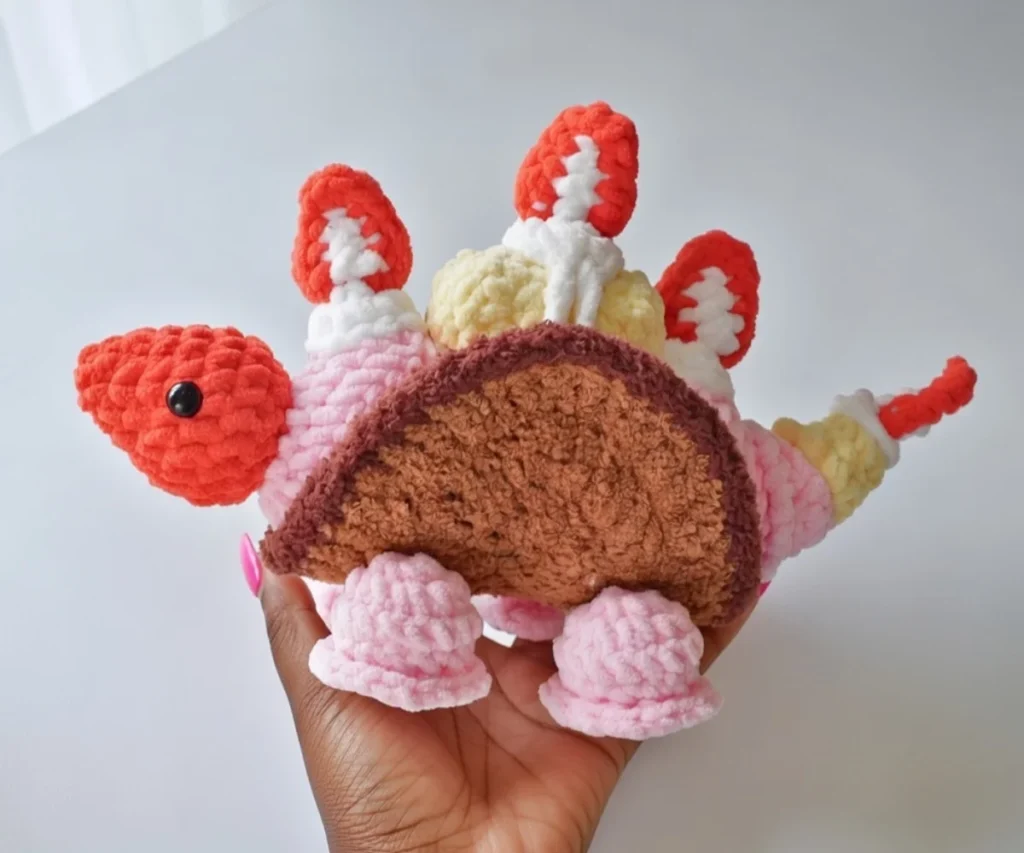
If you’re looking for a crochet project that combines whimsical charm with creative fun, the Ice Cream Stegosaurus is about to become your new favorite amigurumi. This delightful pattern transforms the prehistoric stegosaurus into an adorable ice cream-inspired creation, complete with colorful pastel tones and sweet details that make it irresistible. Whether you’re a dinosaur enthusiast, ice cream lover, or simply enjoy making unique amigurumi, this pattern offers a perfect blend of creativity and craftmanship.
What Makes the Ice Cream Stegosaurus Special?
The Ice Cream Stegosaurus is a masterpiece of creative design that reimagines the classic dinosaur in the most delicious way possible. This pattern features a clever color palette inspired by ice cream flavors, with soft pastels in baby pink, light yellow, red, brown, and dark brown creating a sweet, dessert-inspired aesthetic. The body is constructed to resemble melting ice cream layers, with distinct color sections that flow together beautifully.
What truly sets this pattern apart is the attention to detail in the construction. The stegosaurus features characteristic back plates that look like decorative ice cream toppings, a segmented body that creates the illusion of stacked ice cream scoops, adorable stubby legs with decorative edging that resembles whipped cream, a charming tail with layered construction, and sweet facial features with 9mm safety eyes that give personality.
The finished stegosaurus measures approximately 14 cm by 25 cm (5.5 inches by 9.8 inches), making it the perfect size for display, gifting, or as a beloved cuddle companion. The construction technique includes innovative joining methods that create seamless connections between body parts, and a unique button closure system that adds both functionality and decorative appeal.
Skill Level and Required Techniques
This pattern is best suited for intermediate to advanced crocheters who are comfortable with multiple construction techniques. While the individual components use basic stitches, the assembly and multi-part construction require pattern-reading skills and patience.
Throughout this project, you’ll work with magic ring starts, single crochet, double crochet, half double crochet, increases and decreases, front loop only and back loop only techniques, working in rows with turning chains, and joining rounds with slip stitches. The pattern emphasizes joining each round with a slip stitch and chain one to ensure the best shape and form, which differs from continuous spiral construction used in some amigurumi patterns.
You’ll also need experience with color changes between rounds, assembling multiple separate pieces, positioning and attaching safety eyes, stuffing techniques for proper shaping, and sewing pieces together invisibly.
If you’re newer to amigurumi but have strong basic crochet skills, this pattern can help you develop advanced techniques. However, beginners might want to start with simpler projects like our Shiba Inu crochet pattern before tackling this more complex construction.
Complete Materials List
To create your Ice Cream Stegosaurus, gather these essential supplies:
Yarn: You’ll need bulky weight yarn (Category 5) in five colors. Light yellow for the secondary body sections and ice cream layers, red for the head and decorative elements, dark brown for body accents and base, brown for the main body foundation, and baby pink for the legs, tail components, and accent pieces.
The bulky weight yarn creates a substantial, huggable plushie with good stitch definition. Choose soft, quality yarn for the best results. Acrylic bulky yarns work beautifully and come in a wide range of colors.
Hook Size: A 4.0mm (US G/6) crochet hook is specified for this pattern. Using the correct hook size with bulky yarn ensures proper gauge and prevents stuffing from showing through your stitches.
Safety Eyes: You’ll need one pair of 9mm plastic safety eyes. These will be positioned on the head between rows 5 and 6, with 9 stitches between them for proper spacing.
Button: A 20mm button serves as both a functional closure and decorative element on the stegosaurus body. Choose a button that complements your color scheme.
Stuffing: Polyester fiberfill is essential for giving your stegosaurus its shape. You’ll need enough to firmly stuff the body sections, head, legs, and tail components.
Additional Notions: A stitch marker to track your place in rounds, a sewing needle or yarn needle for assembly, and sharp scissors for cutting yarn.
Understanding the Pattern Structure
The Ice Cream Stegosaurus is constructed from multiple separate pieces that are assembled to create the finished dinosaur. This modular approach allows you to work on different sections at your own pace and ensures clean, professional-looking results.
The main components include Part A (the large oval body base), Parts B.1, B.2, and B.3 (the upper body sections that create the layered ice cream effect), four legs with decorative edging, the head, tail sections C.1, C.2, and C.3 (creating a layered tail), and horn/plate sections D.1, D.2, and D.3 (the distinctive stegosaurus back plates).
An important note about this pattern: it uses a joining method where each round ends with a slip stitch and begins with a chain. This creates better shape and prevents misalignment that can occur with spiral construction. If you typically crochet in continuous spirals, pay careful attention to the joining instructions.
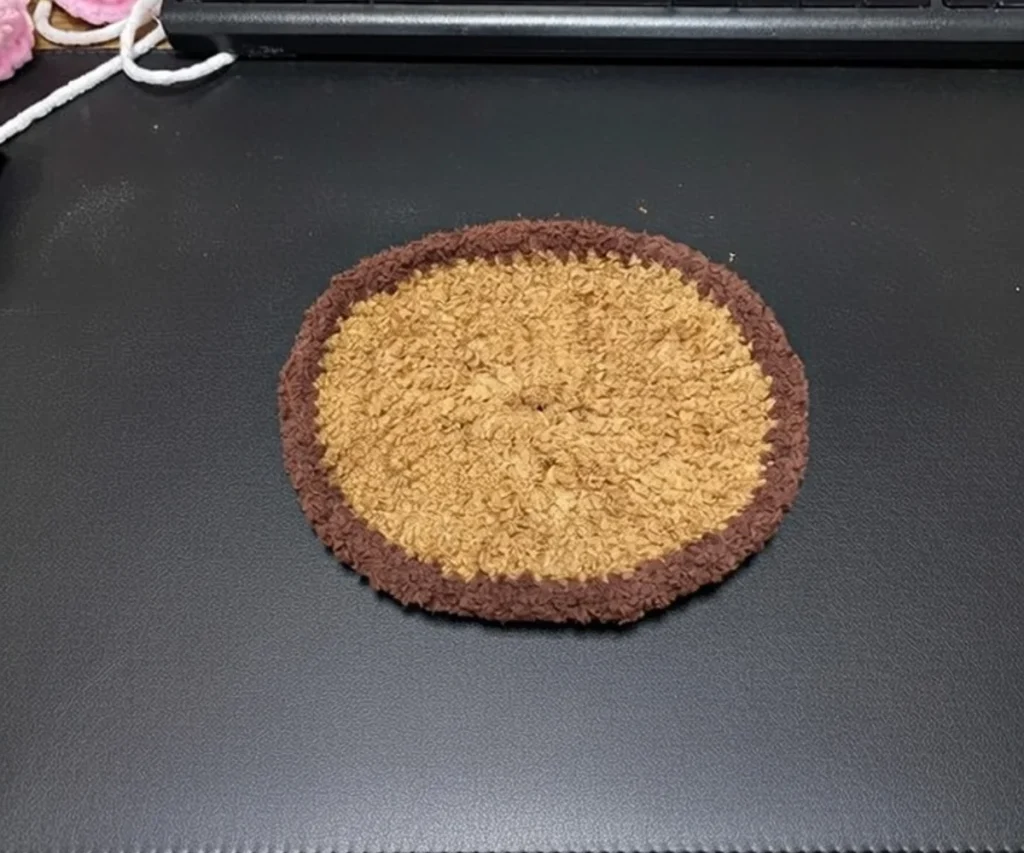
Creating Part A: The Body Foundation
Part A forms the large oval base of your stegosaurus body. This piece establishes the overall shape and size of your dinosaur.
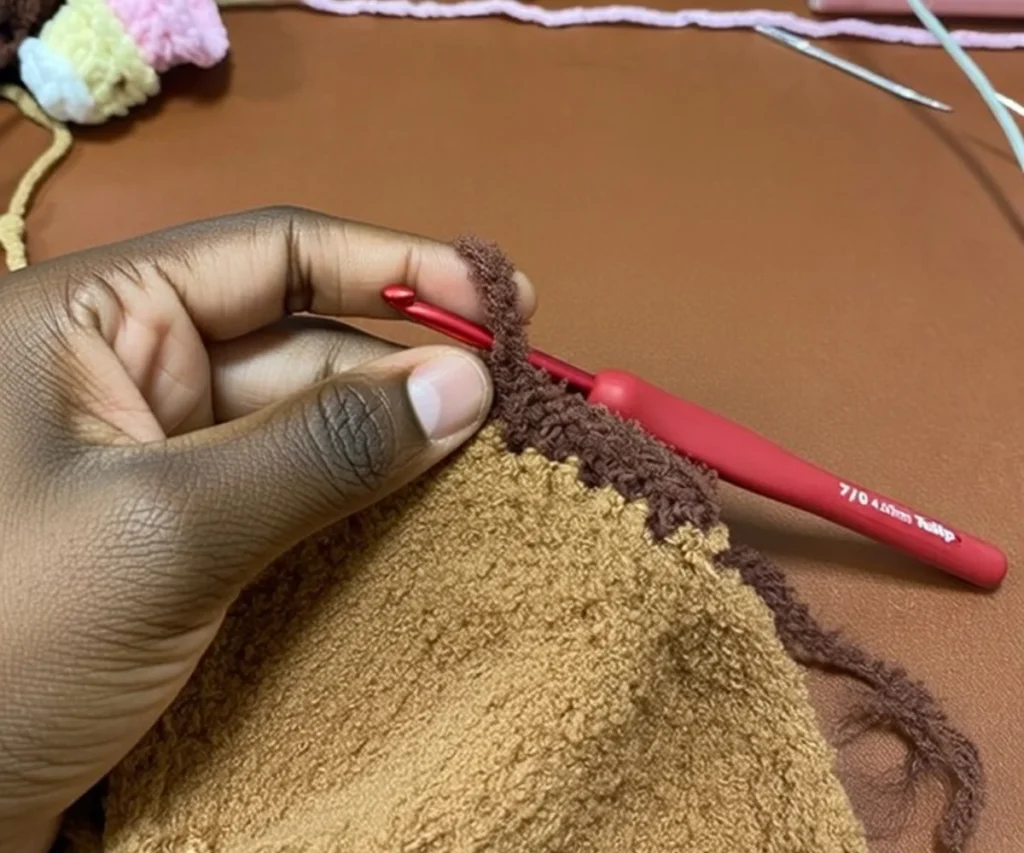
Starting with brown yarn, make a foundation chain of 6. The pattern uses chain 2 at the beginning which counts as the first stitch. Begin working in the 3rd chain from your hook.
Row 1: Work 7 double crochet all in one stitch (creating a fan at the end of the chain), 2 double crochet in the next stitches, 7 double crochet all in one stitch at the other end (creating another fan), 2 double crochet in the remaining stitches. (18 stitches total)
Row 2: Work 7 double crochet increases (2 double crochet in each stitch), 2 double crochet, 7 double crochet increases, 2 double crochet. (32 stitches)
Row 3: Work (1 double crochet, 1 double crochet increase) 7 times, 2 double crochet, (1 double crochet, 1 double crochet increase) 7 times, 2 double crochet. (46 stitches)
Row 4: Work (2 double crochet, 1 double crochet increase) 7 times, 2 double crochet, (2 double crochet, 1 double crochet increase) 7 times, 2 double crochet. (60 stitches) Change to dark brown yarn for the final row.
Row 5: Work 60 single crochet around. (60 stitches)
Fasten off and cut the yarn, leaving a tail for weaving in. This large oval piece will serve as the bottom of your stegosaurus, so set it aside carefully.
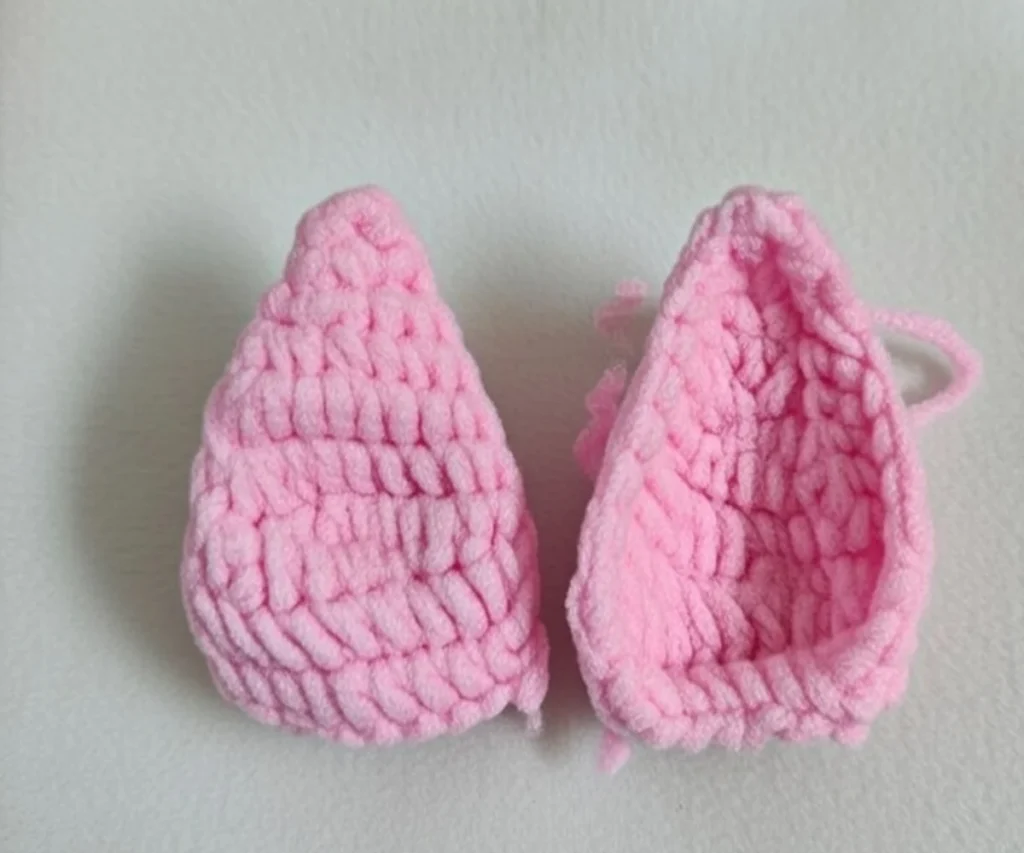
Constructing Parts B.1 and B.3: The Pink Body Sections
Parts B.1 and B.3 are identical pieces that form the sides of the upper body. You’ll make two complete pieces following these instructions.
Using baby pink yarn, create the first piece:
Row 1: Make 2 chains, start in the 2nd chain from the hook and work 1 single crochet, turn and chain 1. (1 stitch)
Row 2: Work 1 increase (2 single crochet in the same stitch), turn and chain 1. (2 stitches)
Row 3: Work 2 increases, turn and chain 1. (4 stitches)
Row 4: Increase, 2 single crochet, increase, turn and chain 1. (6 stitches)
Row 5: 5 single crochet, increase, turn and chain 1. (7 stitches)
Row 6: 6 single crochet, increase, turn and chain 1. (8 stitches)
Row 7: 7 single crochet, increase, turn and chain 1. (9 stitches)
Row 8: 8 single crochet, increase, make chain 1. (10 stitches)
Row 9: This is where the magic happens. Work 8 single crochet, increase, 7 single crochet, increase, 8 single crochet. (27 stitches) Close with a slip stitch in the first stitch and chain 1.
Fasten off and cut the yarn. Make a second identical piece through row 9.
For one of the pieces, continue to Row 10: Work 27 single crochet around. (27 stitches) Slip stitch in the first stitch.
Before fastening off, stuff this piece firmly to create good shape. Fasten off, leaving a long tail for sewing the two B pieces together later.
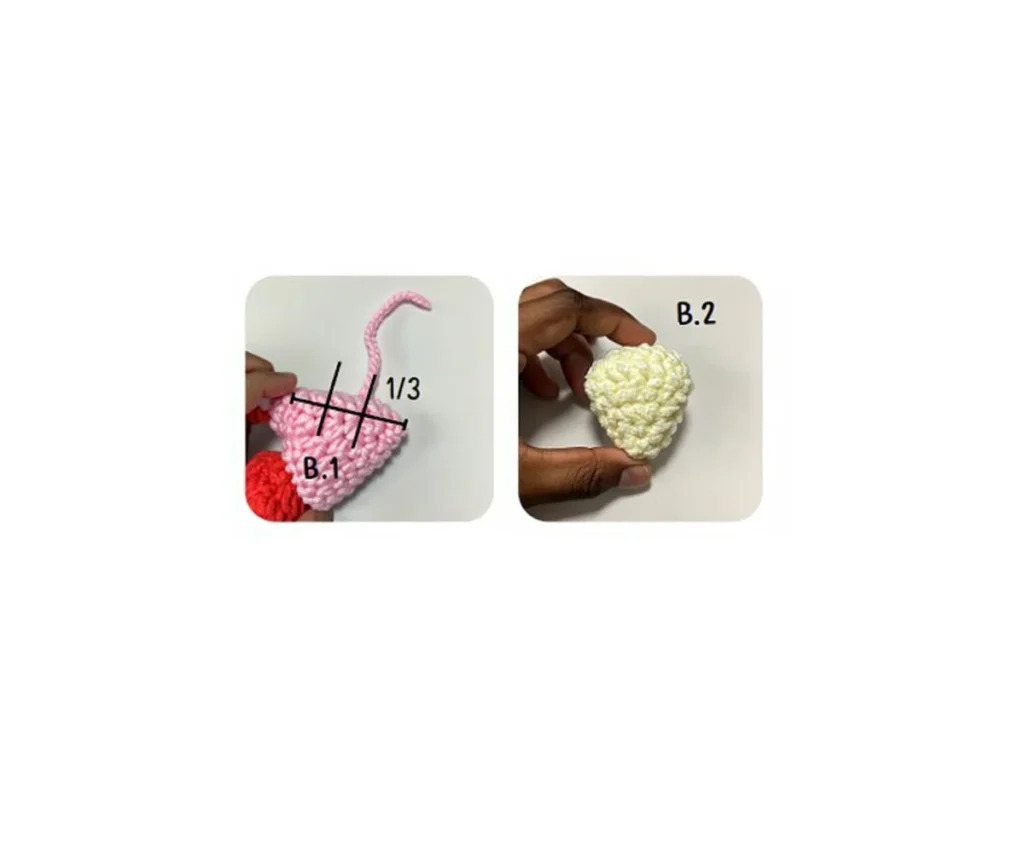
Connecting B.1 and B.3: Pick up yarn from approximately one-third of the way across both B.1 and B.3 pieces. Crochet a chain of 20 stitches to connect them. This creates the channel where B.2 will fit. Fasten off and cut the yarn.
Making Part B.2: The Yellow Center Section
Part B.2 is worked in light yellow yarn and fits between B.1 and B.3, creating the layered ice cream effect.
Row 1: Make 2 chains, start in the 2nd chain from the hook and work 1 single crochet, turn and chain 1. (1 stitch)
Row 2: Work 1 increase, turn and chain 1. (2 stitches)
Row 3: Work 2 increases, turn and chain 1. (4 stitches)
Row 4: Increase, 2 single crochet, increase, turn and chain 1. (6 stitches)
Row 5: Increase, 4 single crochet, increase, make chain 1. (8 stitches)
Row 6: 5 single crochet, increase, 4 single crochet, increase, 6 single crochet, slip stitch in the first stitch, chain 1. (19 stitches)
Fasten off and cut the yarn. Make a second identical piece through row 6.
For one piece, continue to Row 7: Work 19 single crochet around. (19 stitches) Slip stitch in the first stitch.
Stuff firmly before fastening off. Leave a long tail for sewing the two pieces together.
Creating the Legs: Four Adorable Supports
The stegosaurus has four identical legs, each featuring decorative edging that resembles whipped cream or frosting. Make all four legs following these instructions.
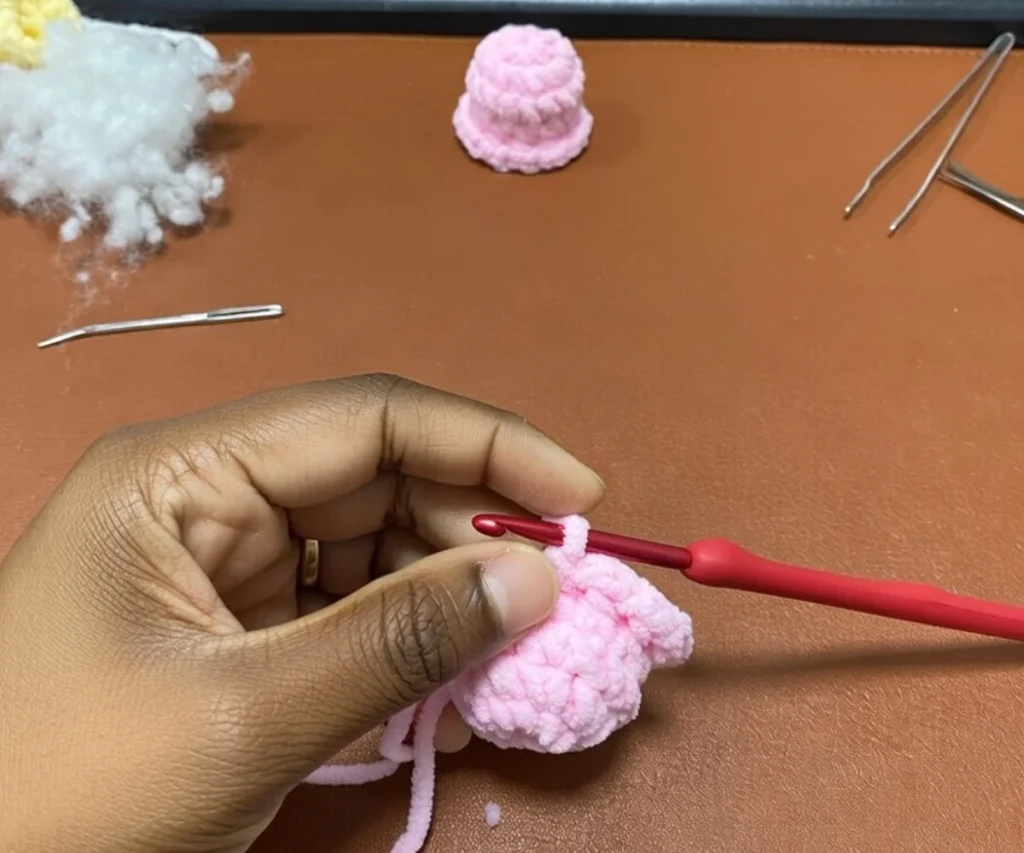
Using baby pink yarn:
Row 1: Work 8 single crochet in a magic ring. (8 stitches)
Row 2: Work 8 increases. (16 stitches)
Row 3: Work 16 single crochet. (16 stitches)
Row 4: Work (2 single crochet, decrease) 4 times. (12 stitches) Stuff the leg at this point.
Row 5: Working in back loops only for all stitches, work 6 decreases. (6 stitches) Fasten off and cut the yarn.
Adding the Decorative Edging:
Row 6: Pick up baby pink yarn in the front loop stitches of row 4. Work (single crochet, chain 1) 12 times around. This creates the ruffled, decorative edge.
Fasten off, leaving a long tail for sewing. The legs will be attached to row 3 of Part A (the body base), with 4 stitches between each pair of legs for proper spacing.
Crafting the Head: Sweet Facial Features
The head is worked in red yarn, creating a charming contrast with the pastel body colors.
Row 1: Work 4 single crochet in a magic ring. (4 stitches)
Row 2: Work (single crochet, increase) 2 times. (6 stitches)
Row 3: Work (single crochet, increase) 3 times. (9 stitches)
Row 4: Work (2 single crochet, increase) 3 times. (12 stitches)
Row 5: Work (single crochet, increase) 6 times. (18 stitches)
Rows 6-7: Work 18 single crochet for 2 rounds. (18 stitches)
Attaching the Eyes: Position the 9mm safety eyes between rows 5 and 6, with 9 stitches between them. Push the eyes through from the front and secure with the backing washers on the inside. Make sure they’re firmly attached before continuing.
Row 8: Work (single crochet, decrease) 6 times. (12 stitches)
Stuff the head firmly, shaping it as you stuff to create a nice rounded form.
Row 9: Work 6 decreases. (6 stitches)
Fasten off, leaving a long tail. The head will be sewn to one-half of B.1 during assembly.
Building the Tail: Layered Construction
The tail consists of three separate sections (C.1, C.2, and C.3) that stack together to create a layered, ice cream-inspired effect.
C.1 (Baby Pink Section):
Row 1: Work 6 single crochet in a magic ring. (6 stitches)
Row 2: Work 6 increases. (12 stitches)
Rows 3-4: Work 12 single crochet for 2 rounds. (12 stitches)
Row 5: Working in front loops only, work (single crochet, chain 1) 12 times to create decorative edging.
Stuff this section before fastening off. Leave a long tail for sewing.
C.2 (Light Yellow Section):
Row 1: Work 6 single crochet in a magic ring. (6 stitches)
Row 2: Work (single crochet, increase) 3 times. (9 stitches)
Row 3: Work 9 single crochet. (9 stitches)
Row 4: Working in front loops only, work (single crochet, chain 1) 9 times.
Stuff and leave a long tail for sewing.
C.3 (White Section):
Row 1: Work 9 single crochet in a magic ring. (9 stitches)
Fasten off immediately, leaving a long tail.
Assembling the Tail: Sew C.3 to C.2 at row 1 of C.2. Then sew from the back loops only of C.2 to rows 1-2 of C.1. Finally, sew from the back loops only of C.1 to one-half of B.3. This creates the stacked, layered tail effect.

Creating the Horn and Back Plates: Distinctive Dinosaur Details
The horn and back plate sections are what make this recognizably a stegosaurus, even with its ice cream inspiration.
D.1 (Make 2 pieces in white yarn):
Row 1: Work 5 single crochet in a magic ring. (5 stitches)
Row 2: Work 5 increases. (10 stitches)
Fasten off, leaving long tails for sewing.
D.2 (Make 4 pieces total):
Begin with white yarn. Make chain 4, start in the 2nd chain from the hook and work 3 single crochet. (3 stitches)
Make a second identical piece. Change to red yarn and make two more pieces.
To join: Take one white piece and one red piece and crochet them together.
Row 2: Chain 1, half double crochet, 2 single crochet, 4 single crochet in one stitch (creating a point), 2 single crochet, half double crochet. (10 stitches)
Fasten off, leaving a long tail. Make four complete back plates this way.
Sew two D.2 pieces into the two D.1 pieces at row 1. These become the main back plates. Sew the two D.1 assemblies to one-half of B.1 and B.3, spacing them as shown in the pattern diagram.
D.3 (Horn/Front Plate in white yarn):
Row 1: Work 6 single crochet in a magic ring. (6 stitches)
Row 2: Work 6 increases. (12 stitches)
Continue by crocheting chain 8, then slip stitch in the first stitch. Cut the yarn. Pick up yarn from the opposite side and make 2 chains.
Fasten off, leaving a long tail for sewing. This piece attaches to the middle of row 4 of the body.
The remaining two D.2 pieces are sewn to the tail and to row 1 of D.3, creating the full line of stegosaurus plates from head to tail.
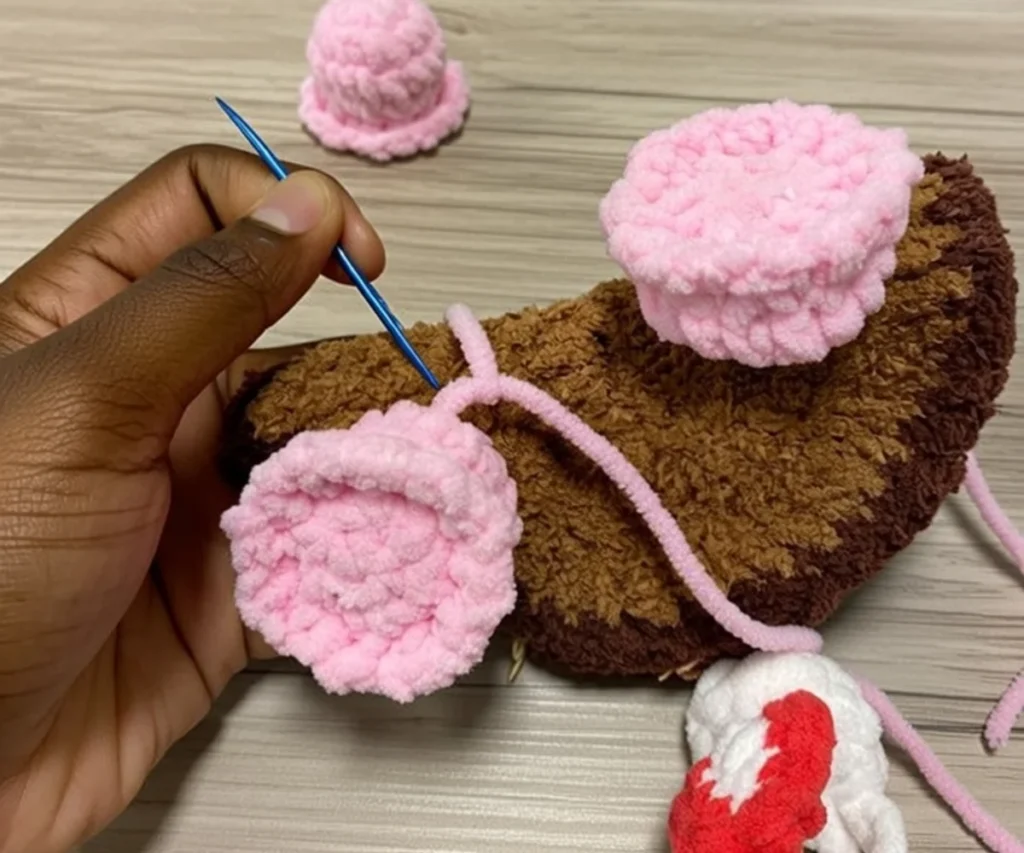
Final Assembly: Bringing Your Stegosaurus to Life
Now comes the exciting part where all your hard work comes together!
Step 1: Connect the Body Sections: Knot B.1 and B.3 together as indicated by the connecting chain you created earlier. Place B.2 (the yellow center section) between B.1 and B.3. The button closure on row 3 (opposite D.3) allows you to secure everything in place while maintaining the layered, dimensional look.
Step 2: Attach the Legs: Position all four legs on Part A (the body base) at row 3, maintaining 4 stitches between each pair of legs. Use the long tails you left to sew them securely, working through both the leg base and the body. Make sure the legs are firmly attached and evenly spaced so your stegosaurus sits level.
Step 3: Attach the Head: Sew the head to one-half of B.1 using the long tail you left. Position it so the dinosaur has a natural head position, slightly tilted upward for character.
Step 4: Secure the Tail: The tail should already be attached to one-half of B.3 from your earlier assembly. Make sure it’s firmly secured and positioned to curve naturally from the body.
Step 5: Position All Back Plates: Verify that all your D.2 and D.3 pieces are securely attached along the back, creating the distinctive stegosaurus silhouette.
Step 6: Final Touches: Weave in all remaining yarn ends. Check all seams and reinforce any that feel loose. Close the button to complete the body construction.
Tips for Perfect Results
Maintain Consistent Tension: With bulky yarn, tension is especially important. Keep your stitches tight enough that stuffing doesn’t show through, but not so tight that the fabric becomes stiff.
Use Stitch Markers: Mark the beginning of each round, especially during the body construction. This prevents losing your place in the complex assembly.
Stuff Gradually: Add stuffing as you work rather than waiting until the end. This allows you to shape pieces properly and achieve the right firmness.
Pay Attention to Joining: Since this pattern uses slip stitch joins rather than spiral construction, make sure to close each round completely before starting the next. This creates the proper shape.
Test Eye Placement: Before securing the safety eyes permanently, place them without the backs and check from multiple angles. Once locked in place, they cannot be repositioned.
Match Colors Carefully: The ice cream effect relies on the color palette working harmoniously. Choose pastels that complement each other, or experiment with different ice cream-inspired combinations.
Block Your Pieces: If any sections seem misshapen, gently steam block them before assembly to even out stitches and improve the overall appearance.
Take Your Time with Assembly: The multi-part construction requires patience. Refer to the pattern diagrams frequently and double-check positioning before sewing pieces permanently.
Customization Ideas for Your Ice Cream Stegosaurus
While the original pattern uses a specific color palette, there’s plenty of room for creativity and personalization.
Different Ice Cream Flavors: Try mint chocolate chip with green and brown, strawberry swirl with pink and white variegated yarn, cookies and cream with white and black or gray, chocolate fudge brownie with various brown shades, or rainbow sherbet with bright, varied colors in each section.
Seasonal Variations: Create a spring version with pastel Easter colors, a summer edition with bright, sunny tones, an autumn stegosaurus with warm orange, yellow, and brown, or a winter/holiday version with red, white, and green.
Size Adjustments: Use different yarn weights to change the size. Sport or DK weight yarn with a smaller hook creates a miniature version perfect for ornaments or keychains (similar to our crochet keychain collection). Super bulky yarn with a larger hook makes an extra-large cuddle companion.
Embellishments: Add embroidered sprinkles using contrasting yarn, sew on small felt decorations like cherries or strawberries, use sparkle or chenille yarn for certain sections for texture variation, or add a tiny crochet ice cream cone as an accessory.
Expression Changes: Embroider a smile on the face, add rosy cheeks with pink yarn or fabric paint, create sleepy eyes by positioning safety eyes at an angle, or add eyelashes for extra personality.
Why This Pattern Is Perfect for Creative Crocheters
The Ice Cream Stegosaurus represents the best of creative amigurumi design. It takes a familiar prehistoric creature and reimagines it through a whimsical, modern lens. This pattern appeals to dinosaur enthusiasts who want something unique, dessert and food-themed craft lovers, parents looking for imaginative toys for children, collectors of quirky amigurumi, and crocheters who enjoy challenging, multi-part construction.
The finished stegosaurus makes an exceptional conversation piece, display item, or gift. Its combination of cute and creative appeals to all ages, making it versatile for different recipients and occasions.
If you’ve enjoyed making amigurumi animals, you might also love our Shiba Inu crochet pattern, which features different but equally rewarding construction techniques.
Get the Complete Pattern with Detailed Diagrams
While this tutorial provides comprehensive instructions, the official Ice Cream Stegosaurus pattern includes detailed assembly diagrams, color photos of each step, and a beautifully formatted, ad-free PDF you can print and keep in your project binder. Get the complete pattern from our Etsy shop for the easiest crafting experience. The pattern PDF is designed by Alexandra Roa at OrdinaryLuxeCo and includes everything you need to create your perfect ice cream dinosaur!
Displaying and Caring for Your Ice Cream Stegosaurus
Once completed, your Ice Cream Stegosaurus deserves proper display and care to keep it looking adorable for years to come.
The sturdy construction and four-leg design allow the stegosaurus to stand independently, making it perfect for shelf displays, children’s rooms, craft fair booths, or photography props. The distinctive silhouette and cheerful colors make it an eye-catching piece wherever it’s displayed.
For cleaning, spot clean with a damp cloth and mild soap as needed. The bulky yarn can usually handle gentle cleaning without felting or damage. Avoid machine washing, as this could loosen safety eyes or distort the shape. If deeper cleaning is necessary, hand wash gently in cool water and reshape while drying, being careful not to wring or twist the pieces.
Store in a clean, dry place away from direct sunlight to prevent color fading. If displaying long-term, occasional dusting with a soft brush keeps the piece looking fresh.
Expanding Your Crochet Skills
If you’ve successfully completed the Ice Cream Stegosaurus, you’ve mastered several advanced amigurumi techniques that will serve you well in future projects. The multi-part assembly, color work, and structural elements prepare you for even more complex patterns.
Consider expanding your skills with other challenging projects. Our Valentina Sweater pattern teaches garment construction with lace details, while our various character keychain patterns offer practice with detailed small-scale work.
For those interested in seasonal crafting, explore our Halloween crochet bags for functional accessories, or try character-specific patterns like our Shadow the Hedgehog keychain or Wolverine keychain for fan-inspired projects.
Sharing Your Ice Cream Stegosaurus Creation
We would absolutely love to see your finished Ice Cream Stegosaurus! Share photos of your creation in the comments below or tag us on Pinterest @CozyChicLife_. Seeing how different crocheters interpret color choices and add personal touches is incredibly inspiring for the entire crafting community.
You’re welcome to sell finished Ice Cream Stegosaurus plushies you create from this pattern, making it an excellent option for craft fair vendors, Etsy shops, or local boutiques. Just remember to credit Alexandra Roa as the original pattern designer when selling or posting your work.
Final Thoughts on the Ice Cream Stegosaurus Pattern
The Ice Cream Stegosaurus represents everything wonderful about modern amigurumi design: creativity, technical skill, and pure whimsical joy. This isn’t just another dinosaur pattern; it’s a celebration of imagination that transforms a prehistoric creature into something delightfully contemporary and sweet.
The construction techniques you’ll master while making this pattern—from the layered body assembly to the decorative edging and multi-part tail—are skills you’ll use again and again in future projects. The satisfaction of seeing all those separate pieces come together into one cohesive, adorable dinosaur is truly rewardi