If you’re searching for a crochet sweater pattern that combines romantic details with wearable elegance, the Valentina Sweater is calling your name. This stunning top features delicate lace bell sleeves and charming puff stitch edging that will make it a staple in your handmade wardrobe. Originally created for Valentine’s Day, this sweater has all the romantic details you could want while remaining practical enough for everyday wear.
What Makes the Valentina Sweater Special?
The Valentina Sweater is thoughtfully designed with both style and construction in mind. The body is worked flat in straightforward double crochet stitches, creating a solid foundation that’s perfect for intermediate crocheters. The sleeves are worked in rounds from the armhole down, incorporating gradual decreases for a flattering tapered fit.
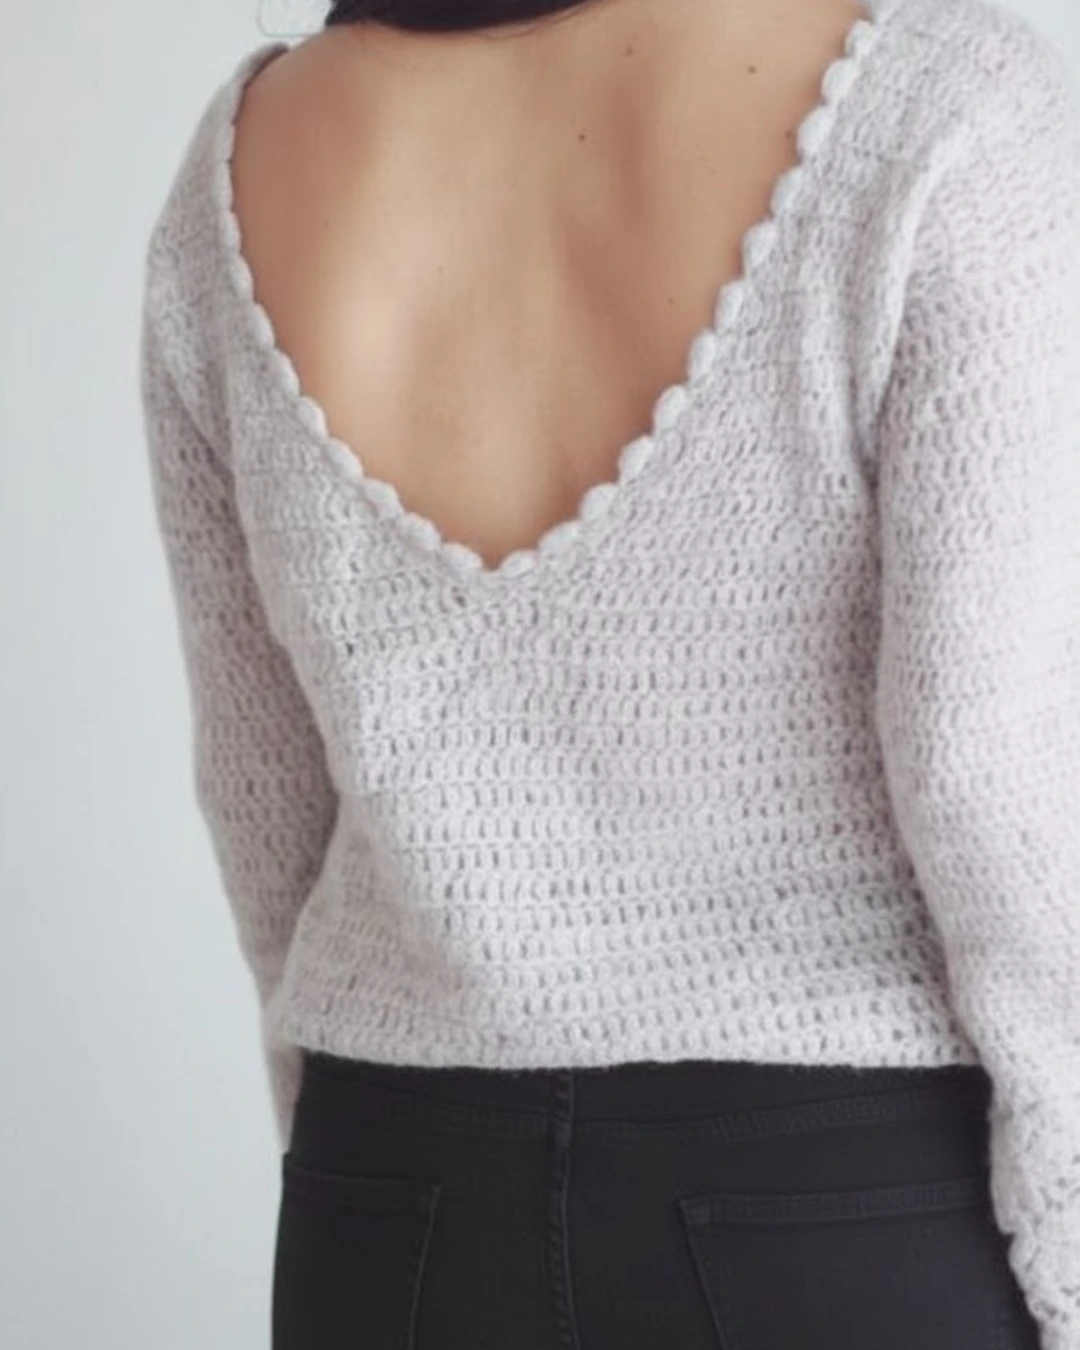
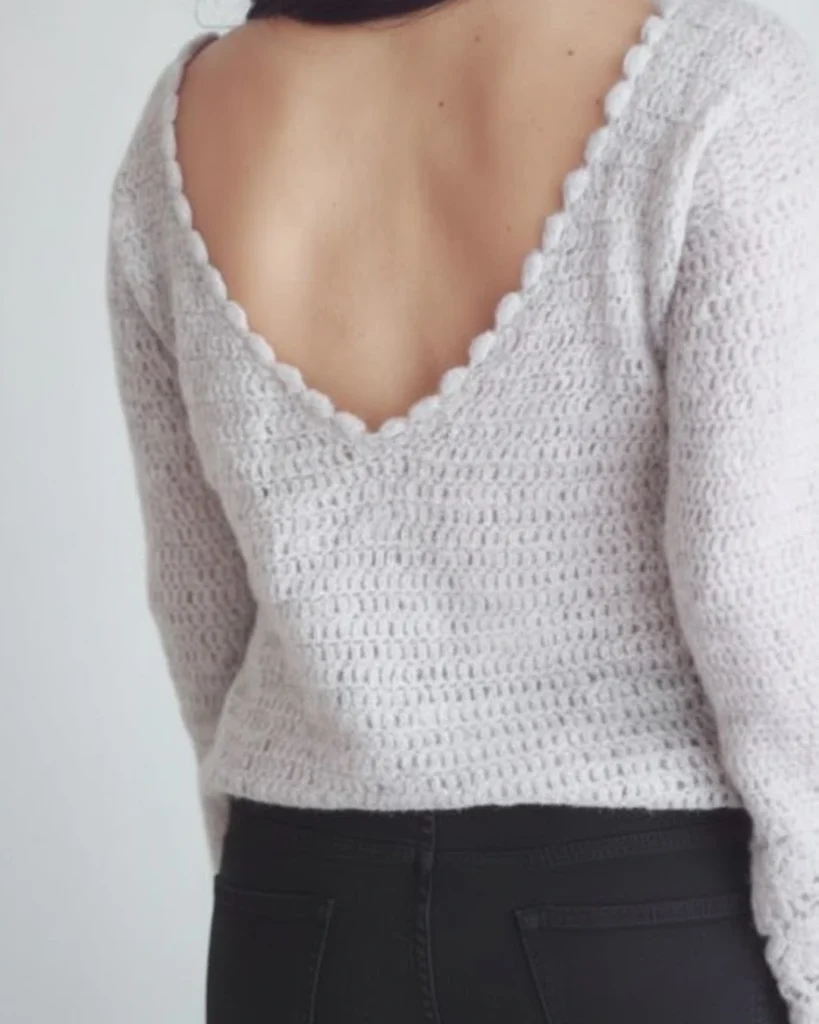
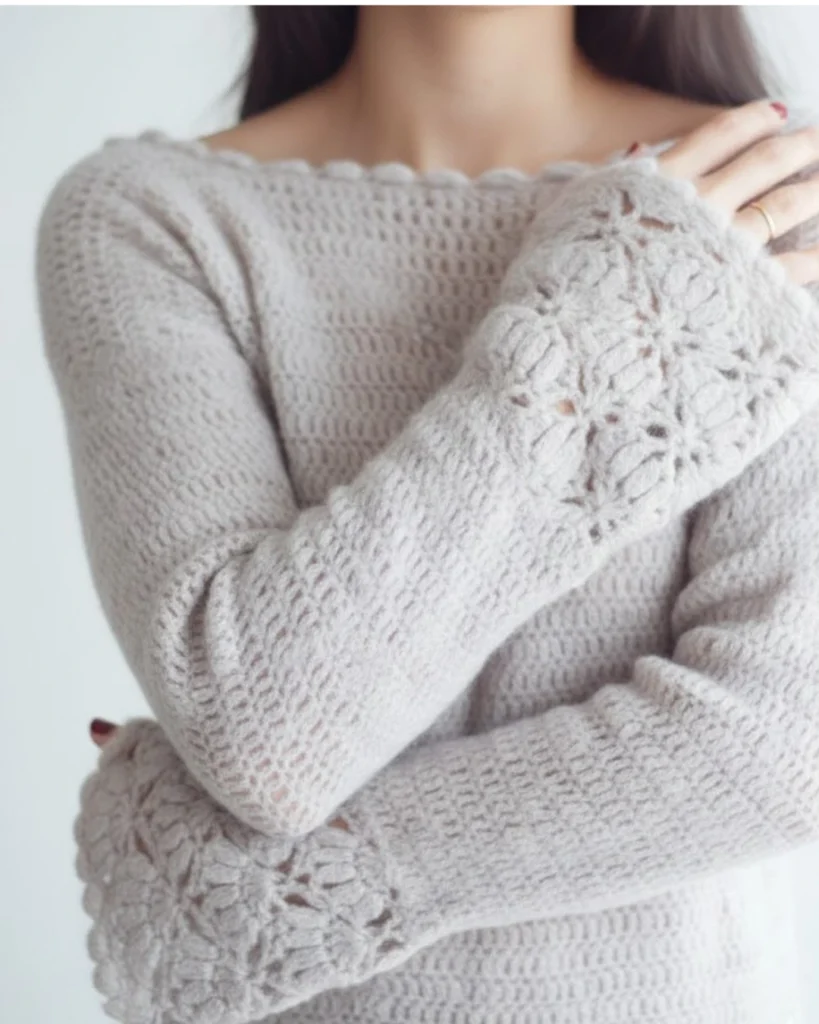
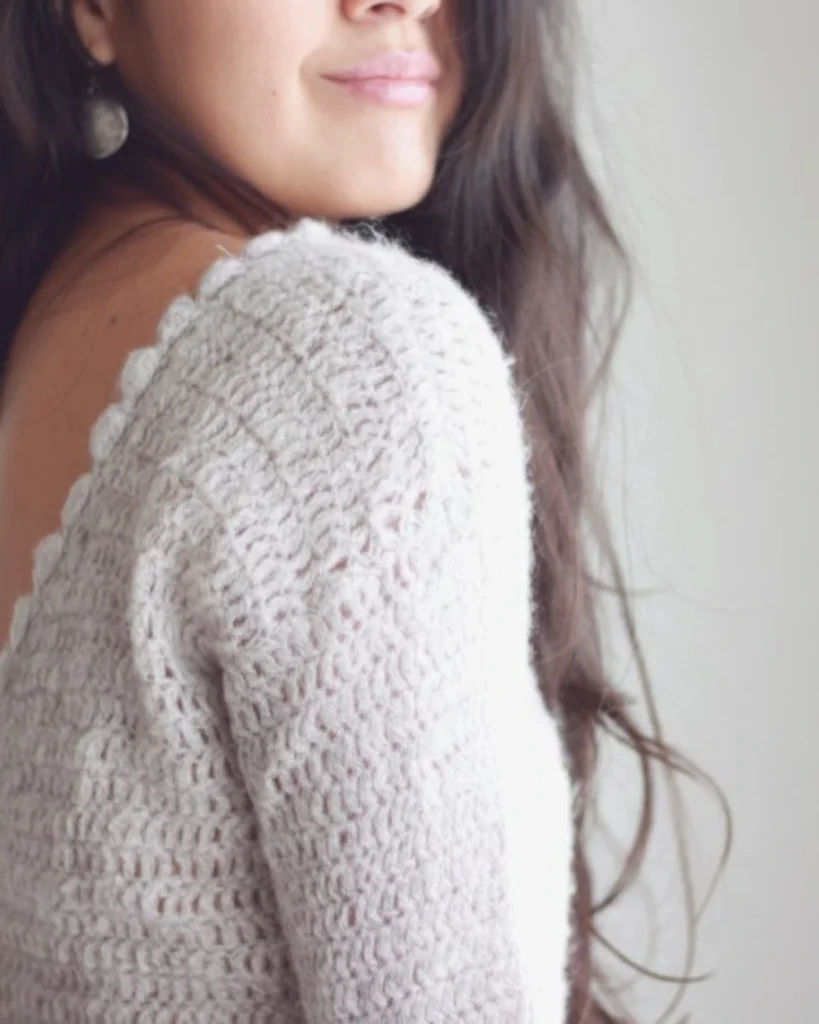
What truly sets this sweater apart are the exquisite finishing details. The lace motif on the sleeves creates a gorgeous bell-sleeve effect that adds movement and femininity to the design. The puff stitch edging around the neckline provides a delicate frame for your face, while the V-shaped back neckline adds sophisticated shaping. These thoughtful touches transform a simple double crochet sweater into something truly special.
Skill Level and Required Knowledge
This pattern is rated as intermediate, which means you should have a solid foundation in basic crochet techniques and some experience reading patterns. You don’t need to be an expert, but you should be comfortable working without constant guidance.
The stitches you’ll use throughout this project include chain stitch, single crochet, double crochet, slip stitch, decreases (working 2 double crochet stitches together), and puff stitch. If you’re unfamiliar with puff stitch, don’t worry. The pattern includes detailed instructions for creating this decorative element.
You’ll also gain experience with garment construction techniques like working flat pieces, joining panels, working in the round, creating neckline shaping through strategic decreases, and adding decorative edging.
Complete Materials List
To create your own Valentina Sweater, you’ll need the following supplies:
Yarn: The original design uses 3 balls of Phil Light by Phildar in the color Gazelle. Each ball contains 50 grams with 287 meters of yarn (approximately 1.76 oz with 314 yards). The fiber content is 53% acrylic, 29% polyamide, and 18% wool, creating a wonderfully soft, lightweight, and slightly hairy texture that resembles alpaca.
If you can’t source this exact yarn, look for a fingering or sport weight yarn with similar characteristics. The key is finding something soft and light with good drape. The slight halo from the fiber blend adds to the romantic aesthetic, so consider yarns with a similar fuzzy quality.
Hook Size: You’ll need a 4mm (US G/6) crochet hook for the entire project.
Additional Notions: A yarn needle for seaming and weaving in ends is essential for finishing your sweater professionally.
Understanding Gauge and Measurements
Gauge is absolutely critical when creating wearable garments. For this pattern, you should achieve 16 double crochet stitches and 9 rows in a 10 cm by 10 cm (approximately 4 inches by 4 inches) square.
Before starting your sweater, take the time to create a gauge swatch using your chosen yarn and the 4mm hook. If you’re getting more stitches per 10 cm, your tension is too tight and you should try a larger hook. If you’re getting fewer stitches, your tension is too loose and you should try a smaller hook. This step ensures your finished garment will fit as intended.
The finished Valentina Sweater measures:
- Width: 42 cm (approximately 16.5 inches)
- Length: 48 cm (approximately 19 inches)
- Sleeve Length: 44 cm (approximately 17.5 inches)
These measurements create approximately a size Medium. The pattern includes guidance for adjusting the armhole depth to accommodate different body types.
Constructing the Front Panel: Step-by-Step
The front of the Valentina Sweater is the simpler of the two body panels, making it a great place to start your project.
Foundation and Main Body: Begin by creating a foundation chain of 68 chains total (65 chains plus 3 additional chains). Those first 3 chains count as your first double crochet stitch throughout the pattern.
For Row 1, you’ll work into the 4th chain from your hook and make 1 double crochet in every chain across. This gives you 66 double crochet stitches total.
Rows 2 through 40 follow the same simple pattern: chain 3 to begin the row (counting as your first double crochet), then work 1 double crochet in every stitch across the row, turn your work, and repeat. You’ll maintain 66 double crochet stitches throughout these 40 rows, creating the main body of the sweater front.
Shaping the Shoulders: After completing Row 40, you’ll work each shoulder separately to create the neckline shaping.
For the right shoulder, begin Row 41 by chaining 3, then make 1 double crochet in the next 18 stitches. In the following 2 stitches, work them together as a decrease (2 double crochet worked together). Turn your work.
Row 42 is straightforward: chain 3 and work 1 double crochet in every stitch across, giving you 20 double crochet stitches for the shoulder.
For the left shoulder, count 21 stitches from the end of Row 40 and attach your yarn. Chain 2 (which doesn’t count as a stitch in this case) and work 1 double crochet in every stitch across. Turn your work.
Row 42 follows the same pattern as the right shoulder: chain 3 and work 1 double crochet in every stitch across to finish with 20 double crochet stitches.
Constructing the Back Panel: Creating the V-Neckline
The back panel is where the Valentina Sweater gets more interesting with its elegant V-shaped neckline.
Initial Rows: Start exactly like the front panel, following the same instructions from Row 1 through Row 20. You’ll have 66 double crochet stitches and the same foundation structure.
Dividing for the V-Neckline: After Row 20, you’ll work each side of the back separately, creating the V-shape through strategic decreases on the inside edges.
Right Shoulder Shaping:
Row 21 begins the decreasing. Chain 3, work 1 double crochet in the next 31 stitches, then work the next 2 stitches together as a decrease. Turn. You now have 32 double crochet stitches.
Row 22: Chain 2 (doesn’t count as a stitch) and work 1 double crochet in each stitch across the row. Turn. You maintain 31 double crochet stitches.
Row 23: Chain 3, work 1 double crochet in each stitch until the third stitch from the end, then work the last 2 stitches together as a decrease. Turn. You’re down to 30 double crochet stitches.
Rows 24 through 33: Continue alternating between Row 22 and Row 23 instructions, decreasing one stitch every other row until you have 20 double crochet stitches remaining.
Rows 34 through 42: Once you’ve reached 20 stitches, work straight without any decreases. Chain 3 and work 1 double crochet in each stitch across for each of these rows, maintaining 20 double crochet stitches.
Left Shoulder Shaping:
Attach your yarn in the middle of Row 20 to begin the left side.
Row 21: Chain 2 (doesn’t count as a stitch) and work 1 double crochet in every stitch across. You’ll have 32 double crochet stitches.
Row 22: Chain 3, work 1 double crochet in every stitch until the third stitch from the end, then work the last 2 stitches together as a decrease. Turn. You now have 31 double crochet stitches.
Row 23: Chain 2 (doesn’t count as a stitch) and work 1 double crochet in each stitch across the row. Turn. You maintain 30 double crochet stitches.
Rows 24 through 33: Repeat Rows 22 and 23, alternating the decrease pattern until you have 20 double crochet stitches.
Rows 34 through 42: Work straight with chain 3 and 1 double crochet in each stitch across, maintaining 20 double crochet stitches for each row.
Assembling the Body
With both your front and back panels complete, it’s time to join them together.
Place the front and back pieces with right sides facing together. Using your yarn needle and yarn, sew the shoulders together first, matching up the 20-stitch shoulder sections on each side.
Next, sew the side seams, but here’s the critical part: you need to leave enough space for the armholes. The pattern recommends leaving approximately 14 cm for a size Medium.
Before finishing your seams completely, try the body on. This is your opportunity to check the fit and adjust if needed. For a smaller size, decrease the armhole opening by 1 or 2 cm. For a larger size, increase it by 1 or 2 cm. This customization ensures your finished sweater fits your body perfectly.
Creating the Sleeves: Working in the Round
Once you’ve confirmed that the body fits well, you’re ready to create the sleeves. The sleeves are worked in the round, starting at the armhole and working downward.
Starting the Sleeve: Attach your yarn at the seam under your arm where you joined the front and back panels.
Finishing Each Round: To complete each round, make 1 slip stitch into the 3rd chain of your beginning chain-3.
Round 1: Chain 3 (counts as first double crochet), then make 47 double crochet stitches evenly spaced around the entire armhole opening. You’ll have 48 double crochet stitches total.
Round 2: Chain 3, work 1 double crochet in every stitch around. Maintain 48 double crochet stitches.
Round 3: Chain 3, work 1 double crochet in every stitch until you reach the third stitch from the end, then make 1 decrease. You now have 47 double crochet stitches.
Rounds 4 and 5: Chain 3 and work 1 double crochet in every stitch around. Keep 47 double crochet stitches.
Rounds 6 through 24: Continue repeating the pattern from Rounds 3 through 5. You’ll decrease one stitch every third round until you have a total of 40 double crochet stitches.
Rounds 25 and 26: Chain 3 and work 1 double crochet in each stitch around, maintaining 40 double crochet stitches.
Important Note: Before beginning the lace motif, ensure your total stitch count is a multiple of 10. With 40 stitches, you’re perfectly set to begin the decorative lace section.
The Lace Motif: Creating the Bell Sleeve Effect
The lace motif is what gives the Valentina Sweater its signature romantic look. This section requires careful attention to the pattern, but the results are absolutely worth it.
Round 27: Chain 1 (doesn’t count as a stitch). Work 3 single crochet in the first 3 stitches, skip 2 stitches, then work 5 double crochet all in the same stitch. Now you’ll repeat this pattern: skip 2 stitches, work 5 single crochet, skip 2 stitches, work 5 double crochet in the same stitch. Repeat this sequence twice more, then skip 2 stitches, work 2 single crochet, and finish with a slip stitch in the first single crochet.
Round 28: Chain 1 (doesn’t count as a stitch), work 1 single crochet, chain 2, skip 2 stitches. In each of the 5 double crochet stitches from the row below, work 3 double crochet together followed by chain 2. Skip 2 stitches, then repeat the pattern: 1 single crochet, chain 2, skip 2 stitches, and work 3 double crochet together plus chain 2 in each of the next 5 stitches from the row below, skip 2 stitches. Repeat this sequence twice more. Close the round with a slip stitch in the first single crochet.
Understanding Spaces: For Round 29 and beyond, “1 sp” refers to a 2-chain space from the round below.
Round 29: Chain 3 (counts as 1 double crochet), work 2 double crochet in the same first stitch, skip 1 space. In the next 3 spaces, make 1 single crochet plus chain 2 in each space, work 1 single crochet in the following space, then skip 1 space. Now work 5 double crochet in the next single crochet from the round below, skip 1 space, work 1 single crochet plus chain 2 in each of the next 3 spaces, work 1 single crochet in the next space, skip 1 space. Repeat this pattern twice more, work 2 double crochet in the first stitch from the beginning, and close the round with a slip stitch in the 3rd chain.
Round 30: Chain 2, work 2 double crochet together in the same first stitch, chain 2. Work 3 double crochet together plus chain 2 in each of the next 2 double crochet stitches from the round below. Skip 1 space, work 1 single crochet plus chain 2 in the next space. Skip 1 space, then in the next 5 double crochet stitches from the round below, make 3 double crochet together plus chain 2 in each stitch. Skip 1 space, work 1 single crochet plus chain 2 in the next space. Repeat this pattern twice more. Skip 1 space, work 3 double crochet together plus chain 2 in the next double crochet. In the last stitch, work 3 double crochet together plus chain 1. To finish this round, make 1 single crochet into the second chain from the beginning. This technique positions you in the middle of the chain space to start the next round perfectly.
Round 31: Chain 1 (doesn’t count as a stitch). Work 1 single crochet plus chain 2 into the first 2 spaces, work 1 single crochet in the next space, skip 1 space, work 5 double crochet in the next single crochet from the round below, skip 1 space. In the next 3 spaces, make 1 single crochet plus chain 2 in each space, work 1 single crochet in the next space, skip 1 space, work 5 double crochet in the next single crochet from the round below, skip 1 space. Repeat this pattern twice more. In the last space, make 1 single crochet plus chain 2, then finish the round with a slip stitch into the first single crochet and into the first space.
Round 32: Chain 1 (doesn’t count as a stitch), work 1 single crochet in the same space, chain 2, skip 1 space. In the next 5 double crochet stitches from the round below, make 3 double crochet together plus chain 2 in each stitch, skip 1 space. Work 1 single crochet in the next space, chain 2, skip 1 space. In the next 5 double crochet stitches, make 3 double crochet together plus chain 2 in each stitch, skip 1 space. Repeat this pattern twice more. Finish the round with a slip stitch in the first single crochet.
Rounds 33 through 36: Repeat Rounds 29 through 32 to continue building the lace pattern.
Rounds 37 and 38: Repeat Rounds 29 and 30 one more time.
Adding the Puff Stitch Edging to Sleeves
The puff stitch creates beautiful texture and gives the sleeve edge a professional, finished appearance. Here’s how to create a puff stitch:
Puff Stitch Technique: Yarn over, insert your hook into the stitch, pull the yarn through (you now have 3 loops on your hook). Repeat this process twice more in the same stitch. You should now have 7 loops on your hook. Pull the yarn through the first 6 loops, yarn over, and pull through the last two loops. This creates one complete puff stitch.
Round 39: Chain 1. In the next 2-chain space, make 1 single crochet, chain 2, then work 1 puff stitch in the same single crochet you just made. Repeat this pattern around the entire sleeve edge. Finish with a slip stitch in the 1st chain, cut your yarn, and use your yarn needle to weave in the ends.
Repeat all the sleeve instructions to create the second sleeve.
Finishing with Neckline and Bottom Edging
The final touches bring your Valentina Sweater to polished perfection.
Neckline Edging:
Attach your yarn at one of the shoulder seams. Chain 1 and work a first round of single crochet stitches evenly around the entire neckline, finishing with a slip stitch in the first chain.
For the second round, chain 1. Work 1 single crochet and 1 puff stitch in the same single crochet you just made, skip 2 stitches. Repeat this pattern all the way around the neckline. Finish with a slip stitch in the first chain, cut your yarn, and weave in the end with your needle.
Bottom Edging:
The original pattern uses a decorative shell-stitch edge. Work a round of 1 single crochet, chain 1, 1 single crochet all in the same stitch, skip 1 stitch. Repeat this pattern around the entire bottom edge.
Alternatively, if you prefer a simpler finish, you can work just one round of single crochet evenly around the bottom edge.
Tips for Success with Your Valentina Sweater
Work Your Gauge Swatch: This cannot be stressed enough. Creating a proper gauge swatch saves you from finishing an entire sweater only to discover it doesn’t fit.
Count Stitches Regularly: Especially during the lace motif section, counting your stitches at the end of each round helps you catch mistakes early.
Use Stitch Markers: Place markers at the beginning of rounds and at key points in the lace pattern to help you keep track of where you are.
Block Your Work: After completing your sweater, blocking will open up the lace motif beautifully and even out your stitches. Wet block or steam block according to your yarn’s care instructions.
Try On As You Go: Don’t wait until the very end to check the fit. Try on the body before adding sleeves, and try on with one sleeve complete before making the second.
Take Your Time with the Lace: The lace motif is the star of this sweater. Don’t rush through these rounds. Take breaks if needed and work when you’re fresh and focused.
Styling Your Finished Valentina Sweater
The Valentina Sweater is incredibly versatile despite its romantic details. Layer it over a simple camisole or tank top in a coordinating color for a put-together look. The V-back neckline means you’ll want to choose undergarments accordingly.
Pair it with high-waisted jeans for a casual weekend outfit, or dress it up with a flowing midi skirt for a more feminine ensemble. The bell sleeves make a statement on their own, so keep other accessories minimal.
For cooler weather, this sweater layers beautifully over long-sleeved shirts, with the lace sleeves peeking out for added interest.
Color and Yarn Substitution Ideas
While the original Gazelle colorway is lovely and neutral, don’t feel limited to this choice. Consider these alternatives:
Romantic Pastels: Soft pink, lavender, or mint green create a dreamy, feminine aesthetic perfect for spring.
Rich Jewel Tones: Deep burgundy, emerald green, or sapphire blue make stunning fall and winter versions.
Classic Neutrals: Cream, gray, or black offer maximum versatility and endless styling options.
When substituting yarn, look for fingering or sport weight options with good drape. Yarns with a slight halo or fuzzy texture will mimic the original’s soft, romantic appearance. Cotton blends work well for warmer weather, while wool blends add warmth for cooler seasons.
Final Thoughts on the Valentina Sweater Pattern
The Valentina Sweater represents the perfect intersection of accessible construction and impressive results. The body’s simple double crochet foundation builds your confidence, while the lace motif and puff stitch details teach you new techniques and create a truly special finished garment.
This is a sweater you’ll be proud to wear and even prouder to say you made yourself. The combination of classic shaping, romantic details, and thoughtful construction ensures this pattern will become a favorite in your crochet repertoire.
Whether you’re making it for yourself or as a heartfelt handmade gift, the Valentina Sweater is a project that rewards your time and effort with a beautiful, wearable piece you’ll treasure for years to come.