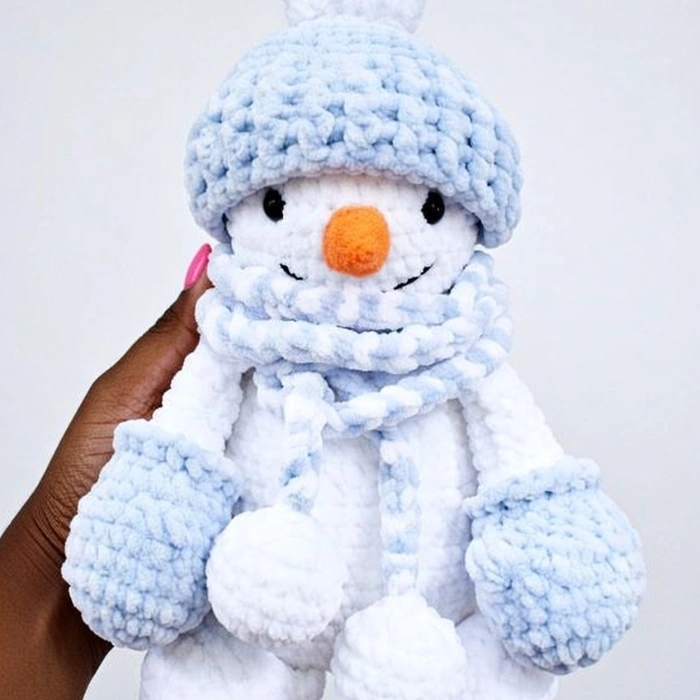
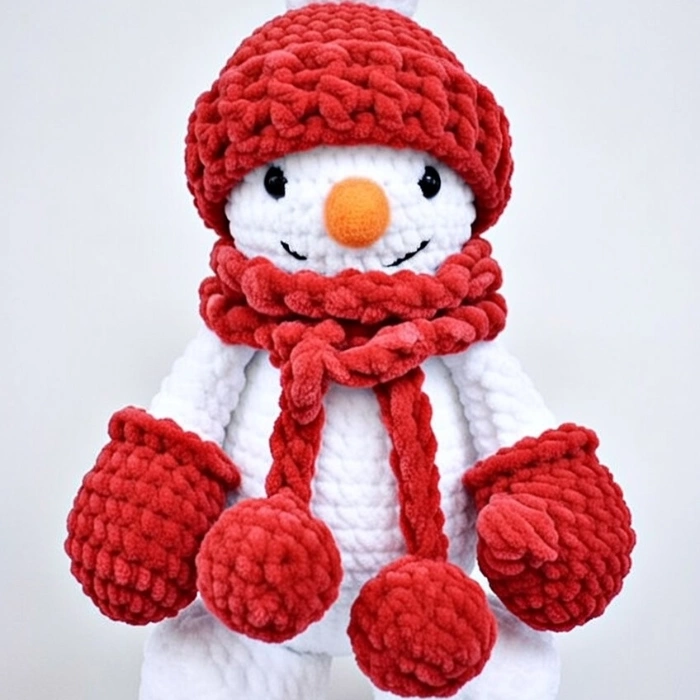
When winter arrives and snowflakes start to fall, there’s nothing quite as magical as bringing the spirit of the season indoors with handmade decorations. The Plush Snowman crochet pattern captures all the charm and coziness of winter in an adorable amigurumi that’s incredibly soft to touch and heartwarming to display. Standing at approximately 29-30 cm tall, this delightful snowman makes a perfect seasonal decoration, a cherished gift, or a cuddly companion for cold winter nights.
Download the complete pattern from our Etsy shop for the easiest, most enjoyable crafting experience.
What Makes This Plush Snowman Special?
This isn’t your average snowman amigurumi. The Plush Snowman pattern uses luxuriously soft velvet yarn that creates an incredibly tactile, huggable texture unlike traditional cotton amigurumi. The plush yarn gives the snowman a modern, premium appearance while maintaining all the classic charm of a traditional winter snowman.
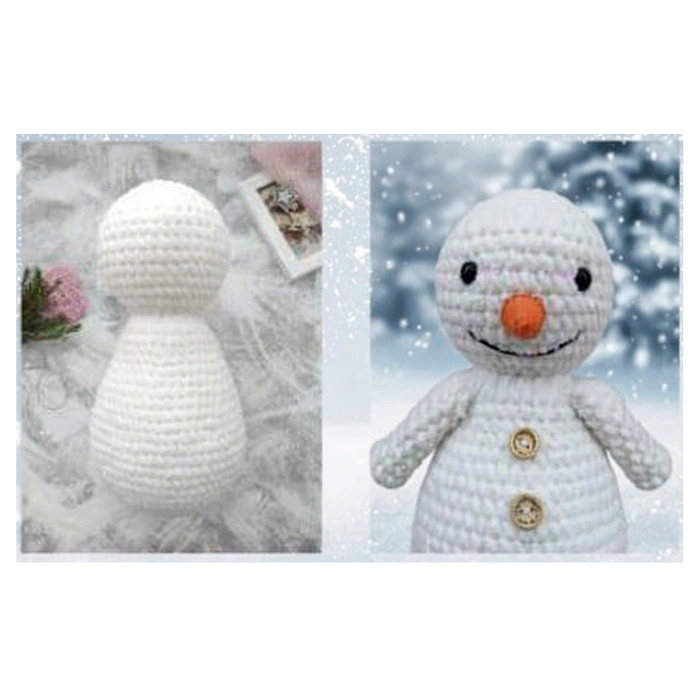
The pattern features a one-piece head and body construction that creates seamless, professional-looking results. This clever design technique eliminates the need to sew the head to the body separately, reducing assembly time and creating a stronger, more cohesive structure. The snowman includes all the classic elements: adorable safety eyes positioned perfectly for maximum cuteness, a carrot-orange nose (called a “spout” in the pattern) with dimensional shaping, embroidered smile that adds personality, decorative buttons on the belly for authentic snowman style, and charming winter accessories including a hat with pompom, long cozy scarf, mittens with cute finger details, and sturdy legs that allow the snowman to stand independently.
The use of velvet yarn creates a contemporary aesthetic that looks stunning in holiday displays, on mantels, or as part of your winter décor. The soft, plush texture invites touching and hugging, making this snowman as functional as it is decorative.
Skill Level and Required Techniques
This pattern is suitable for intermediate crocheters who have experience working with specialty yarns and basic amigurumi construction. While the techniques themselves aren’t overly complex, working with velvet yarn requires some special considerations.
Throughout this project, you’ll work with continuous spiral rounds (the most common amigurumi technique), magic ring starts, single crochet, increases and decreases, double crochet for textured elements, popcorn stitch for the mitten fingers, front loop only and back loop only techniques for textured details, and working in continuous rounds without joining.
You’ll also need skills in stuffing techniques for proper shaping, positioning and securing safety eyes, embroidering facial features, assembling multiple pieces, and working with velvet yarn (which has different handling than cotton).
The pattern emphasizes working in continuous rounds (spiral method) rather than joining each round, which creates smooth, seamless pieces. Careful stitch counting is essential when working with velvet yarn, as the fuzzy texture can make individual stitches harder to see than with cotton yarn.
If you’re comfortable with basic amigurumi but haven’t worked with velvet yarn before, this pattern is an excellent introduction to plush yarn techniques. The larger size and simpler shaping make it more forgiving than smaller, more detailed velvet projects.
Download the complete pattern from our Etsy shop for the easiest, most enjoyable crafting experience.
Complete Materials List
To create your Plush Snowman, you’ll need these specific supplies:
Plush/Velvet Yarn: The pattern specifies Himalaya Dolphin Baby or YarnArt Dolce, both popular velvet yarn brands. Each skein contains 100 grams with 120 meters of yarn. You’ll need approximately 1.5 skeins in white for the snowman body, and an additional half skein in your choice of color for the hat, scarf, and mittens. Popular choices include red, green, blue, or purple for a classic winter look.
Velvet yarn creates the signature soft, plush texture. While the pattern specifies these brands, you can substitute with similar velvet or chenille yarns. Brands like Bernat Velvet, Red Heart Hygge, or Himalaya Velvet also work beautifully. The key is using a bulky weight velvet yarn with similar yardage.
Cotton Yarn for Nose: YarnArt IDEAL or similar cotton yarn (50 grams with 170 meters) in orange for the carrot nose. You’ll only need a small amount, so this is a great project for using up leftover orange yarn from other projects.
Black Cotton or Semi-Cotton Yarn: A small amount for embroidering the smile. Any black yarn in a similar weight will work.
Hook Sizes: You’ll need three different hook sizes for this project. A 4mm hook and 5mm hook for working with the plush yarn (the pattern uses both for different sections), and a 2mm hook for the small cotton nose.
Safety Eyes: One pair of 10-12mm safety eyes. The larger size works well with the scale of the snowman and the plush yarn texture.
Stuffing: Polyester fiberfill for stuffing. You’ll need a generous amount as the snowman is fairly large and needs firm stuffing to maintain shape and stand independently.
Buttons: Optional decorative buttons for the belly. Choose sizes and colors that complement your accessory color scheme.
Additional Notions: A yarn needle for assembly and weaving in ends, sharp scissors for cutting yarn, and stitch markers (optional but helpful for tracking rounds).
Understanding the Construction Method
The Plush Snowman uses several clever construction techniques that create a professional, polished appearance.
The head and body are worked as one continuous piece, starting at the top of the head and working down through the body to the base. This eliminates the weakest point in many amigurumi (the head-to-body connection) and creates a seamless, sturdy structure. The shaping creates a natural narrowing at the neck area, giving the snowman proper proportions without any visible seam.
The accessories (hat, scarf, mittens, and legs) are worked separately and attached during assembly. This modular approach allows you to customize colors easily and makes the project portable—you can work on small pieces like the nose or pompoms while traveling.
The pattern uses continuous rounds (spiral method) rather than joining each round with a slip stitch. This creates smooth, seamless pieces without a visible seam line running up the side. However, this means careful stitch counting is essential to maintain proper shaping.
Creating the Head and Body: One Seamless Piece
The head and body construction is where the magic of this pattern really shines. You’ll start at the crown of the head and work your way down.
Download the complete pattern from our Etsy shop for the easiest, most enjoyable crafting experience.
Starting the Head: Begin with a magic ring and work 6 single crochet into the ring. Pull tight to close.
Round 2: Work 6 increases (2 single crochet in each stitch). (12 stitches)
Round 3: Work 12 increases. (24 stitches)
Round 4: Work (3 single crochet, increase) 6 times. (30 stitches)
Round 5: Work (4 single crochet, increase) 6 times. (36 stitches)
Round 6: Work (5 single crochet, increase) 6 times. (42 stitches)
Round 7: Work (6 single crochet, increase) 6 times. (48 stitches)
Round 8: Work (7 single crochet, increase) 6 times. (54 stitches)
Round 9: Work (8 single crochet, increase) 6 times. (60 stitches)
Rounds 10-15: Work 60 single crochet for 6 rounds. These straight rounds build up the height of the head.
Shaping the Head and Creating the Neck:
Round 16: Work (8 single crochet, decrease) 6 times. (54 stitches)
Rounds 17-18: Work 54 single crochet for 2 rounds.
Round 19: Work (7 single crochet, decrease) 6 times. (48 stitches)
Round 20: Work 48 single crochet.
Round 21: Work (6 single crochet, decrease) 6 times. (42 stitches)
Round 22: Work 42 single crochet.
Round 23: Work (5 single crochet, decrease) 6 times. (36 stitches)
Rounds 24-25: Work 36 single crochet for 2 rounds.
Round 26: Work (4 single crochet, decrease) 6 times. (30 stitches)
Round 27: Work (1 single crochet, decrease) 10 times. (20 stitches)
Round 28: Work 20 single crochet.
Creating the Body:
Round 29: This is where the neck transitions to the body. Work 20 increases. (40 stitches)
Rounds 30-37: Work 40 single crochet for 8 rounds. This creates the full, round snowman belly.
Closing the Body:
Round 38: Work (6 single crochet, decrease) 5 times. (35 stitches)
Round 39: Work (5 single crochet, decrease) 5 times. (30 stitches)
Round 40: Work (4 single crochet, decrease) 5 times. (25 stitches)
Round 41: Work (3 single crochet, decrease) 5 times. (20 stitches)
Round 42: Work (2 single crochet, decrease) 5 times. (15 stitches)
Round 43: Work (1 single crochet, decrease) 5 times. (10 stitches)
Round 44: Work 5 decreases. (5 stitches)
Close the remaining stitches, fasten off, and weave in the end securely.
Adding the Eyes and Smile: Position the safety eyes between rounds 10 and 11 (counting from the crown of the head), with 8 stitches between them. This placement creates a sweet, friendly expression. Using black cotton yarn, embroider a gentle smile below the nose area. The decorative buttons are sewn onto the belly area for that classic snowman look.
Important Note: Stuff the snowman firmly as you work. The velvet yarn has stretch, so firm stuffing is essential to maintain the proper shape and prevent the snowman from looking deflated. Pay special attention to stuffing the neck area well to support the head.
Making the Hands: Cozy Mittens with Details

Download the complete pattern from our Etsy shop for the easiest, most enjoyable crafting experience.
The hands are worked in the accessory color (not white) to look like mittens, adding to the winter charm.
Starting with your chosen accessory color:
Round 1: Work 6 single crochet in a magic ring. (6 stitches)
Round 2: Work 6 increases. (12 stitches)
Round 3: Work 12 increases. (24 stitches)
Rounds 4-6: Work 24 single crochet for 3 rounds.
Adding the Finger Detail:
Round 7: Work 10 single crochet, create a popcorn stitch from 5 double crochet (this creates the thumb bump), 13 single crochet. (24 stitches total)
The popcorn stitch creates a dimensional thumb detail. To make a popcorn: work 5 double crochet in one stitch, remove your hook from the loop, insert it into the first double crochet of the group, then pull the working loop through to cinch the stitches together.
Round 8: Work (2 single crochet, decrease) 6 times. (18 stitches)
Rounds 9-10: Work 18 single crochet for 2 rounds.
Creating the Mitten Cuff:
Round 11: Work 18 single crochet in front loops only. This creates a ridge that looks like a mitten cuff.
Cut the yarn, fasten off, and weave in the end. Attach white yarn in the remaining back loops and continue:
Round 12: Work (1 single crochet, decrease) 6 times. (12 stitches)
Rounds 13-21: Work 12 single crochet for 9 rounds. This creates the arm extending from the mitten.
Closing the Arm: Fold the arm in half so the thumb detail is on the side. If needed, work a few additional stitches to position the thumb correctly. Crochet through both sides with 6 single crochet to close. Leave a long tail for sewing.
Stuff the mitten/hand portion lightly, but leave the arm unstuffed for easier positioning.
Make two complete hands following these instructions. Attach them to the body between rounds 28 and 29, with 5 stitches between each hand for balanced placement.
Creating the Legs: Stable Support
The legs are simple but essential for allowing your snowman to stand independently.
Round 1: Work 6 single crochet in a magic ring. (6 stitches)
Round 2: Work 6 increases. (12 stitches)
Round 3: Work 12 increases. (24 stitches)
Rounds 4-9: Work 24 single crochet for 6 rounds.
Stuff the legs firmly. Fold each leg in half and crochet through both sides to close. Leave a long tail for sewing.
Make two complete legs following these instructions.
Attaching the Legs: The legs are sewn to the body between rounds 8 and 9 (counting from the bottom end of the body) and secured at round 10. Position the legs so the snowman stands balanced and stable. The pattern emphasizes sewing the legs securely enough that the snowman can stand on its own, which requires firm attachment and even placement.
Download the complete pattern from our Etsy shop for the easiest, most enjoyable crafting experience.
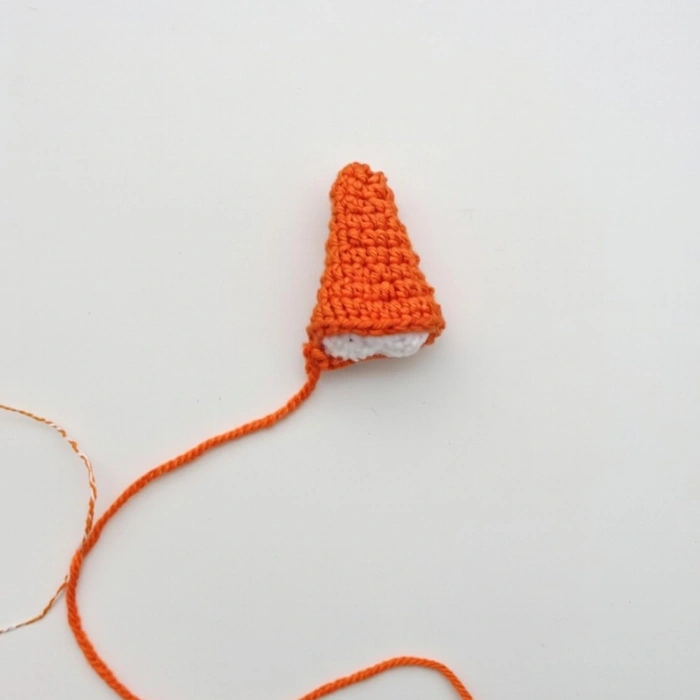
Crafting the Carrot Nose (Spout)
The orange nose is worked with cotton yarn and a smaller hook to create appropriate scale and texture contrast.
Using orange cotton yarn and a 2mm hook:
Round 1: Work 6 single crochet in a magic ring. (6 stitches)
Rounds 2-3: Work 6 single crochet for 2 rounds.
Round 4: Work (1 single crochet, increase) 3 times. (9 stitches)
Round 5: Work 9 single crochet.
Round 6: Work (2 single crochet, increase) 3 times. (12 stitches)
Round 7: Work 12 single crochet.
Round 8: Work (3 single crochet, increase) 3 times. (15 stitches)
Round 9: Work (4 single crochet, increase) 3 times. (18 stitches)
Round 10: Work 18 single crochet.
Download the complete pattern from our Etsy shop for the easiest, most enjoyable crafting experience.
Stuff lightly to give the nose dimension without making it too stiff. Leave a long tail for sewing. Attach the nose to the center of the face, positioned naturally between and slightly below the eyes.
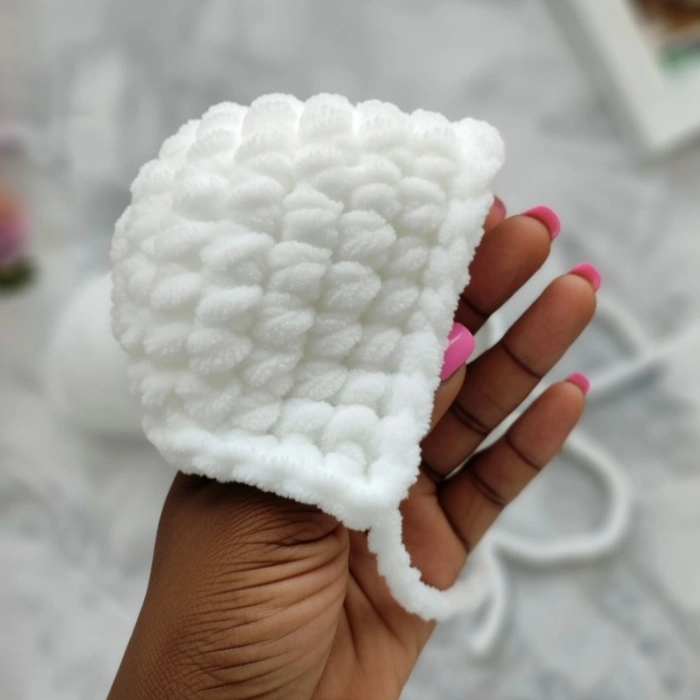
Making the Hat: Classic Winter Accessory
The hat is worked in your chosen accessory color using the larger velvet yarn.
Download the complete pattern from our Etsy shop for the easiest, most enjoyable crafting experience.
Round 1: Work 6 single crochet in a magic ring. (6 stitches)
Round 2: Work 6 increases. (12 stitches)
Round 3: Work 12 increases. (24 stitches)
Round 4: Work (3 single crochet, increase) 6 times. (30 stitches)
Round 5: Work (4 single crochet, increase) 6 times. (36 stitches)
Round 6: Work (5 single crochet, increase) 6 times. (42 stitches)
Round 7: Work (6 single crochet, increase) 6 times. (48 stitches)
Rounds 8-10: Work 48 single crochet for 3 rounds.
Creating the Textured Brim:
Rounds 11-13: Crochet embossed double crochet stitches, alternating front post and back post stitches. This creates a ribbed, elastic band effect that looks like a folded hat brim.
To work front post double crochet: yarn over, insert hook from front to back to front around the post of the stitch from the previous round (rather than into the top loops), complete the double crochet as normal.
To work back post double crochet: yarn over, insert hook from back to front to back around the post of the stitch, complete the double crochet.
Cut the yarn and fasten off securely.
Hat Pompom:
Round 1: Work 6 single crochet in a magic ring. (6 stitches)
Round 2: Work 6 increases. (12 stitches)
Round 3: Work 12 increases. (24 stitches)
Rounds 4-6: Work 24 single crochet for 3 rounds.
Round 7: Work (2 single crochet, decrease) 6 times. (18 stitches)
Round 8: Work (1 single crochet, decrease) 6 times. (12 stitches)
Stuff firmly to create a nice round pompom. Leave a long tail for sewing. Attach the pompom to the top of the hat at round 2 of the hat, sewing it on securely in a circle.
Creating the Scarf: Long and Cozy
The scarf is made using a hollow cord technique with two colors, creating a tube-like scarf that’s dimensional and realistic.
Using your 5mm hook and working with two colors of velvet yarn, create a hollow cord approximately 140 cm long. The hollow cord technique creates a tube by working single crochet stitches in a spiral around a chain, creating a 3D effect.
To make a two-color hollow cord: work with both colors held together or alternate colors as you work for a striped or variegated effect.
Scarf Pompoms (Make 2):
Round 1: Work 6 single crochet in a magic ring. (6 stitches)
Round 2: Work 6 increases. (12 stitches)
Round 3: Work (1 single crochet, increase) 6 times. (18 stitches)
Rounds 4-6: Work 18 single crochet for 3 rounds.
Round 7: Work (1 single crochet, decrease) 6 times. (12 stitches)
Round 8: Work 6 decreases. (6 stitches)
Do not close the hole completely. Stuff firmly and leave a long tail.

Download the complete pattern from our Etsy shop for the easiest, most enjoyable crafting experience.
Insert the ends of the scarf into the holes left in each pompom, tighten the holes around the scarf ends, and sew securely, catching the scarf in your stitches. This creates pompom-ended scarf that looks professionally finished.
Assembly: Bringing Your Snowman to Life
With all pieces complete, it’s time to assemble your snowman.
Step 1: Add Facial Features: If you haven’t already, position and secure the safety eyes, attach the carrot nose, and embroider the smile. These features bring personality to your snowman.
Step 2: Attach the Legs: Sew the legs to the bottom of the body between rounds 8-9 from the bottom, securing them at round 10. Make sure they’re evenly spaced and firmly attached so the snowman stands stable.
Step 3: Attach the Arms/Mittens: Sew the arms to the body between rounds 28-29, with 5 stitches between each arm. Position them slightly forward for a welcoming pose.
Step 4: Add Decorative Buttons: If using buttons, sew them to the belly area in a vertical line for classic snowman styling.
Step 5: Position the Hat: Place the hat on the snowman’s head at a jaunty angle or straight, whichever you prefer. You can tack it down with a few stitches if desired, though many prefer to leave it removable.
Step 6: Wrap the Scarf: Drape the scarf around the snowman’s neck, arranging it artfully with the pompom ends hanging down. The scarf can be wrapped once or twice depending on your preference.
Step 7: Final Touches: Weave in all remaining ends securely. Check all attachments to ensure they’re firm. Give your snowman a final shaping, adjusting stuffing if needed.
Tips for Working with Velvet Yarn
Velvet yarn is wonderful but requires some special handling techniques for best results.
Use Gentle Tension: Velvet yarn is softer and stretchier than cotton. Don’t pull stitches too tight or the fabric will pucker. Maintain gentle, consistent tension throughout.
Count Stitches Carefully: The fuzzy texture of velvet yarn makes individual stitches harder to see than cotton. Use stitch markers liberally and count after each round to catch mistakes early.
Avoid Frogging: Velvet yarn doesn’t handle being ripped back well. The fuzzy pile can become damaged and matted. It’s better to count carefully and work slowly than to have to redo sections.
Stuff Firmly: Velvet yarn has more stretch than cotton, so you need firmer stuffing to maintain shape and prevent the piece from looking flat or deflated.
Be Patient: Working with velvet yarn takes longer than cotton because you need to work more carefully. Don’t rush the process.
Use Larger Hooks: The pattern specifies 4mm and 5mm hooks with the velvet yarn. These larger hooks help the stitches show through the fuzzy pile and create appropriate gauge.
Work in Good Lighting: The soft texture and matte finish of velvet yarn can make stitches hard to see in dim light. Work near a bright light or in natural daylight for best visibility.
Store Carefully: Velvet yarn can pick up lint and fuzz easily. Store your work in a clean bag between sessions.
Customization Ideas for Your Snowman
While the classic white snowman with colorful accessories is timeless, there’s plenty of room for personalization.
Color Variations: Try different accessory color combinations like red and white (candy cane style), blue and silver (frosty elegance), green and red (holiday traditional), purple and pink (whimsical and modern), or rainbow accessories (bright and cheerful).
Facial Expressions: Adjust the smile embroidery for different personalities. A wider smile creates a jolly snowman, a small smile looks shy and sweet, and an open mouth smile with added tongue creates a playful expression. Try different eye placements—closer together for adorable, wider apart for surprised.
Accessory Variations: Add a scarf with fringed ends instead of pompoms, make a top hat instead of a beanie-style hat, create earmuffs for the snowman, add a small broom or shovel accessory, or crochet tiny mittens on strings.
Size Adjustments: Use sport weight velvet yarn with smaller hooks for a miniature version, or use super bulky chenille yarn with larger hooks for a giant snowman. Each yarn weight change will proportionally resize your snowman.
Embellishments: Add embroidered snowflakes to the body, sew on sequins for sparkle, create a vest or coat for extra warmth, add rosy cheeks with pink embroidery or felt, or position the hat at different angles for personality.
Seasonal Variations: While this is designed as a winter/Christmas project, you could adapt it for year-round snowman displays by using different accessory colors that match your décor.
Why This Pattern Is Perfect for Winter Crafting
The Plush Snowman embodies everything wonderful about winter crafting. It’s cozy, nostalgic, and creates something truly special that brings joy to any space. Unlike our Halloween-themed projects that are specific to one holiday, this snowman works throughout the entire winter season.
This pattern makes an exceptional handmade gift for snowman collectors, winter enthusiasts, children who love soft toys, anyone who appreciates handmade seasonal décor, or yourself as a special holiday decoration. The plush velvet construction makes it especially appealing as a cuddly companion for children, while the sophisticated construction and attention to detail make it appropriate for adult collections as well.
The snowman stands independently, making it perfect for mantel displays, shelves, under the Christmas tree, winter vignettes, or as a centerpiece. At 29-30 cm tall, it’s substantial enough to make a statement without being so large it’s difficult to display.
If you enjoy creating seasonal amigurumi, you might also love our Ice Cream Stegosaurus pattern, which offers similarly creative construction techniques with a whimsical twist.
Get the Complete Pattern with Assembly Photos
While this tutorial provides comprehensive instructions, the official Plush Snowman pattern includes detailed assembly photos, close-up images of each component, step-by-step visual guides, and a beautifully formatted, ad-free PDF that’s perfect for printing. Download the complete pattern from our Etsy shop for the easiest, most enjoyable crafting experience.
Displaying Your Finished Snowman
Once completed, your Plush Snowman deserves a place of honor in your winter décor.
The independent standing design means he can be placed almost anywhere without support: mantels and fireplace surrounds, bookshelves and display cabinets, entryway tables, under the Christmas tree, window sills, or holiday vignettes with other winter decorations.
The soft velvet texture invites touching and cuddling, making this snowman interactive décor that both children and adults will enjoy. Unlike fragile decorations, this sturdy amigurumi can handle gentle play and frequent repositioning.
For cleaning, spot clean with a damp cloth as needed. The velvet yarn can handle gentle cleaning, but avoid soaking or machine washing. If deeper cleaning is necessary, hand wash carefully in cool water with gentle detergent, reshape while drying, and avoid wringing. The plush texture may require light brushing with a soft brush after cleaning to restore the fuzzy pile.
Store your snowman in a clean, dry place during the off-season. Place him in a box or container to prevent dust accumulation and protect from crushing. Avoid storing in areas with extreme temperature fluctuations.
Download the complete pattern from our Etsy shop for the easiest, most enjoyable crafting experience.
Building Your Crochet Skills Year-Round
Successfully completing the Plush Snowman teaches valuable techniques you can apply to other projects throughout the year. The one-piece head-and-body construction is a technique used in many larger amigurumi patterns, and working with velvet yarn opens up possibilities for creating plush versions of other animals and characters.
Consider expanding your skills with other patterns in different styles. Our Shiba Inu pattern offers experience with multi-part assembly, while our Valentina Sweater teaches garment construction. For character work, explore our collection of crochet keychains, including fan-favorite designs like our Shadow the Hedgehog keychain or Wolverine keychain.
Each project builds different skills, making you a more versatile and confident crocheter. The techniques you’ve mastered with velvet yarn in this snowman pattern translate beautifully to other plush toys and decorative items.
Sharing Your Plush Snowman Creation
We would love to see your finished Plush Snowman! Share photos in the comments below or tag us on Pinterest @CozyChicLife_. Seeing how different crocheters choose accessory colors and style their snowmen is wonderfully inspiring for the entire crafting community.
You’re welcome to sell finished Plush Snowmen you create from this pattern, making it an excellent option for craft fairs, holiday boutiques, Etsy shops, or gift-giving.
Download the complete pattern from our Etsy shop for the easiest, most enjoyable crafting experience.
Final Thoughts on the Plush Snowman Pattern
The Plush Snowman Crochet Pattern represents the best of winter crafting: a project that’s both practical and magical, technically interesting and emotionally satisfying. The soft velvet yarn elevates this beyond a simple amigurumi into something truly special—a plush companion that captures the joy and coziness of winter in every stitch.
The one-piece construction creates a seamless, professional appearance, while the charming accessories and attention to detail make this snowman a standout piece in any holiday display. Whether you’re making this for your own home, as a gift for someone special, or to sell at craft markets, the Plush Snowman is a project that brings smiles at every stage of creation.
The 29-30 cm height makes this snowman substantial and impressive without being overwhelming. The independent standing design means no props or supports are needed—just place your snowman where you want that touch of winter magic.
So gather your soft velvet yarn, your hooks in multiple sizes, and prepare to create the coziest snowman that ever graced a winter display. Your plush snowman adventure awaits, and we can’t wait to see the adorable winter friends you bring to life!
Download the complete pattern from our Etsy shop for the easiest, most enjoyable crafting experience.
Download the complete pattern from our Etsy shop for the easiest, most enjoyable crafting experience.
Download the complete pattern from our Etsy shop for the easiest, most enjoyable crafting experience.
Download the complete pattern from our Etsy shop for the easiest, most enjoyable crafting experience.