
DIY Crochet Cocoon Shrug: Free Pattern for Beginners
Crocheting is not just a relaxing hobby but also an incredible way to create personalized fashion pieces that can elevate your wardrobe. If you’re a beginner, you might be searching for a quick and easy project that brings together your burgeoning skills with a stylish result. Enter the Cocoon Shrug – an adorable and functional accessory perfect for layering!
In this article, we’ll take you through an easy-to-follow crochet pattern for a cocoon shrug, perfect for beginners. You’ll be creating a charming piece to wear during chilly evenings or to layer over your favorite dresses. Let’s get started!
What is a Cocoon Shrug?
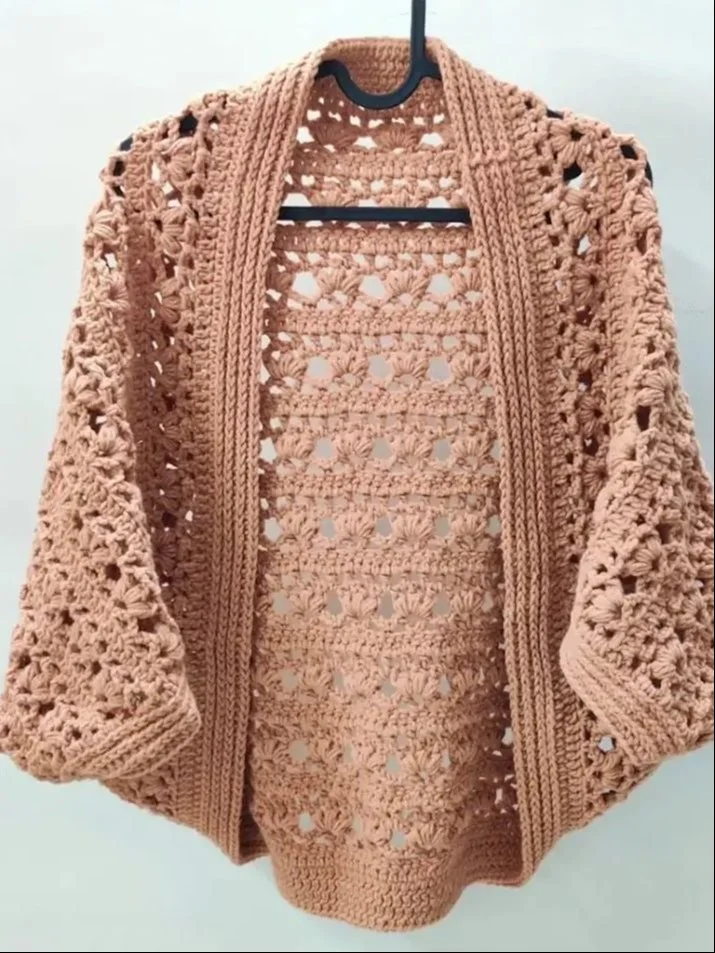
Before we dive into the crochet pattern, let’s understand what a cocoon shrug is. This trendy garment is essentially an oversized cardigan that drapes beautifully over your shoulders and arms, resembling a cocoon shape. It’s lightweight, versatile, and complements various outfits, making it a must-have in any crochet lover’s collection.
Why Crochet a Cocoon Shrug?
- Beginner-friendly: This project requires very basic stitches that are easy to master.
- Versatile: It can be styled in various ways, making it suitable for different occasions.
- Personalized Elegance: You can choose yarn colors and textures that resonate with your personal style.
- Quick Project: The cocoon shape means fewer stitches and rows, making it a relatively quick crochet project, perfect for those who are just getting started.
Materials You Will Need
Before we get into the pattern, gather the following materials:
- Yarn: Choose a medium-weight yarn (Category 4) that feels good against your skin. You will need approximately 400-500 yards, depending on your size.
- Crochet Hook: A 5.5mm (I-9) crochet hook works well for medium-weight yarn.
- Scissors: For cutting yarn.
- Tapestry Needle: For weaving in loose ends.
- Measuring Tape: To ensure proper sizing.
Basic Stitches to Know
If you’re a beginner, familiarize yourself with these essential crochet stitches:
- Chain Stitch (ch): The foundation of most crochet patterns.
- Double Crochet (dc): A common stitch that adds height and texture.
- Slip Stitch (sl st): Used for joining and finishing.
Free Crochet Pattern for the Cocoon Shrug
Gauge: 4 inches = 10 stitches in double crochet.
Instructions
Size: This pattern is designed for a one-size-fits-most cocoon shrug. Feel free to adjust the starting chain for larger or smaller sizes.
Step 1: Foundation Chain
Begin by making a foundation chain of 80 chains (or adjust to fit your desired width).
Step 2: Row 1
- Double Crochet in the 4th chain from your hook, then double crochet in each remaining chain across. You should have 78 double crochets at the end of this row.
Step 3: Continuing Rows
- Row 2 to 10: Chain 3 (count as your first double crochet), turn your work, and double crochet in each stitch across. Repeat this for a total of 10 rows.
Step 4: Creating Sleeves
- Row 11: Chain 3, turn, and double crochet two stitches in the first double crochet of the previous row.
- Continue to double crochet in each stitch, adding two double crochets in the last stitch (this creates the deep armhole).
Step 5: Maintain Width
- Rows 12 to 25: Repeat Row 11 until the total number of rows equals 25.
Step 6: Decrease for the Other Side
- Row 26: Chain 3, turn, and double crochet in each stitch. When reaching the last three stitches, reduce by double crocheting two together to maintain the shape.
Step 7: Final Rows
- Rows 27 to 32: Continue to double crochet across until your shrug’s desired length is achieved.
- Finish with a slip stitch.
Step 8: Edging (Optional)
If you want to add a decorative finish, you can single crochet around the entire edge of the shrug, which will give it a polished look.
Step 9: Weaving in Ends
Use a tapestry needle to weave in any loose ends, ensuring that your shrug looks neat and tidy.
Step 10: Wear it Proudly!
Your cocoon shrug is now complete! It can be worn over a tank top, dress, or even a long-sleeve shirt for added warmth and style.
Styling Your Cocoon Shrug
A cocoon shrug is incredibly versatile and can be styled in numerous ways:
- Casual Look: Pair it with your favorite jeans and a t-shirt for a laid-back vibe.
- Elegant Evening: Wear it over a dress with statement jewelry for an evening out.
- Layered Look: Use it to add dimension to your outfit by layering it over different lengths or textures.
Choosing the Right Yarn
The yarn you choose can significantly impact the overall look and feel of your cocoon shrug. Here are some yarn types to consider:
- Acrylic Yarn: Budget-friendly, durable, and available in a wide variety of colors.
- Cotton Yarn: Great for summer wear as it’s breathable and lightweight.
- Wool Yarn: A cozy choice for those extra chilly evenings, though it might be warmer than desired for summer wear.
Useful Tips for Beginners
- Practice Makes Perfect: Don’t worry if your first cocoon shrug doesn’t turn out exactly how you pictured. The more you practice, the better you’ll get.
- Stay Relaxed: Keep your tension consistent. Don’t make your stitches too tight; find a comfortable rhythm that works for you.
- Use Stitches as Guides: Feel free to experiment with different stitch patterns for unique textures.
Common Mistakes to Avoid
As a beginner crochet enthusiast, here are a few common pitfalls and how to avoid them:
- Not Counting Rows: Always count your rows and stitches to ensure your project maintains its shape.
- Tight Stitches: If your stitches are too tight, it can lead to a misshaped piece. Find a balance that feels comfortable.
- Forgetting to Check Gauge: Checking gauge guarantees your piece will fit as planned.
Conclusion
Crocheting a cocoon shrug is an enjoyable and rewarding project for beginners. With its simple construction and the versatility of yarn choices, you can create a piece that suits any wardrobe. Don your comfy crochet cocoon shrug with pride, knowing you made it with your own two hands! So grab your yarn, hook, and get started on this beautiful layering piece today.
Whether as a project for yourself or as a handcrafted gift, this cocoon shrug is sure to be cherished. Enjoy the process, and don’t forget to share your finished project in crochet communities online!
