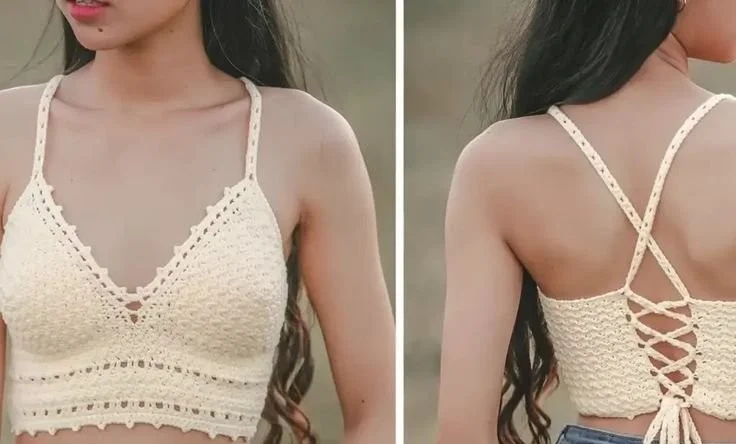
Crochet a Classic: Free Vintage Bralette Pattern
Crochet enthusiasts, rejoice! If you’ve been searching for a way to infuse vintage charm into your wardrobe, look no further. This free vintage bralette crochet pattern offers a unique blend of old-world elegance and modern flair. Not only will you showcase your crafting skills, but you’ll also wear a piece that is undoubtedly one-of-a-kind. In this article, we’ll break down the design, stitch techniques, and essential materials, ensuring your crochet journey is as enjoyable as the final product.
The Appeal of Vintage Crochet
Vintage crochet patterns have seen a resurgence in popularity, attracting crafters seeking nostalgia and timeless style. The appeal lies in their intricate designs, often featuring delicate motifs and a flair for femininity that can be absent in contemporary clothing. This vintage bralette is not just a practical item; it’s a statement piece that showcases your individuality and artistic prowess.
Why Crochet a Bralette?
-
Unique Style: In a world where mass production reigns, handmade crochet pieces stand out. You’ll never find anyone else with the same bralette as you.
-
Sustainable Fashion: By creating your own garments, you take a significant step towards sustainable fashion, minimizing your carbon footprint.
-
Perfect for All Seasons: A crochet bralette can serve as a chic layering piece in summer with high-waisted shorts or under a loose-fitting sheer top in the cooler months.
-
Skill Development: Crocheting a bralette will help you hone your skills, from mastering various stitches to learning how to create custom fit designs.
Materials Needed
Before you dive into the vintage bralette crochet pattern, gather the following materials:
- Yarn: Choose a soft cotton or a cotton-blend yarn, as it’s breathable and perfect for warmer weather. Look for a sport-weight yarn for optimal drape.
- Crochet Hook: A 3.5mm to 4mm hook is generally suitable, but check your yarn label for specific recommendations.
- Measuring Tape: Accurate measurements are vital for a perfect fit.
- Scissors: For trimming yarn ends.
- Tapestry Needle: To weave in ends and sew pieces together.
- Stitch Markers: Helpful for keeping track of your rows and stitches.
Understanding the Pattern
The vintage bralette pattern consists of several components: the cups, straps, and an optional underbust band. Each part can be adjusted to fit your personal style and measurements. Let’s break down the components for clarity.
Measurement Guide
To ensure your bralette fits perfectly, measure the following:
- Underbust: Measure directly beneath your bust.
- Bust: Measure around the fullest part of your bust.
- Cup Size: This can vary, and you may adjust your crochet accordingly.
With these measurements, it’s easier to customize the fit.
Basic Stitches Used
The vintage bralette pattern will primarily utilize foundational crochet stitches:
- Chain Stitch (ch): This stitch forms the base of your crochet work.
- Slip Stitch (sl st): Used for joining pieces or moving yarn without gaining height.
- Single Crochet (sc): A versatile stitch ideal for creating dense fabric.
- Double Crochet (dc): Adds height and a lacy texture to your work.
The Vintage Bralette Pattern
Now that you’ve gathered your materials and mastered the basic stitches, let’s get started on the pattern.
Cup Construction
-
Foundation Chain: Start by making a chain based on your cup measurement. A suggested starting point is around 20-25 chains, but you can adjust according to your size.
-
Row 1: In the second chain from the hook, make a single crochet, then continue to single crochet across your foundation chain. Turn your work.
-
Rows 2-4: Work in the next row by chaining 1, then single crocheting in each stitch across. For each additional row, increase by one stitch on either end (optional for shaping).
-
Shaping the Cup: Begin transitioning into the double crochet stitch, layering additional rows as necessary until you achieve your desired cup size.
Adding Straps
-
Chain for Straps: After completing both cups, create a chain of about 50-70 stitches, depending on how long you’d like your straps to be.
-
Attaching Straps: Identify the apex of each cup, and attach the straps using slip stitches. Ensure they’re secure but not too tight—comfort is key!
Optional: Underbust Band
For an added touch, consider crocheting an underbust band to offer extra support.
-
Foundation Chain: Create a chain that matches your underbust measurement.
-
Row Construction: Work in single crochet rows, ensuring it’s slightly stretchy. Attach to the bottom of the cups using a slip stitch to secure the band.
-
Finishing Edges: Finish off the edges with a scalloped or picot stitch to give your bralette an exquisite finish.

Customization Tips
Now that you have the basic pattern, it’s time to make it your own:
-
Color Choices: Play with color combinations to suit your style. Soft pastels evoke a vintage vibe, while bold colors add a modern twist.
-
Embellishments: Consider adding beads or lace trim for that extra flair. You can also switch up the stitch patterns for a unique design.
-
Size Adjustments: Don’t be afraid to modify the pattern to fit your shape. If you’re unfamiliar with sizing, consult online resources or crochet communities for guidance.
Caring for Your Vintage Bralette
Once you’ve completed your masterpiece, it’s essential to care for it properly to maintain its vintage charm:
- Hand wash in cold water with mild detergent.
- Lay flat to dry, avoiding direct sunlight to prevent fading.
- Store in a cool, dry place to evade moisture damage.
Showing Off Your Crochet Bralette
Your vintage bralette is not only a personal project but a statement piece! Here are ideas for styling your crocheted creation:
-
Layer Over Tanks: Pair it with a simple tank for a casual look that highlights your crochet skills.
-
Under Shirt or Blouse: Use it as a stylish layering piece under sheer blouses or oversized shirts for an elegant touch.
-
Beachwear: Worn over a swimsuit, your bralette adds a unique, handmade touch to your beach day look.
Join the Crochet Community
Don’t forget to share your finished bralette with the crochet community! Use social media platforms to connect with other enthusiasts by using hashtags related to crocheting, such as #VintageCrochet or #CrochetBralette. You will find a wealth of inspiration and feedback, enhancing your crochet journey even further.
Conclusion
Crocheting a vintage bralette allows you to express your creativity, while also embracing sustainability in fashion. It’s a process that combines skill, artistry, and personalization, resulting in a stunning piece that you can wear with pride.
Whether you’re an experienced crocheter or a beginner looking to test your skills, this free vintage bralette pattern offers a delightful project suited for all crafting levels. We hope this guide serves as both inspiration and instruction on your crochet journey!
Don’t forget to show us your creations and keep crafting your classics!
